Gate Introduction
GATE is an infrastructure for developing and deploying software components that process human language.It is an Open-source software framework and set of ready solutions for text/natural language processing.
The GATE family of tools has grown over the years to include a desktop client for developers, a workflow-based web application, a Java library, an architecture and a process.
Gate Site:Click Here
Gate Installation
Gate Developer
It is an integrated development environment for language processing components bundled with a very widely used Information Extraction system(analyse unrestricted text in order to extract information about pre-specified types of events, entities or relationships) and a comprehensive set of other plugins.
1.Navigation through Gate GUI
Resource Pane
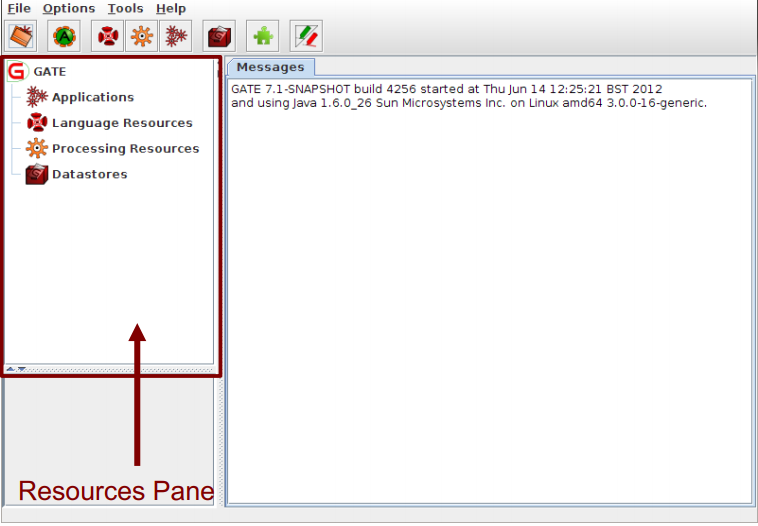
• Language resources (LRs) are documents or document collections.
– a collection of documents is known as a corpus.
• Processing resources (PRs) are annotation tools that operate on text within the documents.
• Data stores are specialised files where documents are kept for future use.
• Applications are groups of processes that run on one or more documents.
Simple operations on resources
• In general, right clicking on the name of a resource in the resource pane gives access to a menu of actions.
• Double clicking on an instance of a resource enables you to view the resource.
• Selecting a resource instance and pressing Delete will generally close it.
• You can also right click and then select “Close”.
Display pane
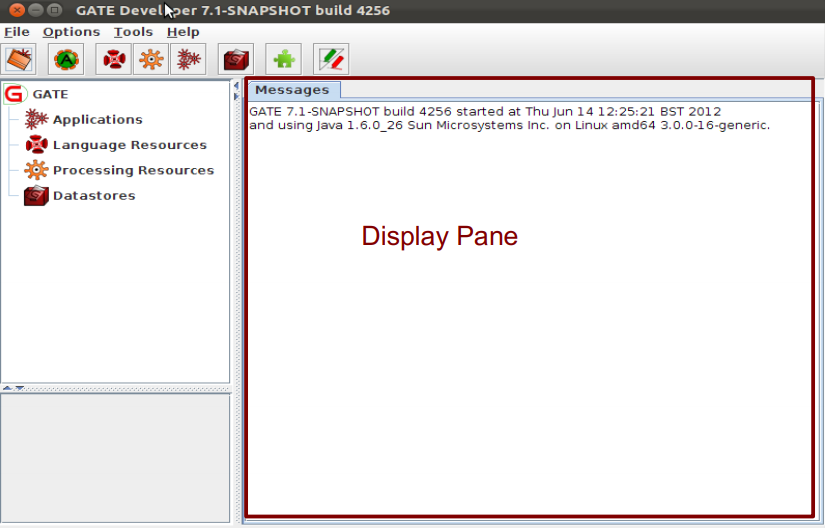
Displaying Elements
• When you first open GATE, the Display page will typically just display any messages from the system.
• It displays whatever elements you are currently working with, e.g. an application, a document or a processing resource.
• Double clicking on an instance of any resource will generally display it.
• Along the top of the pane may be various tabs which allow you to switch between the views of any open resources.
• Clicking on a tab displays that view e.g. “Messages” tab shows messages.
Parameters
• Applications, LRs, and PRs all have various parameters which can be set either at load time (initialisation) or at run time.
• Parameters enable different settings to be used, e.g. case sensitivity
• Initialisation Parameters (set at load time) cannot be changed without reloading (these may be called “init parameters” for short).
• Run time Parameters can be changed between each application run.
• Later you'll be able to experiment with setting parameters on resources and applications.
2.Loading and Viewing Documents
In this section we will discuss about the following topics
• Loading a document and setting its parameters
• Navigating through documents and viewing their annotations
Loading a document
• When GATE loads a document, it converts it into a special format for processing.
• GATE can process documents in all kinds of formats: e.g. plain text, HTML, XML, PDF, Word.
• Documents have a markupAware parameter which is set to true by default: this ensures GATE will process any existing annotations such as HTML tags and present them as annotations rather than leaving them in the text.
• Documents can be exported in various formats or saved in a datastore for future processing within GATE.
Loading documents
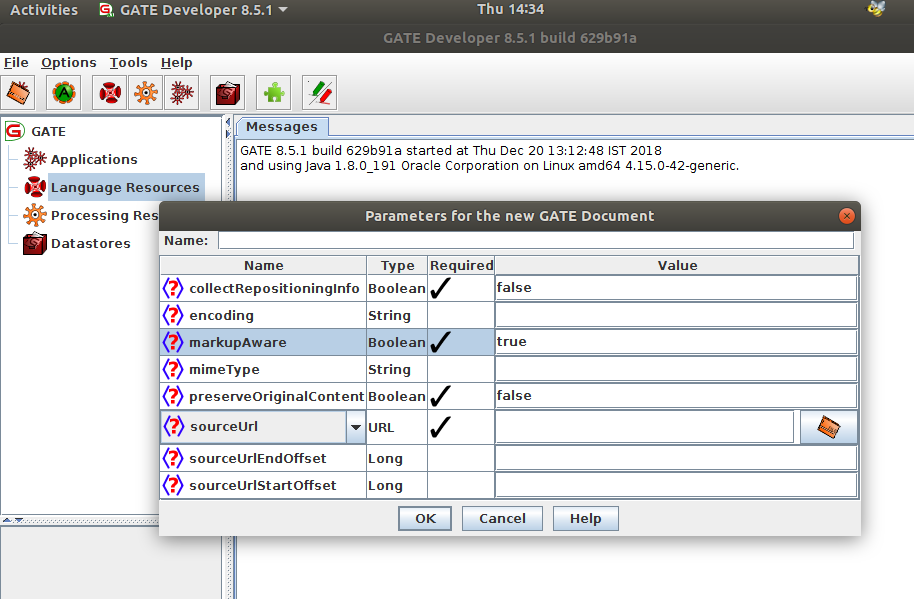
• To load a document, you can right click on Language Resources and select “New → GATE Document”
• You can also go via the File menu → New Language Resource → GATE Document
• The sourceURL parameter enables you to specify the document to be loaded. You can type the filename or URL, or click the file browser icon to navigate to the correct document.
• You can also just type a string of text into the box. In this case,you need to select stringContent rather than sourceUrl,using the arrow, before typing the text.
Document viewer
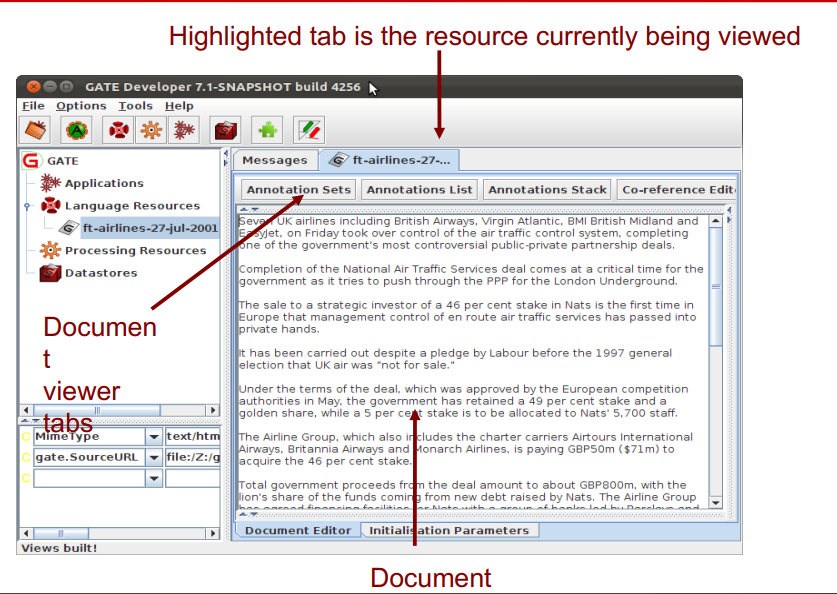
Opening and closing documents
• To view a document, double click on the document name in the Resources pane.
• To close a document, right click on the document name and select “Close”.
• To hide a document, while leaving it loaded, right click on the document tab and select “Hide”.
• The Document viewer buttons at the top of the Display pane let you select different views.
• To view the annotations, you first need click “Annotation Sets”, and then select the relevant set and annotation(s) on the right.
• To see a list of annotations at the bottom, click on “Annotations List”.
3.All about Annotations
Annotations
• The annotations associated with each document are a structure central to GATE
• Each annotation consists of
- • start and end offsets
- • optionally a set of features associated
with it
- • each feature has a name and a value
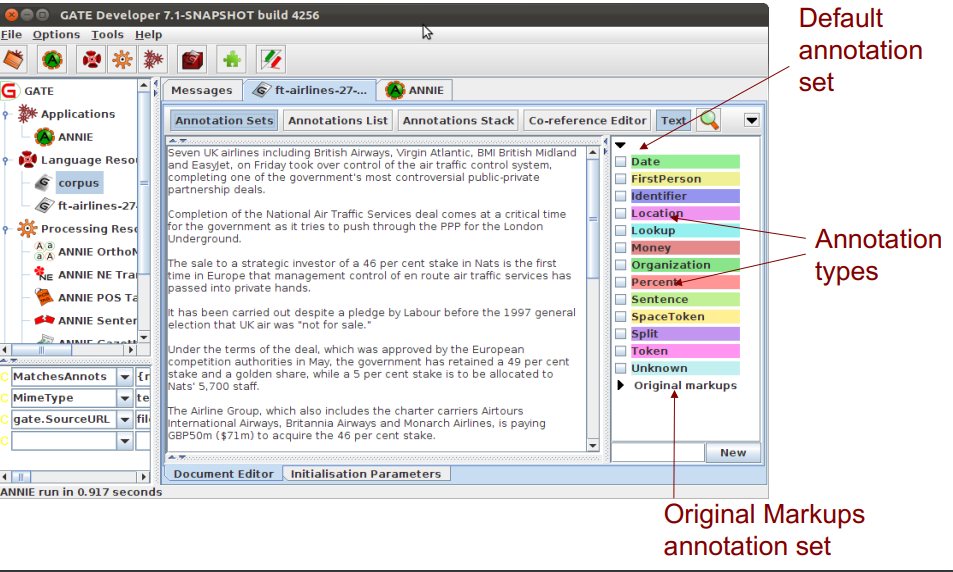
Annotation Sets
• Annotations are grouped into sets, e.g. Default, Original Markups.
• Each set can contain a number of typed annotation, e.g. Person, Location etc.
• You can create and organise your annotation sets as you wish.
• It's useful to keep different sets for different tasks you may perform on a document, e.g. to separate the original HTML tags from your new annotations
• It's important to understand the distinction between annotation set, annotation type, and annotation
• This is best explained by looking at them in the GUI
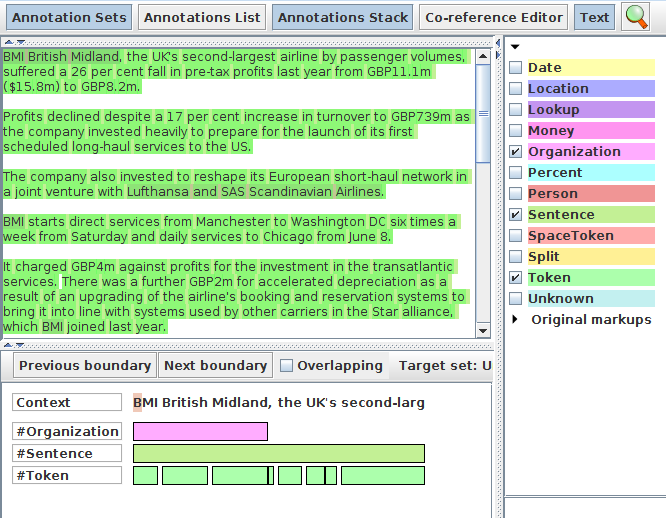
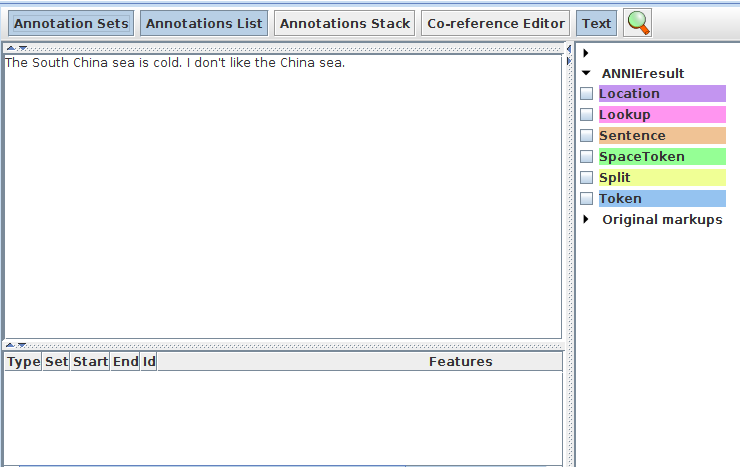
Viewing annotations
• Double click on your document to view it.
• Click on the Annotation Sets button to open a new pane on the right hand side (Annotation Sets view).
• Default (unnamed) set contains some examples of annotations.
• Click on the arrow to display the annotation types belonging to that set.
• You should see types such as Location, Date, Person etc.
• Select an annotation type to view all the annotations of that type in the document.
A closer look at the annotations
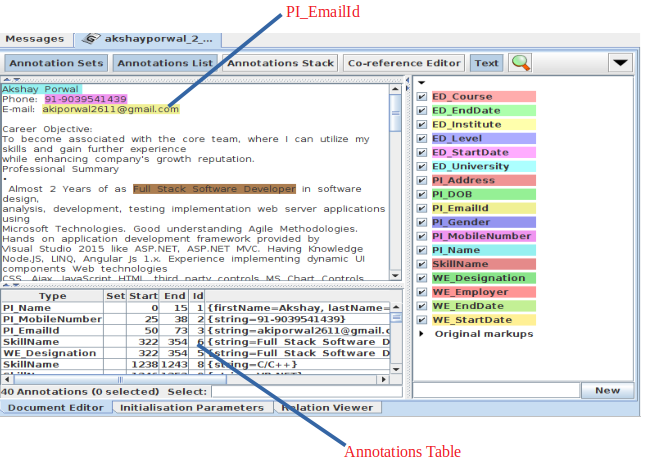
• Select the Annotations List button from the menu above the Display pane.
• For each annotation type selected in the Annotation sets view, all annotations corresponding to that type will be shown in the table.
• Table shows annotation type, offsets, annotation set, features and values.
• Select a row in the table to highlight the annotation in the text.
• Click on a column heading to sort according to the header.
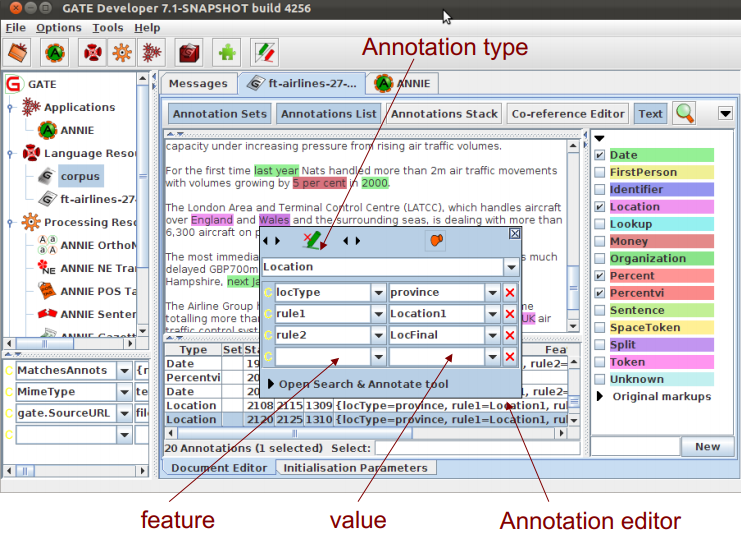
Editing existing annotations
• Select an annotation type from the Annotation Sets view and hover over a highlighted annotation in the text.
• A popup window displays more information about it: this is the annotation editor.
• Click the drawing pin symbol at the top of the editor. This will “pin” the window open (you can still move the window around on your screen if you wish).
• Try editing the annotation: you can change the annotation type, feature names and values, the span of the annotation (clicking left and right arrows at the top of the box) or delete the annotation or its features (red Xs).
• Close the annotation editor by clicking the X in the top right corner, then view your edited annotation in the Annotation List.
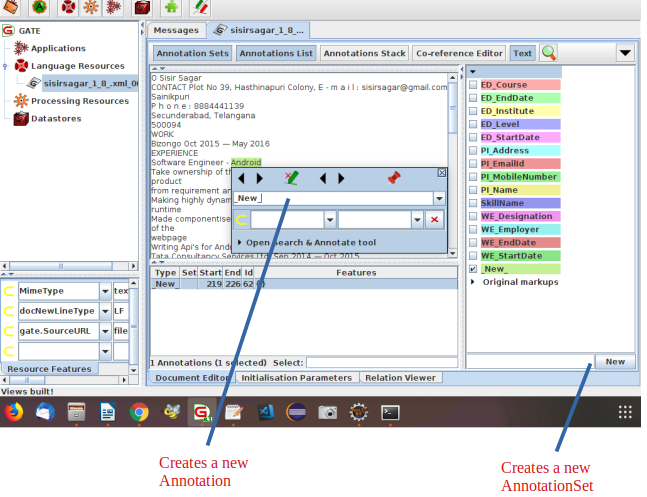
Creating new annotations
• To create a new annotation, select the portion of text you want to annotate and hover over it with the mouse.
• The annotation editor will appear: this will automatically create a new annotation.
• It will create an annotation of the same type as your last annotation: if this is your first annotation it will default to “New”. You can change this by simply editing the text.
• You can edit this annotation as before.
• You can delete the annotation by clicking on the red cross/green crayon icon
• The new annotations will appear in the currently selected annotation set. To change this, simply select a different set.
• To create a new annotation set, enter a name in the text field at the bottom of the annotation sets view and click “New”.
Annotations stack
It displays annotations at the document caret position with some context before and after. The annotations are stacked from top to bottom, which gives a clear view when they are overlapping.
As the view is centred on the document caret, you can use the conventional key to move it and update the view: notably the keys left and right to skip one letter; control + left/right to skip one word; up and down to go one line up or down; and use the document scrollbar then click in the document to move further.
There are two buttons at the top of the view that centre the view on the closest previous/next annotation boundary among all displayed. This is useful when you want to skip a region without annotation or when you want to reach the beginning or end of a very long annotation.
Click on the Annotations stack button to view the annotations covering and overlapping area.
4.Documents and Corpora
Creating and populating a corpus of documents in different ways
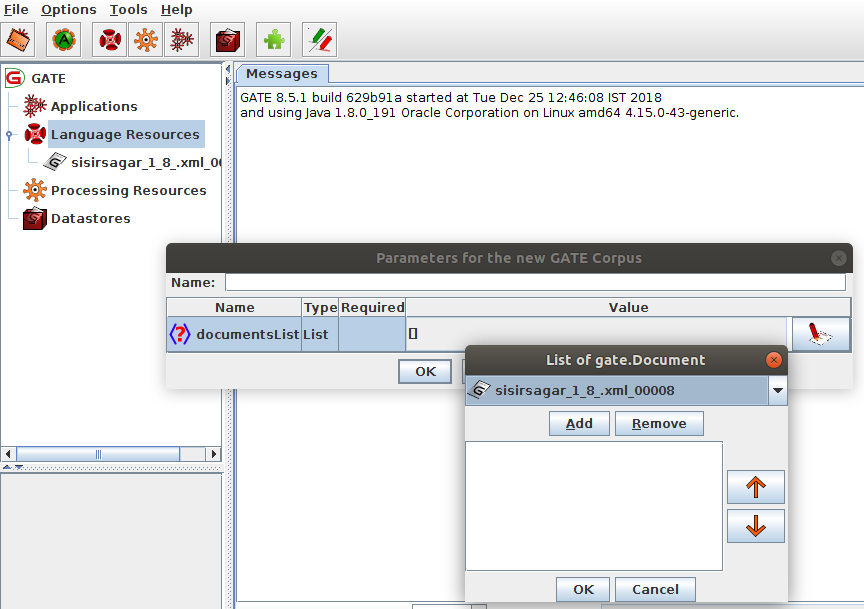
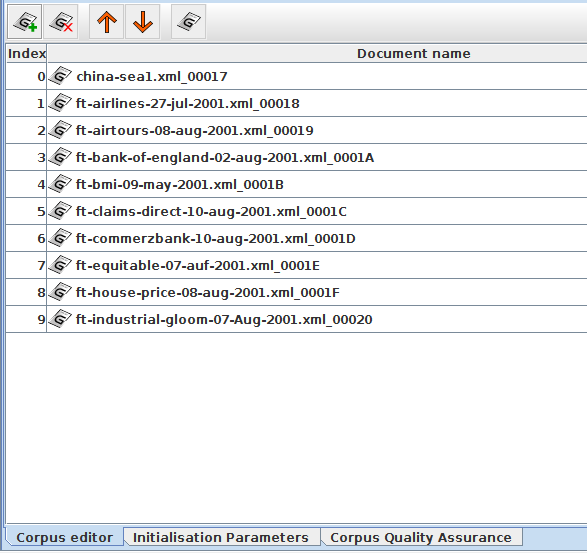
Creating a Corpus
• A corpus is a collection of documents.
• For most GATE applications, it is easier to work with a corpus rather than an individual document, even if that corpus only contains one document.
• Right click Language Resources → New → GATE Corpus or https://gate.ac.uk/sale/tao/splitch2.html#x5-180002 • File menu → New Language Resource → GATE Corpus
• As with the documents, you can name your corpus or use the default GATE name.
Ways to add documents to a corpus
- Click the edit button and add the documents that are already loaded in GATE to the corpus
• Click OK
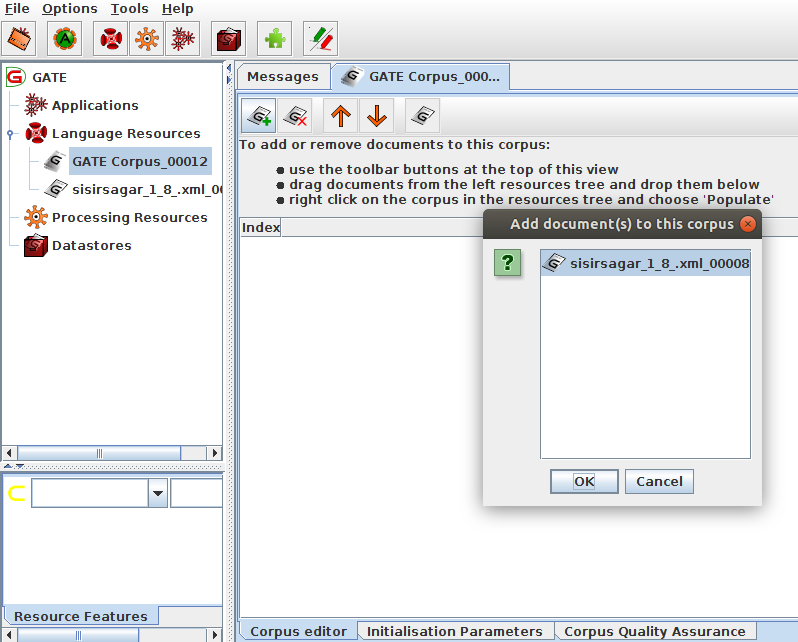
2.OR
• Create an empty corpus
• Double click on the corpus name to open the corpus
• use the + button to add documents, or drag them from the Resources pane
• Double click the document listed there to view it.
Usually, a corpus will consist of more than one document. Sometimes there could be hundreds of documents in a corpus.
Using the populate function means you don't have to preload the documents in GATE first, and allows you to load all the documents into the corpus in one go
Populating a Corpus
• Create a new empty corpus as before, so don't add any documents to it yet
• Right click on the corpus name in the Resources pane and select Populate
• Select the name of the directory with your documents
• The Extensions parameter lets you select only documents of a certain type.
• Press the edit button
• Type “xml” in the box (without the quotes), press “Add” and then “OK”
• “Encoding” lets you choose the right encoding for the documents. The wrong encoding can cause characters to be incorrectly displayed: Enter “UTF-8”
• “Recurse directories” will also load documents in any subdirectories
• Deselect the “Recurse directories” box
• All the documents will be loaded in one go
• View the contents of the corpus as before.
• You can use the up and down arrows to rearrange documents in a corpus
• Click on the tab at the bottom to view the initialisation parameters of a corpus
Tip for quick corpus creation
• If you're just testing something on one document, there's a quick way to create a new corpus and add the document to it.
• Right clicking on the document loaded in GATE and selecting “New corpus with this document”.
• This does everything in one go.
Note
Note that a document can belong to more than one corpus at the same time, but it can get confusing if you do this!
Removing documents from corpora
• To remove documents from a corpus, use the x button in the corpus editor.
• Note that this does not remove the document from GATE, just from the corpus.
– The document is available to be added to other corpora. Indeed a document can belong to several corpora.
• If you do remove the document from GATE, it will also remove it from the corpus.
– But if you remove the corpus, it doesn't remove the document!
5. Processing Resources and Plugins
• Processing resources (PRs) are the tools that enable annotation of text. They implement and execute text processing algorithms. Typically this means creating or modifying annotations on the text.
• An application consists of any number of PRs, run sequentially over a corpus of documents.
• A plugin is a collection of one or more PRs, bundled together. For example, all the PRs needed for IE(Information Extraction) in Arabic are found in the Lang_Arabic plugin.
– A plugin may also contain language or visual resources.
• An application can contain PRs from one or more different plugins.
• In order to access new PRs, you need to load the relevant plugin.
Plugins
Click the  icon on the top GATE menu to open the Plugin Manager [or go via File → Manage CREOLE Plugins]
• You should see a popup box appear with a list of plugins (this may take a few seconds the first time)
• Click on a plugin name to see the information about it.
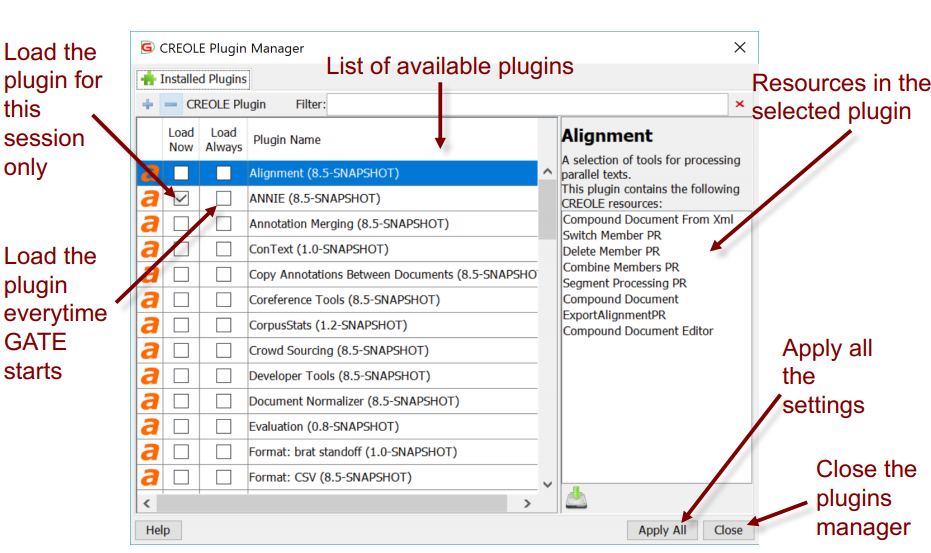
Select a plugin to see (on the RHS) the names of the resources it contains
• Check the relevant “Load Now” box to load a plugin of your choice
• Click “Apply All” to load the selected plugin(s) (This may take a few seconds the first time you do it)
• Click “Close”
• Right click on Processing Resources to see which new PRs are now available
• If you want to edit some of the resources in a plugin you need to first extract them
• In the plugin manager, select any plugin, click the download button and save it to a local folder
6.Applications
Once all the resources you need have been loaded, an application can be created from them, and run on your corpus.Right click on ‘Applications’ and select ‘New’ and then either ‘Corpus Pipeline’ or ‘Pipeline’. A pipeline application can only be run over a single document, while a corpus pipeline can be run over a whole corpus.
Running an Application
• ANNIE is a ready made collection of PRs that performs Information Extraction on unstructured text.
• A detailed explanation of ANNIE will be given in other section. For now, we're just going to use it as an example of an application.
• Later, we'll discuss about how to make our own application from scratch.
• Click the Annie icon from the top GATE menu OR Select
File → Ready Made Applications → ANNIE → ANNIE
• Load any document from your local folder and add it to a corpus.
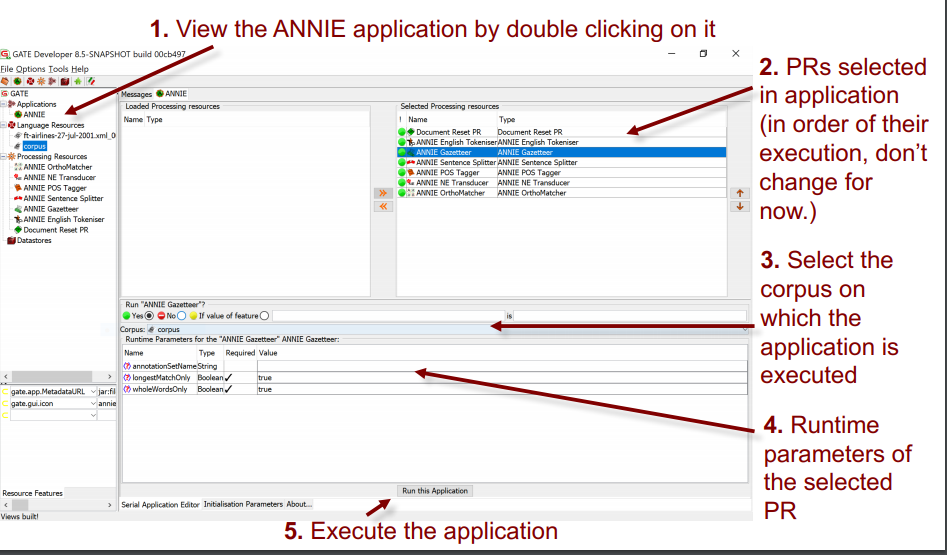
Viewing the results
• After running the application .
• Double click on the document to view it.
• View the annotations by selecting Annotation Sets and clicking on any Annotation types in the Default (unnamed) set.
• If you want, you can view the annotations table too.
Input and output annotation sets
• Some PRs use the results of previous PRs in the application. For example, the "sentence splitter" makes use of Token annotations produced by the "tokeniser".
• The inputAS (annotation set) for the sentence splitter is the name of the annotation set where it will find the Token annotations
• The outputAS is the name of the set where it will produce the results of the sentence annotations.
• In ANNIE, the inputAS and outputAS are always the same. Later, we'll look at examples where you might want these to be different.
• Some PRs just have a parameter “annotationSetName” instead. This is because the inputAS and outputAS must be the same for that PR (usually because the PR adds information to an existing annotation rather than creating a new one)
Changing runtime parameters
• Now we're going to change the name of the annotation set, so that all ANNIE annotations appear in a new set called ANNIEresult
• The annotation set where the results are stored is one of the runtime parameters of the PRs
• Double click on ANNIE to view the application and PRs.
• For each PR listed, click on it and check whether it has any parameters labelled “annotationSetName” , “inputASName” or “outputASName”
• Edit all of these by typing “ANNIEresult” in the box.
• Double check that you haven't missed any. This is really important,otherwise your application may not work.
• Now run the application again and view the results.
Adding new PRs
First, we have to load the plugin that contains it, and then load the PR into GATE, before we can add it to the application.
• Use the plugins manager to load the Tools plugin.
• Right click on Processing Resources and select “New” → “ANNIE VP Chunker”
• Leave all the default parameters set and click “OK”
• Now we need to add the new PR to the application.
• Double click on ANNIE.
• You'll see the VP chunker is in the list of loaded PRs. This means it's available in GATE, but isn't yet contained in the application.
• Add it to the application by selecting it and using the right arrow to transfer it.
• Now use the up arrow to move it to the right place in the application. It should go after (below) the POS tagger but before (above) the NE transducer.
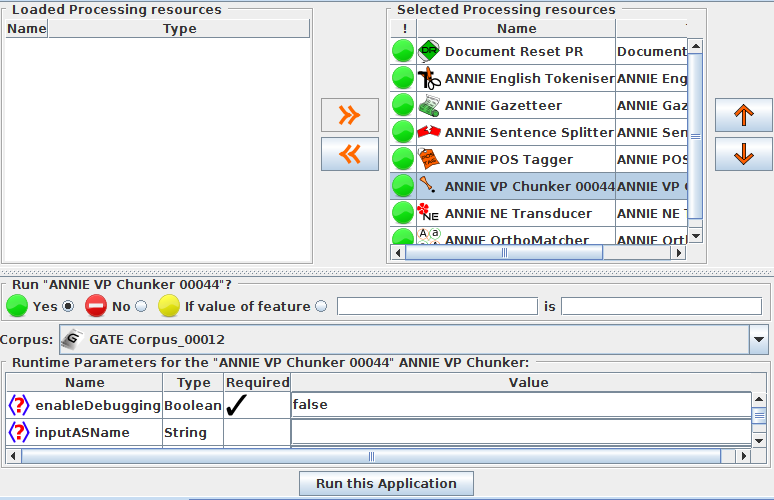
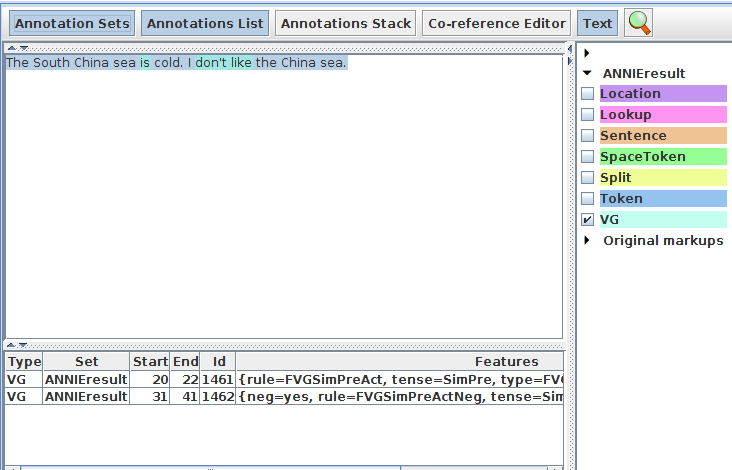
• Change the inputASName and outputASName parameters to ANNIEresult.
• Run the application and view the results on the document.
• You should see a new annotation type “VG”.
7.Saving documents
Types of datastores
There are 2 types of datastore:
• Serial datastores store data directly in a directory.
• Lucene datastores provide a searchable repository with Lucene-based indexing.
Create a new serial datastore
• Right click “Datastores” from the Resources pane and select “Create Datastore”
• Select “Serial Datastore”
• Create a new empty directory by clicking the “Create New Folder” icon and give your new directory a name
• Select this directory and click “Open”
• Now your datastore is ready to store your documents
Save documents to the datastore
• Right click on your corpus and select “Save to Datastore”
• Select the datastore that you just created
• Now close the corpus and document
• Double click on the name of the datastore in the Resources pane
• You should see the corpus and document
• Double click on them to load them back into GATE and view them
• They should contain the annotations you created previously
• You can remove things from the datastore by right clicking on their name in the datastore and selecting “Delete”
• You can add several corpora to the same datastore
Note
In general, it’s best to save the empty corpus to the datastore and then populate it, to avoid keeping a lot of documents in memory.
Saving documents outside GATE
Datastores can only be used inside GATE, because they use a GATE-specific format. If you want to use your documents outside GATE, you can save them in 2 ways:
• Gate XML is a standoff markup, a special GATE representation
• Inline XML has inline annotations (preserving the original format)
Saving as Gate XML
• Load any document from your local folder into GATE and run an application on it, then right click on it in the Resources pane.
• Select “Save as Gate XML” and select a filename.
• In this format, all annotations are appended to the end of the document and the location for each annotation is marked by a tag in the body of the document
• Each annotation has a unique ID
• If you’re curious, load the document into your text editor and have a look at it!
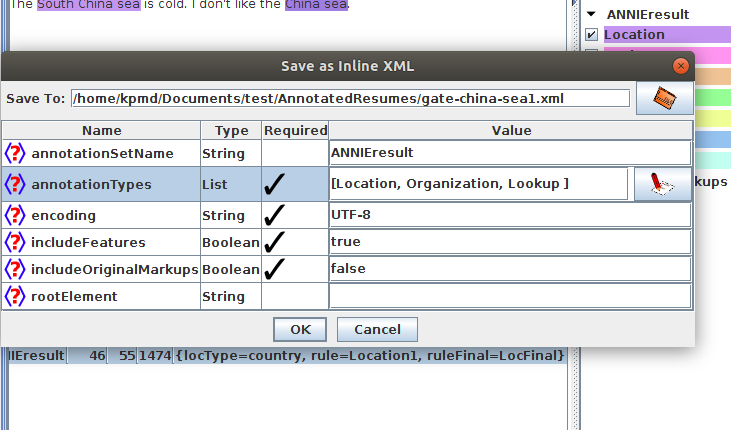
Save as Inline XML
• This option will save the document with all the original annotations from HTML or XML documents, and any new annotations that you currently have selected in the document editor.
• This can be useful for saving only a subset of the annotation types.
• Annotations are saved using standard XML tags, with the annotation type as the tag name.
• Partially overlapping annotations can not be saved.
• Right click on a document and select “Inline XML”.
• Enter the annotationSetName
• Select annotationTypes
• Enter a name for the rootElement, e.g. doc
• Make sure the target path in Save To is correct.
• Click OK to save it.
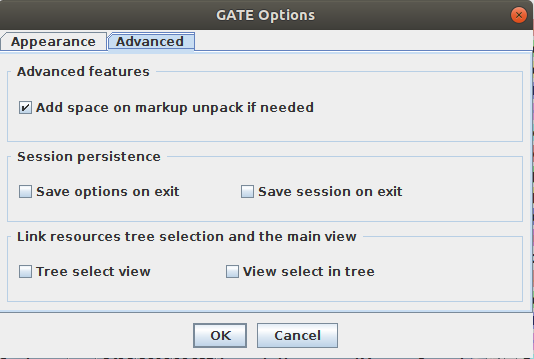
Setting up GATE options
You can set up different options in GATE using the Options menu. Click Options → Configuration → Appearance to change the look and feel of GATE, such as menu and text fonts.
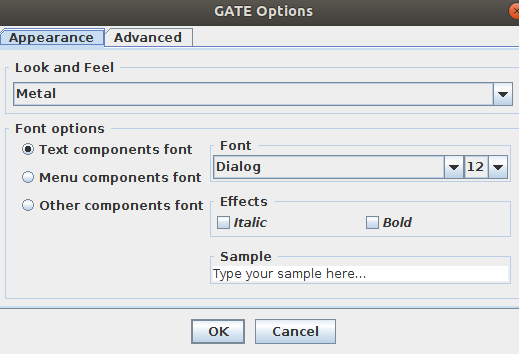
Clicking the Advanced tab enables you to adjust settings such as saving your options, and saving the session so that when you reopen GATE, it will remember and reload the applications you had open at the end of your previous session.