NGRX
RXJS
RxJS is a library for composing asynchronous and event-based programs by using observable sequences.
Subject
a specific kind of observable called Subject. Subjects are observables themselves but what sets them apart is that they are also observers.
What does that mean? It means that a subject can emit data, on top of having the capability to be subscribed to.
A regular observable does not have the next() method as regular observables are not observers. So that’s the first super power of a subject: Data emission.
Subjects are like EventEmitters: They maintain a registry of many listeners.
1 2 3 4 5 6 7 8 9 10 | |
Subjects are multicast
The second super power of subjects is that they support multiple subscriptions. In other words, they are multicast.
Subjects are like EventEmitters: They maintain a registry of many listeners.
1 2 3 4 5 6 7 8 9 10 11 12 13 14 | |
Behavior Subjects
Behavior Subjects are another cool thing about subjects. When you subscribe to a behavior subject, it will give you the last emitted value right away.
Imagine subscribing to a magazine, and right away you receive the latest published issue of it. Wouldn’t that be awesome? Welcome to the world of behavior subjects!
1 2 3 4 5 6 7 8 9 10 11 12 | |
Replay Subjects
Replay Subjects keep a given number of historical values so that those values can be replayed to new subscribers.
1 2 3 4 5 6 7 8 9 10 11 12 13 14 15 16 17 | |
state
Ngrx store helps you build more robust applications by better organizing your app's state -- or in other words, your app's data. Without a state management solution, dealing with complex data across multiple components can become quite difficult to handle and test.
What is Ngrx
Ngrx is a group of Angular libraries for reactive extensions. Ngrx/Store implements the Redux pattern using the well-known RxJS observables of Angular 2. It provides several advantages by simplifying your application state to plain objects, enforcing unidirectional data flow, and more. The Ngrx/Effects library allows the application to communicate with the outside world by triggering side effects.
Redux
Redux is a predictable state container for JavaScript apps.
Redux is a popular approach to managing state in applications. It emphasises:
A single, immutable data store. One-way data flow. An approach to change based on pure functions and a stream of actions.
What Is Reactive Programming?
Reactive programming is a way applications handle events and data flow in your applications. In reactive programming, you design your components and other pieces of your software in order to react to those changes instead of asking for changes.
A Word about Ngrx
In order to understand the application you will build through this tutorial, you must make a quick dive into the core Redux concepts.
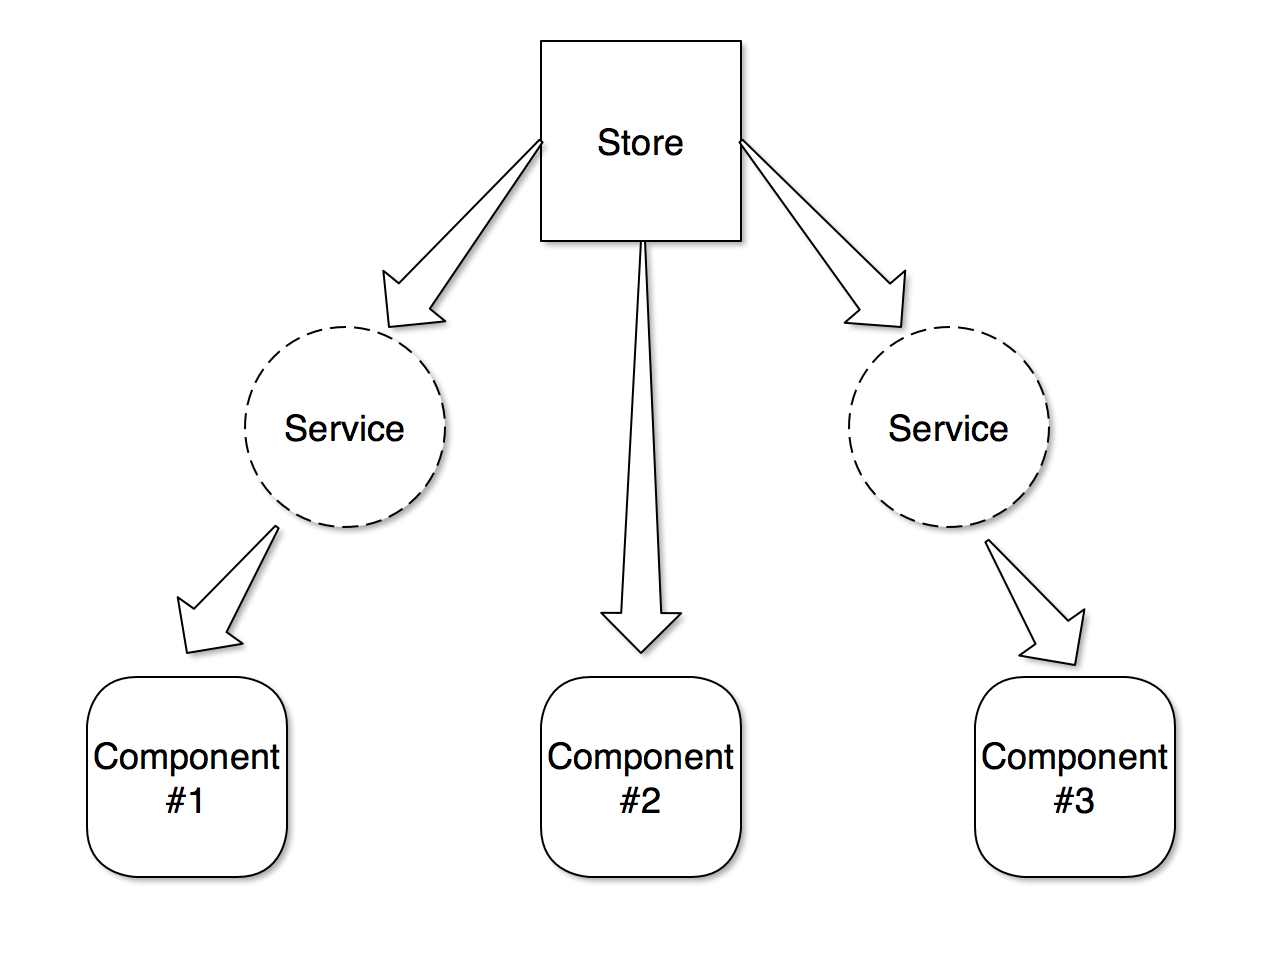
Store
The store can be seen as your client side database but, more importantly, it reflects the state of your application. You can see it as the single source of truth.
It is the only thing you alter when you follow the Redux pattern and you modify by dispatching actions to it.
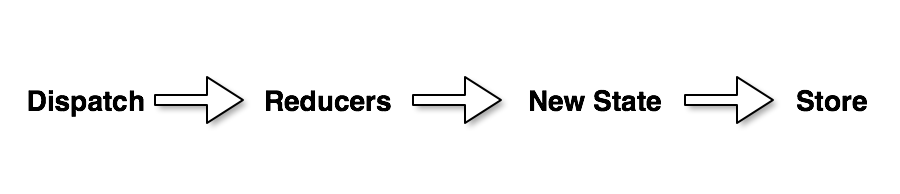
Reducer
Reducers are the functions that know what to do with a given action and the previous state of your app.
The reducers will take the previous state from your store and apply a pure function to it. Pure means that the function always returns the same value for the same input and that it has no side effects.
From the result of that pure function, you will have a new state that will be put in your store.
Actions
Actions are the payload that contains needed information to alter your store. Basically, an action has a type and a payload that your reducer function will take to alter the state.
Dispatcher
Dispatchers are simply an entry point for you to dispatch your action. In Ngrx, there is a dispatch method directly on the store.
Middleware
Middleware are some functions that will intercept each action that is being dispatched in order to create side effects, even though you will not use them in this article.
They are implemented in the Ngrx/Effect library, and there is a big chance that you will need them while building real-world applications.
How to Install ngrx
1 2 3 4 5 6 7 | |
Defining your Main Application State
When building an application using Redux, the first thing to think about is, "What state do I want to store?" It is generally a good idea to capture all of the application's state so that it can be accessible from anywhere and all in one place for easy inspection.
In the application state, we store things like:
1.Data received through API calls
2.User input
3.Presentation state, such as menu and button toggles
4.Application preferences
5.Internationalization messages
6.Themes and other customizable areas of your application
To define your application state, use an interface called AppState or IAppState, depending on the naming conventions used on your project.
Example Application
Your app will allow users to increment and decrement a number by one, as well as reset that value back to zero. Here's the AppState that we'll be using throughout the example:
app/models/appState.ts
1 2 3 4 5 | |
app/models/counter.ts
1 2 3 | |
Reading your Application State using Selectors
To read your application state in Redux, we need to use the select() method on @ngrx's Store class. This method creates and returns an Observable that is bound to a specific property in your application state.
For example, here's how you would select the counter object:
1 | |
And to fetch the counter's currentValue, we can pass in a string array, where each string plucks a single property from the application state one at a time in the order specified:
1 | |
While select() allows for several variations of strings to be passed in, it has it's shortcomings - namely you won't actually know if the plucking is working properly until you execute your code.
Because of that, select() allows you to select values using functions too, which makes things more type-safe and your selectors will be more refactorable by your IDE.
1 | |
Selectors are methods used for obtaining slices of store state. @ngrx/store provides
a few helper functions for optimizing this selection.
When using the createSelector and createFeatureSelector functions @ngrx/store keeps track of the latest arguments in which your selector function was invoked.
Because selectors are pure functions, the last result can be returned when the arguments match without reinvoking your selector function.
This can provide performance benefits, particularly with selectors that perform expensive computation. This practice is known as memoization.
Using a selector for one piece of state
1 2 3 4 5 6 7 8 9 10 11 12 13 14 15 16 | |
Creating a Counter Service
While you could inject Store and select values directly in your Angular components, it's considered to be a best practice to wrap this functionality into separate services.
This approach encapsulates all of the selection logic and eliminates any duplication where the selection path is repeated throughout your application.
Let's tie everything together by building out a CounterService example:
app/services/counter.service.ts
1 2 3 4 5 6 7 8 9 10 11 12 13 14 15 16 17 | |
Because select() returns an Observable, the getCurrentValue() method also applies a filter() to ensure that subscribers do not receive any falsy values.
This greatly simplifies the code and templates in your components, since they don't have to repeatedly consider the falsy case everywhere the value is used.
Store
Like a traditional database represents the point of record for an application, your store can be thought of as a client side ‘single source of truth’, or database.
By adhering to the 1 store contract when designing your application, a snapshot of store at any point will supply a complete representation of relevant application state.
This becomes extremely powerful when it comes to reasoning about user interaction, debugging, and in the context of Angular 2, performance.
Actions
Redux uses a concept called Actions, which describe state changes to your application.
Store encompasses our application state and reducers output sections of that state, but how do we communicate to our reducers when state needs to be updated? That is the role of 4 actions.
Within a store application, all user interaction that would cause a state update must be expressed in the form of actions.
All relevant user events are dispatched as actions, flowing through the 5 action pipeline defined by store, before a new representation of state is output.
This process occurs each time an action is dispatched, leaving a complete, serializable representation of application state changes over time.
Redux actions are simple JSON objects that implement the Action interface provided by @ngrx:
1 2 3 4 | |
The type property is a string used to uniquely identify your action to your application. It's a common convention to use lisp-case (such as MY_ACTION),
however you are free to use whatever casing style that makes to your team, as long as it's consistent across the project.
The payload property provides a way to pass additional data to other parts of Redux, and it's entirely optional.
Here is an example:
1 2 3 4 5 6 7 | |
To simplify action creation, you can create a factory function to take care of the repeating parts within your application:
app/store/createAction.ts
1 2 3 4 5 | |
The resulting creation of the LOGIN_SEND action becomes much more succinct and cleaner:
1 2 3 4 | |
simple actions
1 2 3 4 5 | |
Reducers
The second integral part of a store application is reducers. A 2 reducer is a 3 pure function, accepting two arguments, the previous state and an action with a type and optional data (payload) associated with the event.
Using the previous analogy, if store is to be thought of as your client side database, reducers can be considered the tables in said database.
Reducers represent sections, or slices of state within your application and should be structured and composed accordingly.
2 Reducer Interface
1 2 3 | |
3 A function whose return value is determined only by its input values, with no observable side-effects.
Sample Reducer
1 2 3 4 5 6 7 8 9 10 | |
Effects
to install effects
1 | |
Effects are injectable service classes that use two main APIs.
Effect decorator
The Effect decorator provides metadata to register observable side-effects in the effects class. Registered effects provide new actions provided by the source Observable to the store.
Actions Observable
Represents an observable of all actions dispatched to the store.
Emits the latest action after the action has passed through all reducers.
The ofType operator lets you filter for actions of a certain type in which you want to use to perform a side effect.
Setup
Create an AuthEffects service that describes a source of login actions:
1 2 3 4 5 6 7 8 9 10 11 12 13 14 15 16 17 18 19 20 21 22 23 24 25 26 | |
Register the EffectsModule in your application root imports.
This EffectsModule must be added to your root NgModule for the effects providers to be registered and start when your application is loaded.
1 2 3 4 5 6 7 | |
For feature modules, register your effects via EffectsModule.forFeature method in your module's imports:
1 2 3 4 5 6 7 | |
Effects with dispatch:false
if you do not want to dispatch action then place @Effects({dispatch:flase})
Sample Example Application
In action file
1 2 3 4 5 6 7 8 9 10 11 12 13 14 15 16 17 18 19 20 21 22 23 | |
In Reducers File
1 2 3 4 5 6 7 8 9 10 11 12 13 14 15 16 17 18 19 20 21 22 | |
Import the StoreModule from @ngrx/store and the counter.reducer file.
src/app/app.module.ts (imports)
1 2 | |
Add the StoreModule.forRoot function in the imports array of your AppModule with an object containing the count and the counterReducer that manages the state of the counter.
The StoreModule.forRoot() method registers the global providers needed to access the Store throughout your application.
src/app/app.module.ts (StoreModule)
1 2 3 4 5 6 7 8 9 10 11 12 13 14 15 16 17 18 | |
Create a new Component named my-counter in the app folder. Inject the Store service into your component to dispatch the counter actions, and use the select operator to select data from the state.
Update the MyCounterComponent template with buttons to call the increment, decrement, and reset methods. Use the async pipe to subscribe to the count$ observable.
src/app/my-counter/my-counter.component.html
1 2 3 4 5 6 7 | |
Update the MyCounterComponent class with a selector for the count, and methods to dispatch the Increment, Decrement, and Reset actions.
src/app/my-counter/my-counter.component.ts
1 2 3 4 5 6 7 8 9 10 11 12 13 14 15 16 17 18 19 20 21 22 23 24 25 26 27 28 29 30 31 32 33 34 35 | |
Add the MyCounter component to your AppComponent template.
src/app/app.component.html
1 | |
And that's it! Click the increment, decrement, and reset buttons to change the state of the counter.
Meta-Reducers
For log all actions and states
Why use ngRx/effects for async calls
Using ngrx/effects makes life more simpler than using service to make http call and then take the result and dispatch the action. As following
Effects provide abstraction to the service layer. Our components don't need to know about the services(http) layer. Components will only dispatch actions to get things done.
As Effects are basically service, code is written once and reused multiple times.
Example
Creating the Model
export interface Tutorial { name: string; url: string; }
Creating an Action
An action in Ngrx/store is two things:
1.A type in the form of a string. It describes what's happening.
2.It contains an optional payload of data.
1 2 3 4 5 6 7 8 9 10 11 12 13 14 15 16 17 18 19 20 21 22 23 | |
Seciton 1
Here, we're simply importing our Tutorial model and Action from ngrx/store. This makse sense, being that we're working with actions.
Section 2
We're defining the type of action, which is in the form of a string constant.
Section 3
We're creating a class for each action with a constructor that allows us to pass in the payload. This isn't a required step, but it does provide you with strong typing.
Section 4
We're exporting all of our action classes for use within our upcoming reducer.
Creating a Reducer
Now that we have a model and our actions, we need to create a reducer. A reducer is what takes the incoming action and decides what to do with it.
It takes the previous state and returns a new state based on the given action.
1 2 3 4 5 6 7 8 9 10 11 12 13 14 15 16 17 18 19 20 21 | |
Section 1
Here, we're defining an initial or default state. This isn't required if you don't want to define a state right out of the box.
Section 2
This is our actual reducer. It takes in a state, which we're defining as a Tutorial type and we've optionally bound it to initialState. It also takes in the action from our /actions/tutorial.actions file.
Section 3
First, we use a switch to determine the type of action. In the case of adding a tutorial, we return the new state with the help of our newState() function.
We're simply passing in the previous state in the first parameter, and then our action in the second.
In the event that the action.type does not match any cases, it will simply return the state, as provided in the first parameter of our reducer.
Creating an App State
1 2 3 4 5 6 7 8 9 10 11 12 13 14 15 16 17 18 19 | |
Getting data from Store
1 2 3 4 5 6 7 8 9 | |
Section 1
We're defining an observable named tutorials which we will later display in the template.
Section 2
We're accessing the store from ngrx within the constructor, and then selecting tutorial which is defined as a the property from app.module.ts in StoreModule.forRoot({}).
This calls the tutorial reducer and returns the tutorial state.
writing to data store
```
constructor(private store: Store
addTutorial(name, url) { this.store.dispatch(new TutorialActions.AddTutorial({name: name, url: url}) ) } ```