CDI DASHBOARD 
CDI DashBoard facilitates CDS to view all necessary patient informations in single page , and to query physician.
On clicking any account no's of in queues of CDI Smart Queue module redirects to CDI DashBoard, and below is the sample screen.
Home Button
On clicking HOME button CDI DASHBOARD will be redirected to HOME page.
Current Census,Forward & Backward buttons.
Need to disable these links.
On clicking Current Census link, page should redirect to CDI Smart queue page.
on Clicking forward or backward buttons, current account should move to next account or previous account based on the order of accounts in CDI smart queue.
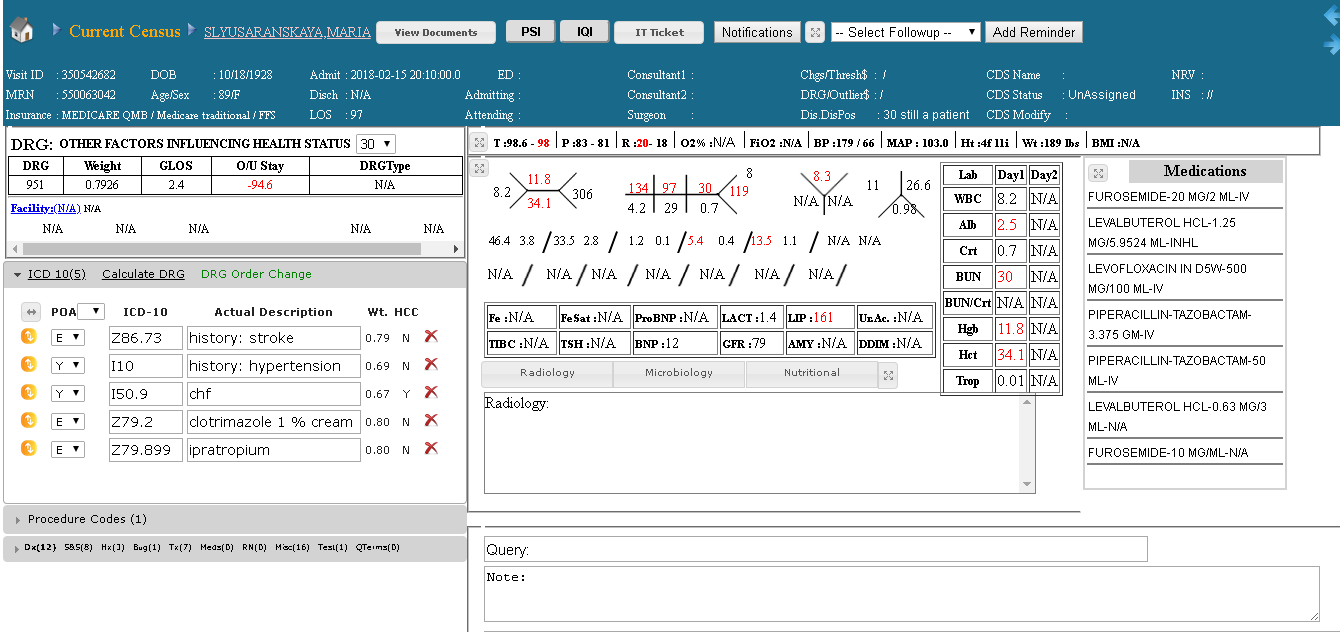
Demographics Section:
All required patient demographics are displayed in this section.This is the top most section in CDI DashBoard with Back Ground color Blue.

Here patient demographics are
- Visit ID
- MRN
- Insurance
- DOB
- Age/Sex
- Admit(admit date)
- Disch
- LOS
- ED (ED physician)
- Admitting (Admitting physician)
- Attending (Attending physician)
- Consultant1 (Consultant1 physician)
- Consultant2 (Consultant2 physician)
- Chgs/Thresh$
- DRG/Outlier$
- Dis.DisPos
- CDS Name
- CDS Status(CDS account status)
- CDS Modify(CDS account last modified date)
- NRV
- INS
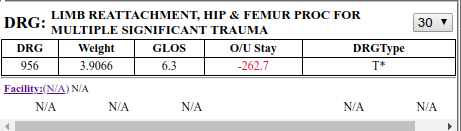
DRG Section:
This section displays both KPAI & Facility DRG details.
KPAI DRG : KPAI calculates DRG automatically on KPAI generated codes.
There are 2 types of DRG's.
1) MS-DRG.
Details displayed for MS-DRG:
- DRG Description
- DRG Disposition - DropDown list
- DRG code
- DRG Weight
- GLOS(General length of stay)
- O/U Stay (over/under stay)
- DRG Type
2) APR DRG.
Details displayed for APR-DRG:
- DRG Description
- DRG Disposition - DropDown list
- DRG code
- DRG Weight
- GLOS(General length of stay)
- SOI
- ROM
Facility DRG : Facility DRG details will be displayed in this section.
Facility DRG details include:
- SOI
- DRG Description
- DRG code
- DRG Weight
- DRG Type
- GLOS(General length of stay)
- O/U Stay (over/under stay)
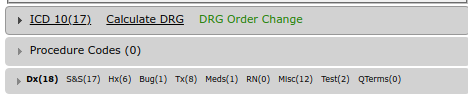
ICD Section:
This section include :
- ICD10(count): This is to display no.of ICD10 codes for the account.
- Calculate DRG: Set Diagnosis codes in Order and set POA for diagnosis and click on CalculateDRG - button. A new Pop-Up window- Modified DRG will be opened. Modified DRG window:
- MS-DRG / APR-DRG (Radio Buttons): Select Radio button MS-DRG / APR-DRG.DRG will be calculated on selection of MS-DRG /APR-DRG.
- Responded Query(DropDownList) User can select NoDRGImpact / any queries listed in Responded Query DropDownList.
- EDIT(Button): User can Edit DRG details.Click on EDIT button and enter values.
- ConfirmDRG (Button): Select MS-DRG / APR-DRG (Radio BUttons),Responded Query(DropDownList),Edit DRG details if needed and click on confirmDRG button. Modified DRG details will be saved and displayed in DRG Section.
- DRG Order Change: Click on DRG Order Change link,new window will be opened DRG Order Change Log.All DRG order change details log will be displayed including username and last modify and other details.
Following are the different actions that can be done in Modified DRG window.
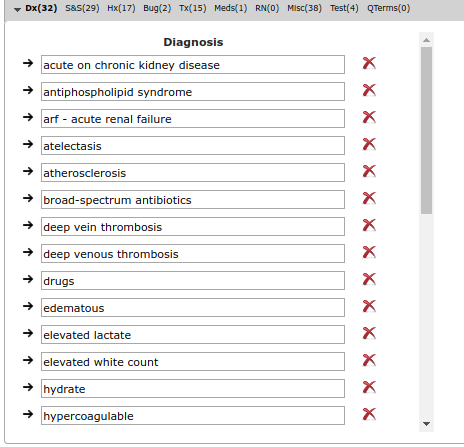
DX Section:
All KPAI generated and user added diagnosis codes will be displayed in this section.
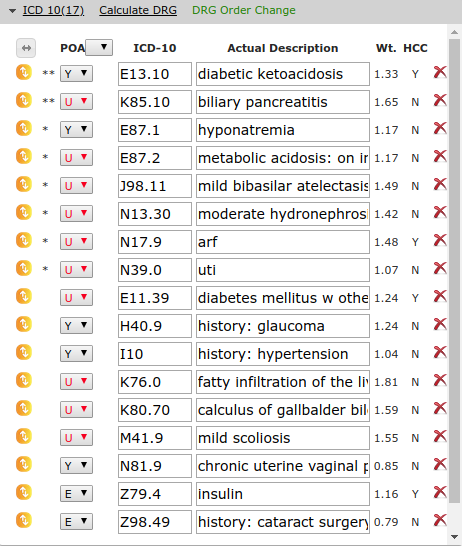
Below are the actions user can perform in ICD section.
- Expand (Button) : Click on Expand button to maximize / minimize entire diagnosis description.
- POA(Drop Down list) : user can select any value (Y/N/U/W) to set all diagnosis POA's at once.User can also set POA's for each diagnosis individually from DropDown list provided beside each diagnosis.
- ICD codes : These contains both KPAI generated & User added ICD codes.ICD codes are selectable , user can select ICD codes to get description of ICD code in to Query Submission NOTE field.
- Actual Description/Standard Description link: User can click on Actual Description/Standard Description link to see other description each time.
- Wt (ICD code weight) Under this column ICD code weight is displayed under each section.
- HCC (Hierarchical condition category) Under this column each diagnosis is displays with Yes or NO (Y/N) to say whether the code comes under hierarchical category condition or not.
- Drag & DROP icon Drag & Drop icon is available beside every diagnosis.Click, hold and drag icon and drop the diagnosis in the order and click CalculateDRG button to recalculate DRG on modified ICD code order.
- Delete icon DELETE icon present beside every ICD code.User can delete ICD code on clicking DELETE icon.
A new Pop-Up window Delete Diagnosis Code will be opened, Select Reason and enter comment and click on Delete Icon.
Procedure Section:
All KPAI generated and user added Procedure codes will be displayed in this section.

Drag & Drop icon is available beside every Procedure code.
Click, hold and drag icon and drop the procedure in the order and click CalculateDRG button to recalculate DRG on modified ICD code order.
DELETE icon present beside every Procedure code.User can delete Procedure code on clicking DELETE icon.
A new Pop-Up window Delete Diagnosis Code will be opened, Select Reason and enter comment and click on Delete Icon.
SnomedCT terms Section:
All KPAI generated Snomed ct terms and user added Query terms will be listed in this section.
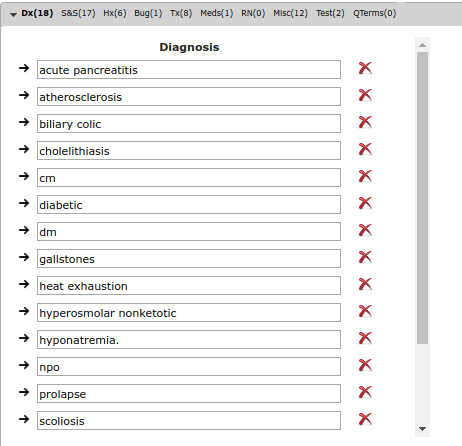
Dx (Diagnosis Data):
All diagnosis related data and terms will be displayed in this section.
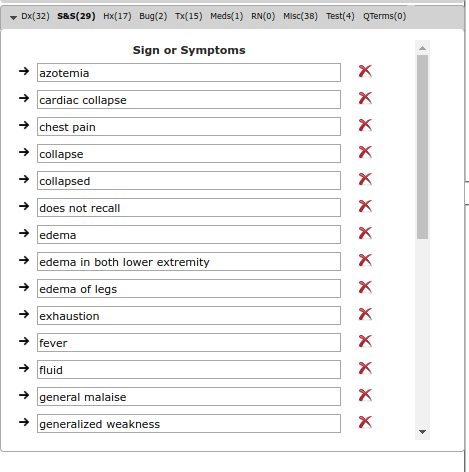
S&S (Sign or Symptom Data):
All SIgn and symptom related data and terms will be displayed in this section.
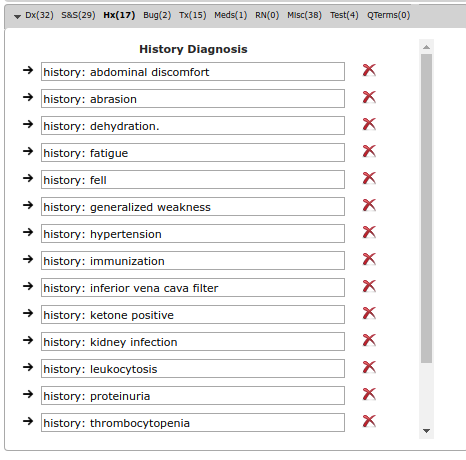
Hx (History Data):
All History related data and terms will be displayed in this section.
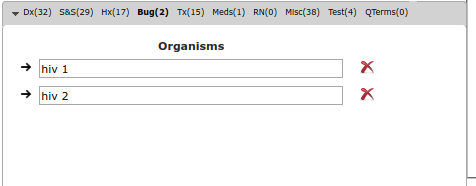
Bug (Bug Data):
Bacterial & other organism related data will be listed in this section.
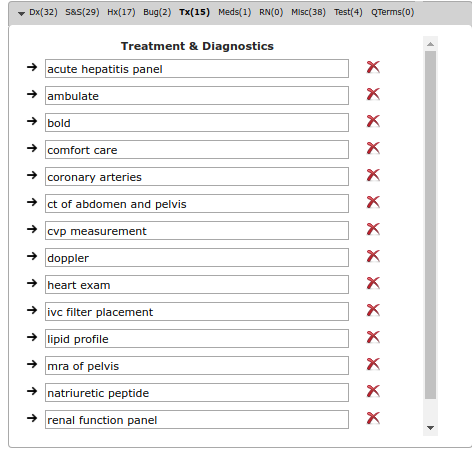
Tx (Treatment & Diagnosis Data):
Diagnostics & its treatment related data will be displayed in this section.
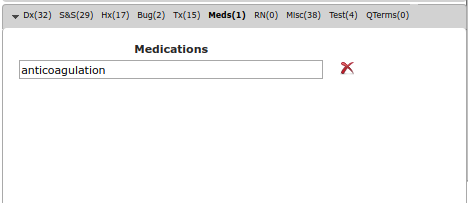
Medx (Medications Data):
Medication related terms will be listed in this section.
RN (Nursing Reports Data):
Nursing Reports related terms will be listed in this section.
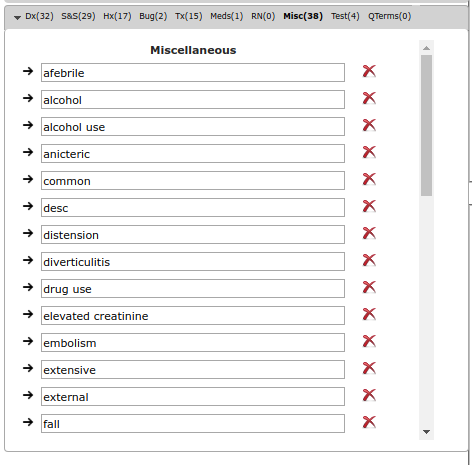
MISC (miscellaneous Data):
All other miscellaneous data will be displayed in this section.
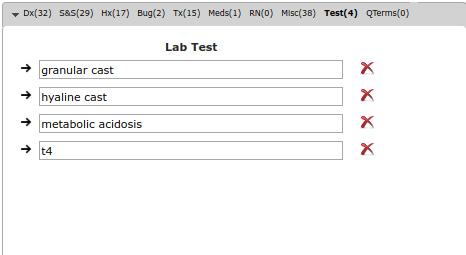
Test (LAB Data):
All lab data will be displayed in this section.
Qterms (Query Terms):
All user added query terms will be temporarily displayed in this section.
Qterms will be displayed temporarily in this section while adding new query or editing existing query.
Moving Data Term from one section to another:
User can move data term from one section to another section.
Click on forward button of data term to open "Snomed Change" window.
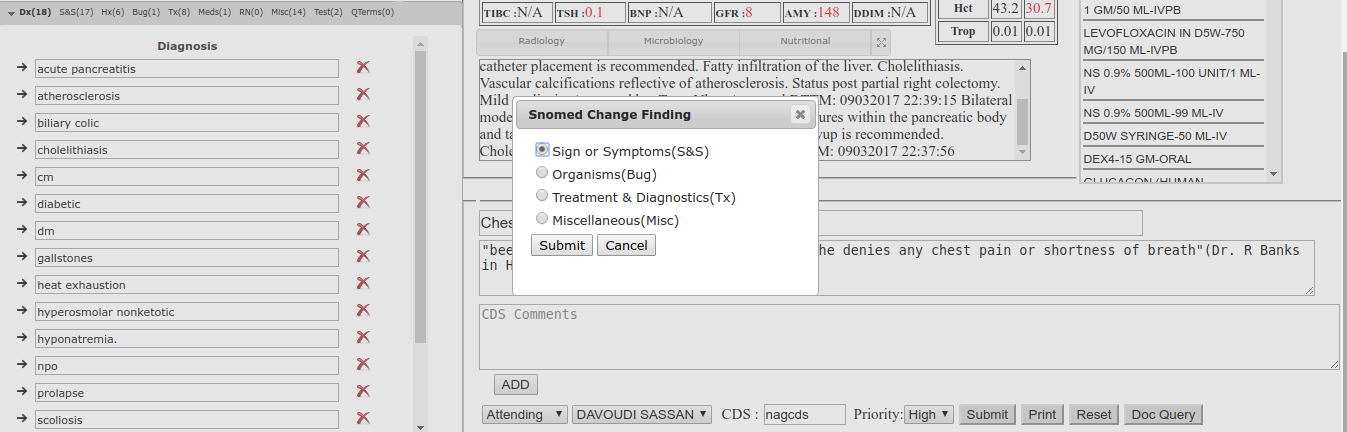
for ex: Dx to S&S.
Following are possible data type changes :
Dx:
Sign or Symptoms(S&S)
Organisms(Bug)
Treatment & Diagnostics(Tx)
Miscellaneous(Misc)
S&S:
Diagnosis(Dx)
Organisms(Bug)
Treatment & Diagnostics(Tx)
Miscellaneous(Misc)
Hx:
Diagnosis(Dx)
Organisms(Bug)
Treatment & Diagnostics(Tx)
Miscellaneous(Misc)
Bug:
Diagnosis(Dx)
Sign or Symptoms(S&S)
Treatment & Diagnostics(Tx)
Miscellaneous(Misc)
Tx:
Diagnosis(Dx)
Sign or Symptoms(S&S)
Organisms(Bug)
Miscellaneous(Misc)
Misc:
Diagnosis(Dx)
Sign or Symptoms(S&S)
Organisms(Bug)
Miscellaneous(Misc)
Test:
Diagnosis(Dx)
Sign or Symptoms(S&S)
Organisms(Bug)
Treatment & Diagnostics(Tx)
Delete Data Term:
Click on Delete icon beside data term.
Data term should be deleted from all section.
Vitals Section:
This section displays few important patient vitals.

All patient vitals are displayed in VItals Pop-Up.
All vital values in vitals section and POP-UP are selectable.

Lab Section:
This section displays patient labs. 
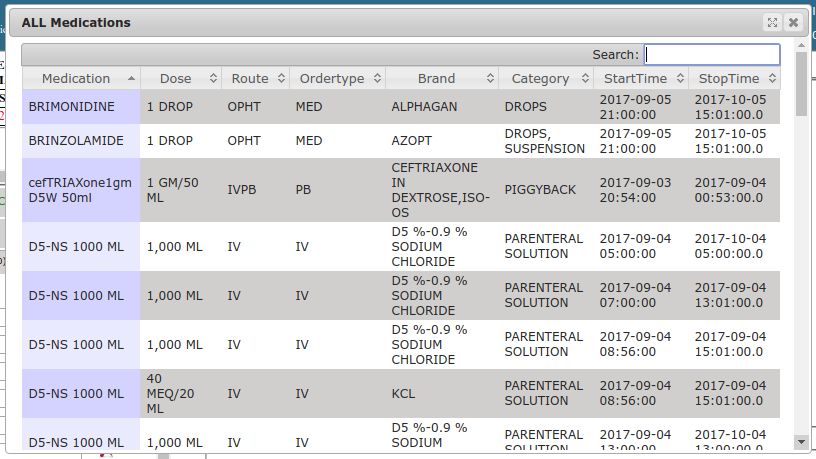
Medication Section:
All patient medications are displayed in Medications Section.
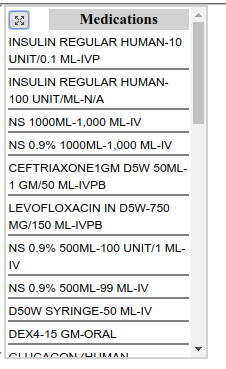
Detailed patient medications are displayed in Medication-PopUp.
All Medication values in Lab section and POP-UP are selectable.
Radiology Section:
Radiology impressions are displayed in this section.
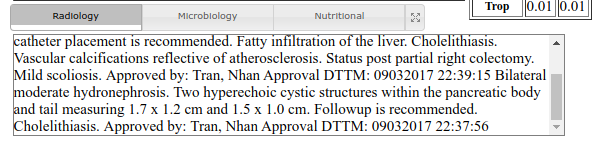
Data in Radiology documents can be added to Query Note by selecting data.
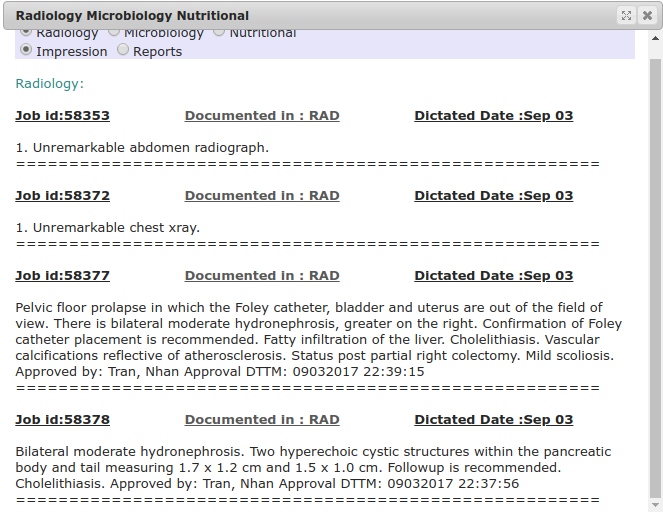
Select Data in Radiology section,a new Pop-Up window will be opened and click on "Add To Query" button.
Data will be added to Query Note field and SnomedCT-QTerms section.
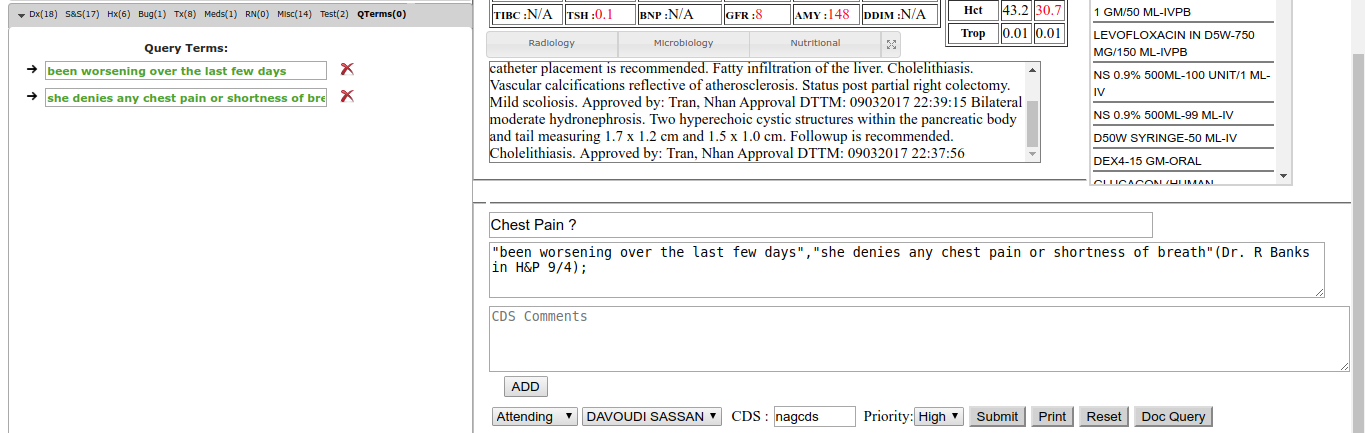
Query Submission
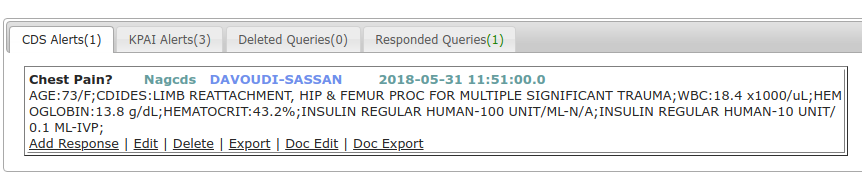
Queries are done by CDS to physician, Physician gives response to query to improve clinical documentation. Following are different tabs present in this section.
CDS Alerts:
Queries done by CDS will be listed under this tab.
KPAI Alerts:
Queries generated automatically by KPAI are KPAI Alerts. All KPAI Alerts are listed under this section.
Deleted Queries:
All deleted CDS queries & KPAI alerts will be listed under this section.
Responded Queries:
All responded queries will be listed under this section.
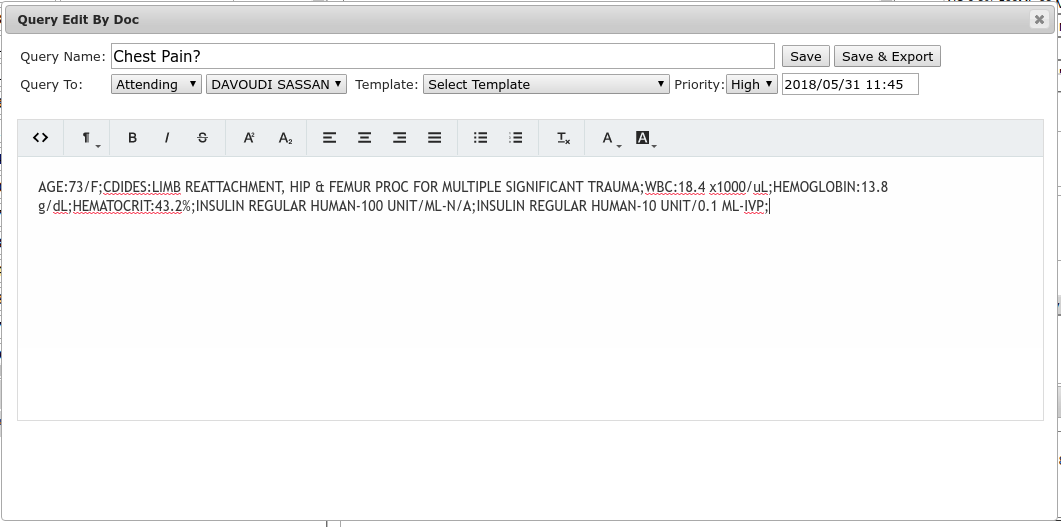
Doc Query:
Enter Query name,Query,QueryTo - Type,Physicain,Template,Priority,date & time.Click on Save / Save & Export button.
Query will be listed under CDS Alerts.
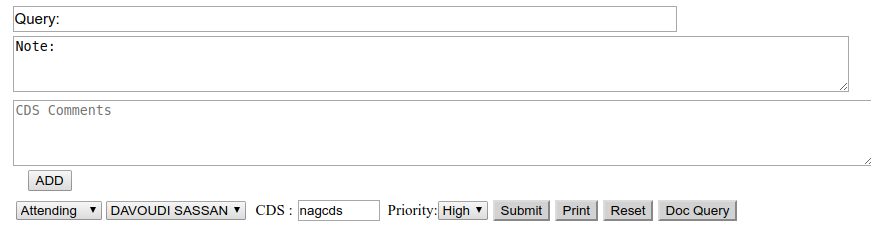
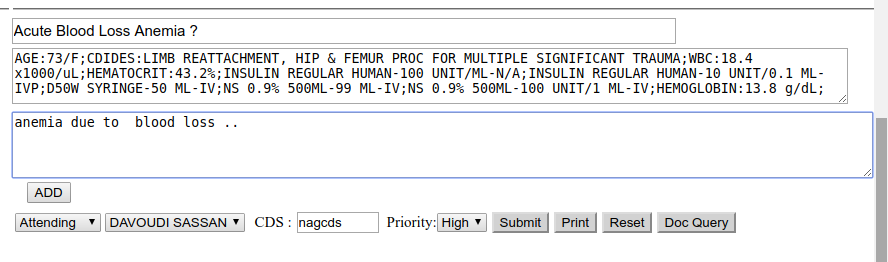
Submit Query:
Select required data From CDI DASH BOARD, Enter data in CDS Comments and click on ADD-Button.Data will be added to NOTE section.
Select data from View documents, a new Pop-Up window will be opened and click on "Add To Query" button.
Data will be added to Query Note field and SnomedCT-Qterms section.Then click on Submit button.
Query will be listed in CDS Alerts tab.
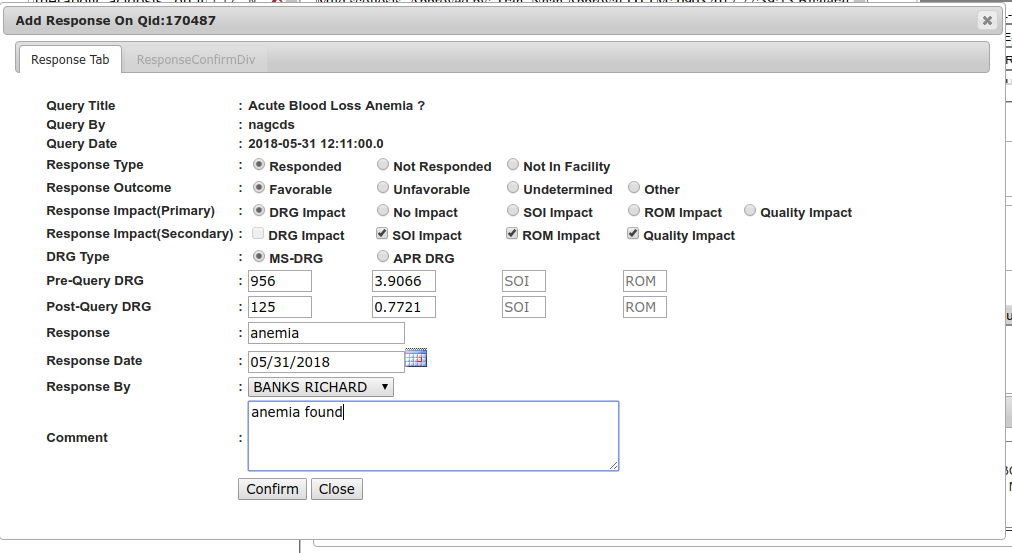
Query-ADD Response :
Response is given to query by physicians.
Add Response- link is provided for every query .
Click On AddAdd Response- link to open ADD RESPONSE window.
Select Response Type,Response OutCome,Response Impact(Primary),Response Impact(Secondary),DRG Type,Pre-Query DRG,Post-Query DRG,Response,Response Date,select Physician name from Response By - DropDown list,Enter comment and click on Confirm button.
Query-Edit :
User can Edit both CDS Queries and KPAI Alerts.
If user edits and submit KPAI alert,then the alert will be moved in to CDS Alerts section.
Click on EDIT button present under each query.
All data fields from CDI dash board will be highlighted.CDS can deselect existing data and select new data and enter new data and Submit Query.

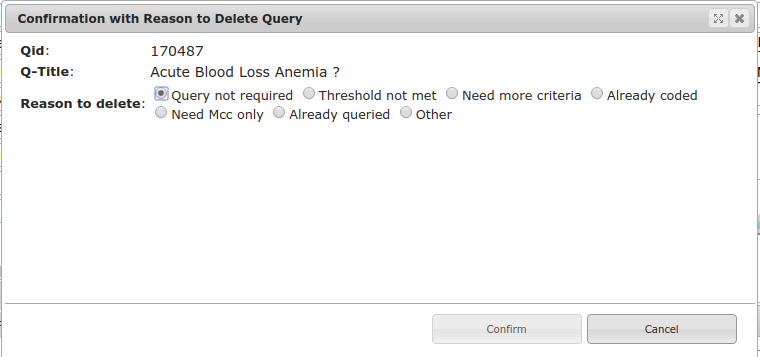
Query-Delete :
User can delete both CDS Queries and KPAI Alerts.
Click on delete-link present under each query.New window will be opened to confirm deletion of query.
Select reason to delete query and click on Confirm button.
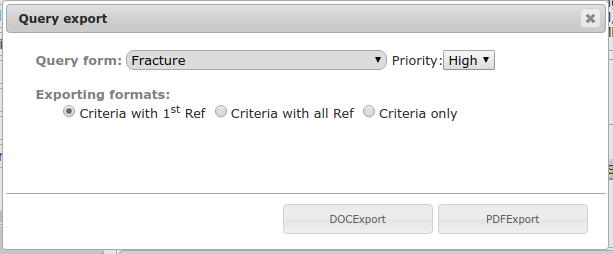
Query-Export :
user can export both CDS Queries and KPAI Alerts to diagnosis PDF or DOC form.
Click on Export- link present under each query .
A new window - Query Export will be opened.Select query form from Query-form dropdownList,Select any type of exporting formats and click on DOCEXPORT button to export and download into DOCFormat file or click on PDFEXPORT button to export and download into PDF format file.
Query-Mark as Query-Check Box :
Select Mark as Query - Check box to indicate that query is exported and is valid query.
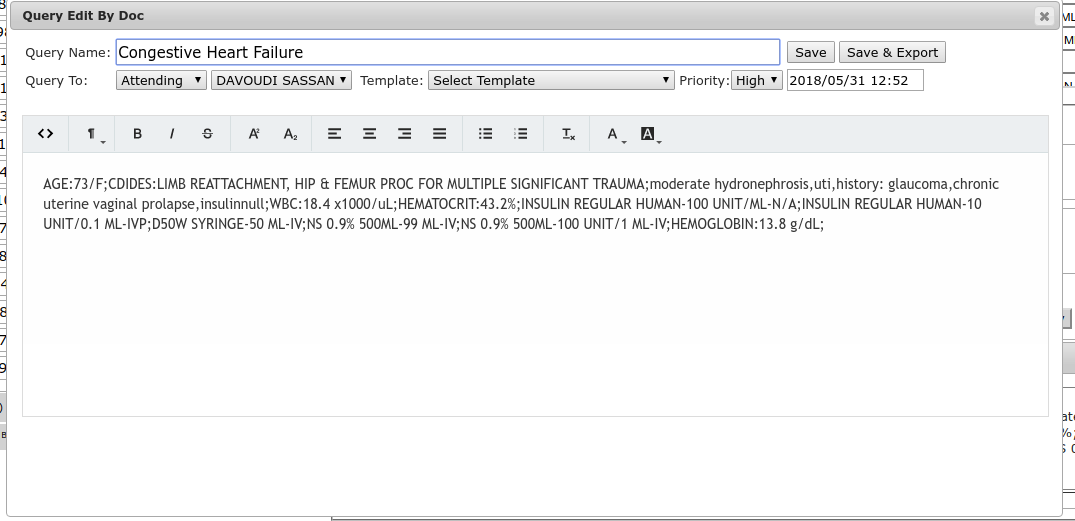
Query-DOC Edit :
Doc Edit is to edit Doc Queries(Queries generated from Doc Query).
Select DOC Edit for the query and enter data or delete existing data and click Save or Save or Export button.
Query-DOC Export :
Doc Export is to export Doc Queries(Queries generated from Doc Query) in to word document.

PSI(Patient Safety Indicator)
The Patient Safety Indicators (PSIs) are a set of measures that screen for adverse events that patients experience as a result of exposure to the health care system. These events are likely amenable to prevention by changes at the system or provider level.
Click on PSI button,to open new window Patient Safety Indicators.Following are two options to view patient safety indicators.
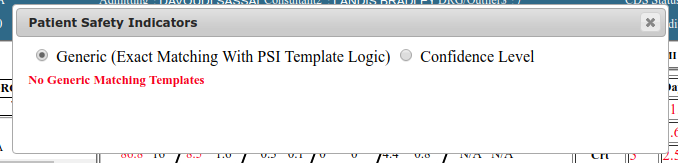
Generic:
All 100% matched PSI indicators are listed in this section.
Confidence Level:
Drag confidence level bar from 100% to 0% , to view patient safety indicators at there triggered percentage level.
 form:
Every form contains two sections,Inclusion and Exclusion.
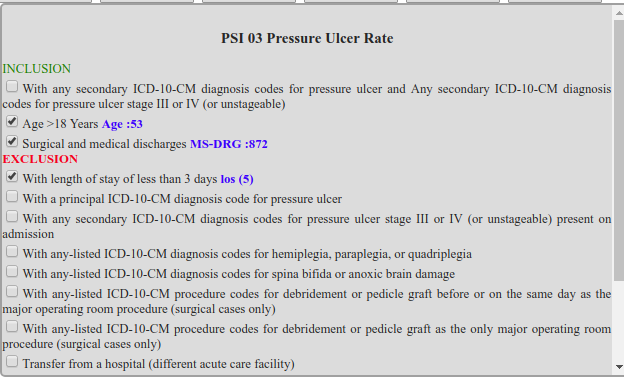
If a condition is triggered in Inclusion section,percentage will be increased.
If a condition is triggered in Exclusion section,percentage will be decreased.
Click on any patient safety indicator , to view form with its conditions.
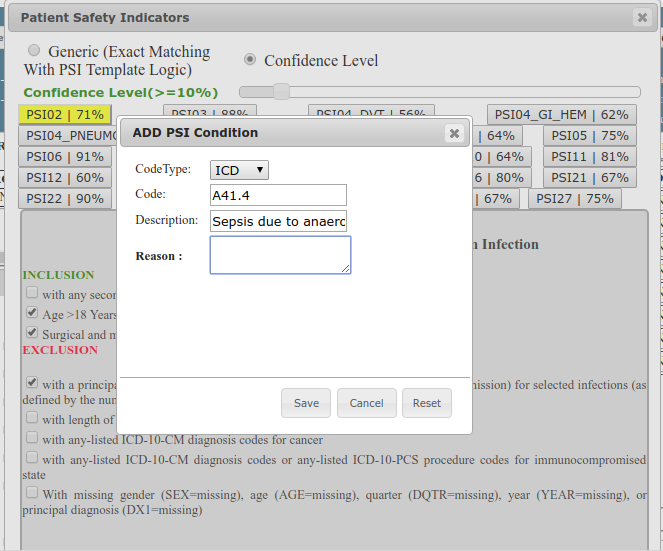
ADD PSI Condition
Select check box in PSI form, to open new Pop-Up window "ADD PSI Condition".
Select CodeType,Code/Name,Description/value,reason and click Save button to add condition in PSI form.
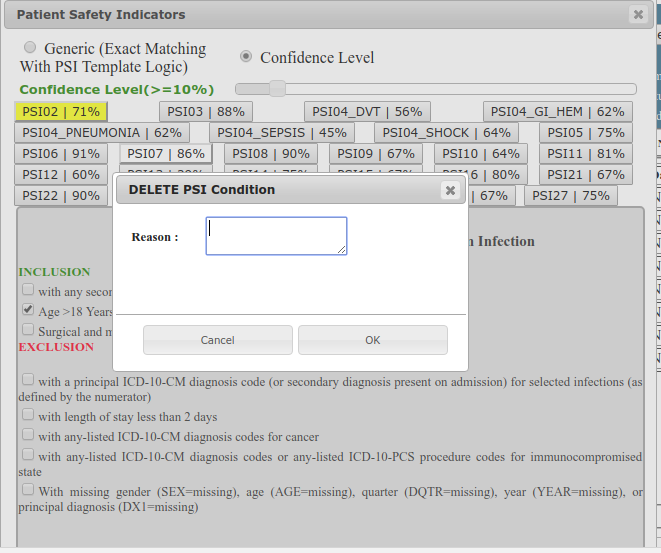
Delete PSI Condition
Uncheck check box in PSI form,to open new Pop-Up window "DELETE PSI Condition".
Enter reason and click on OK button to delete PSI condition.
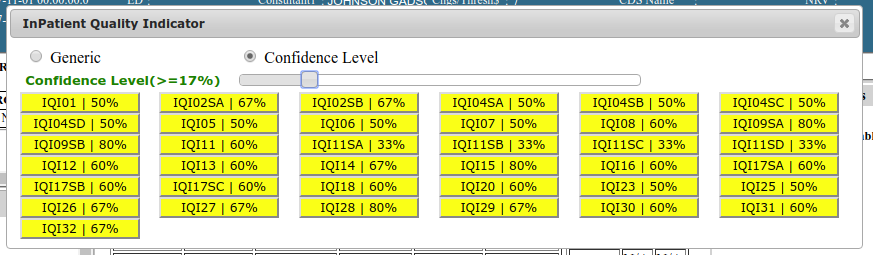
IQI(In-Patient Quality Indicator)
The Inpatient Quality Indicators (IQIs) are a set of measures that can be used with hospital inpatient discharge data to provide a perspective on quality.
Click on IQI button,to open new window In-Patient Quality Indicator.Following are two options to view In-Patient Quality Indicator.
Generic:
All 100% matched IQI indicators are listed in this section.

Confidence Level:
Drag confidence level bar from 100% to 0% , to view In-Patient Quality Indicator at there triggered percentage level.
IQI(In-Patient Quality Indicator) form:
Every form contains two sections,Inclusion and Exclusion.
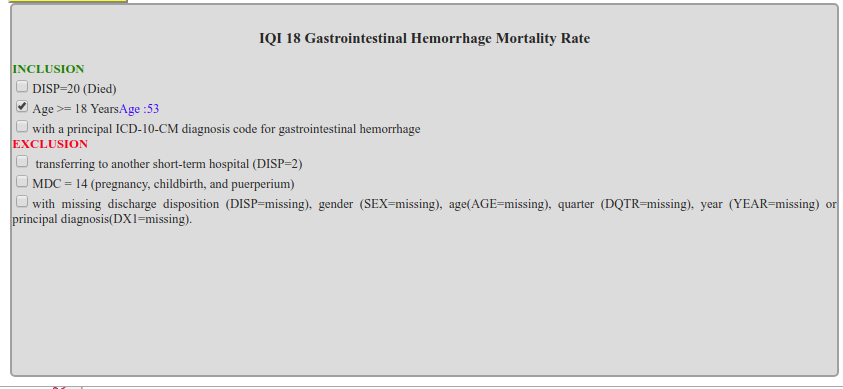
If a condition is triggered in Inclusion section,percentage will be increased.
If a condition is triggered in Exclusion section,percentage will be decreased.
Click on any In-Patient Quality Indicator,to view form with its conditions.
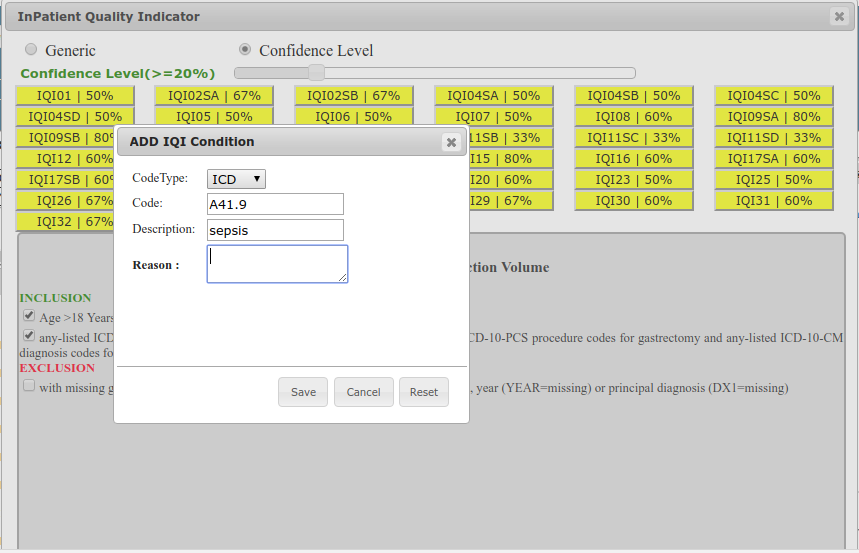
ADD IQI Condition
Select check box in IQI form, to open new Pop-Up window "ADD IQI Condition".
Select CodeType,Code/Name,Description/value,reason and click Save button to add condition in IQI form.
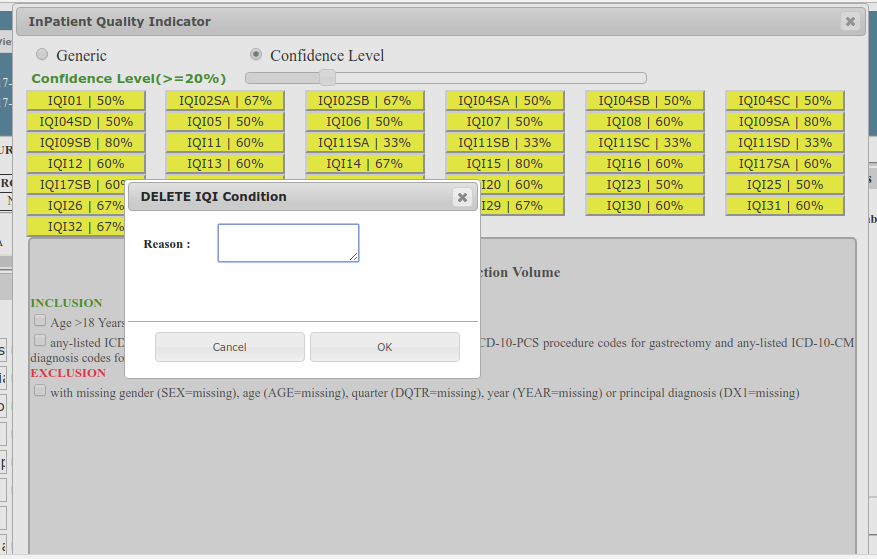
Delete IQI Condition
UnCheck check box in IQI form,to open new Pop-Up window "DELETE IQI Condition".
Enter reason and click on OK button to delete IQI condition.
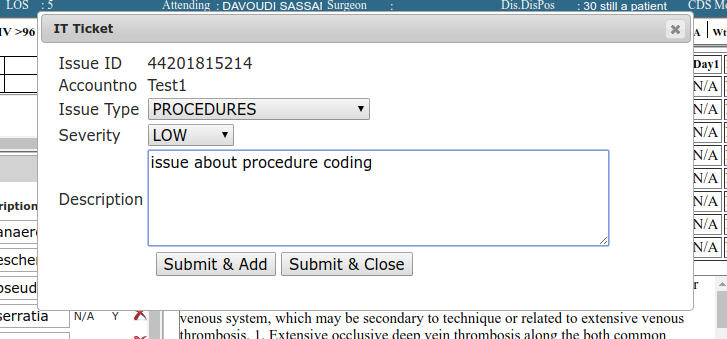
IT Ticket
IT ticket provides user to post any issues regarding KPAI to IT team.
Click on IT Ticket button in CDI-Dash board to open a new window - IT Ticket.
Select Issue Type, Severity from drop down lists , and enter comments in Description text box.
Click on Submit & Add button / Submit & Close button to submit IT Ticket.
Submit & Add button submits IT Ticket and Pop-Up window will remain unclosed to submit new IT Ticket.
Submit & Close button submits IT TIcket and Pop-Up window will be closed.
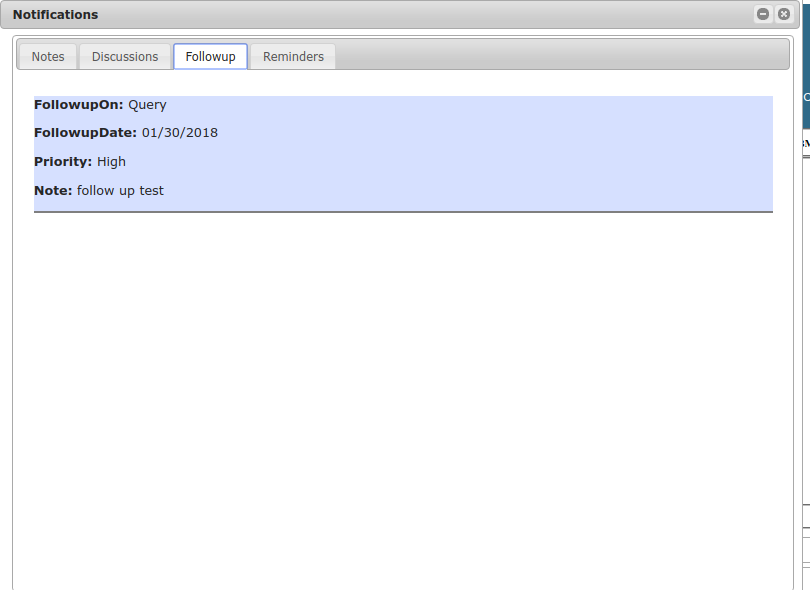
Notifications:
Notifications is used to communicate with other CDS or CDS auditor or other users from CDI Dash board. Below are the different tabs present in Notifications window.
Notes:
Notes tab is intended to display information about particular account.
Enter related data or any information of account and click on Submit button.

FollowUp:
All CDS Follow-Ups on account will be displayed here.
Reminders:
All CDS reminders on account will be displayed here.

FollowUp:
Follow-Up is USER defined Reminder on account to check account on specific date for particular Code/Query/Other.Follow-Up reminds CDS to review account on specific date.
Select any option from Select-FollowUp drop down list to open a new Pop-Up Window "Follow-Up".
Select Priority,FollowUp date,Enter comment and click on OK button.
Then follow up will be triggered and displayed in NOtifications tab and also triggered on followup date in to FollowUp queue.

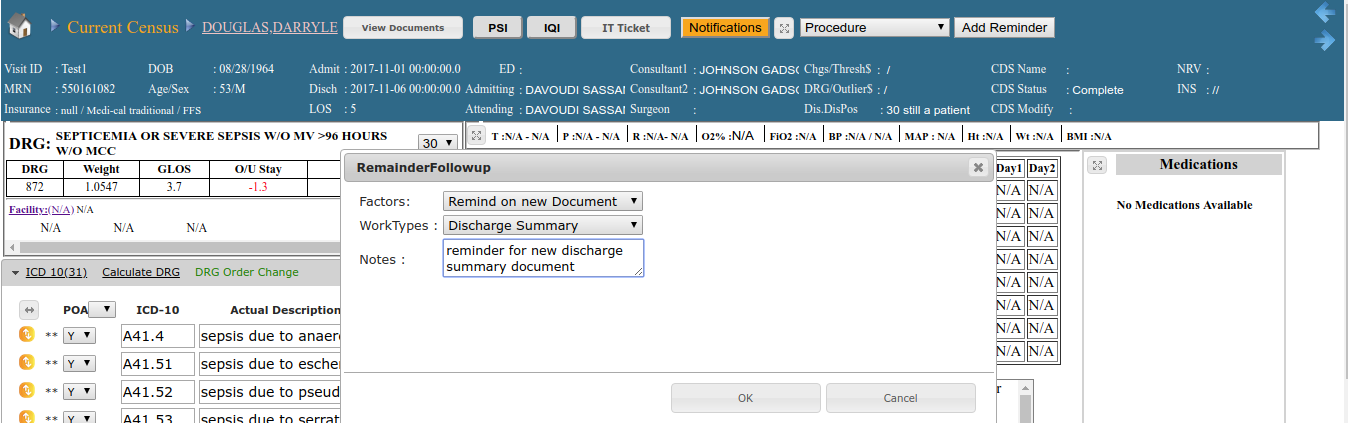
Add Reminder:
Reminder reminds CDS on specific condition.
Select required option in Factors,WorkTypes DropDown lists.Enter Description in Notes:-text box.
Click on OK button.
Reminders will be triggered if condition mets, and reminder will be displayed in Reminders section in Notifications tab.