Staff Documentation
After logging into the Shift Planner, staff will see the following Home Screen:
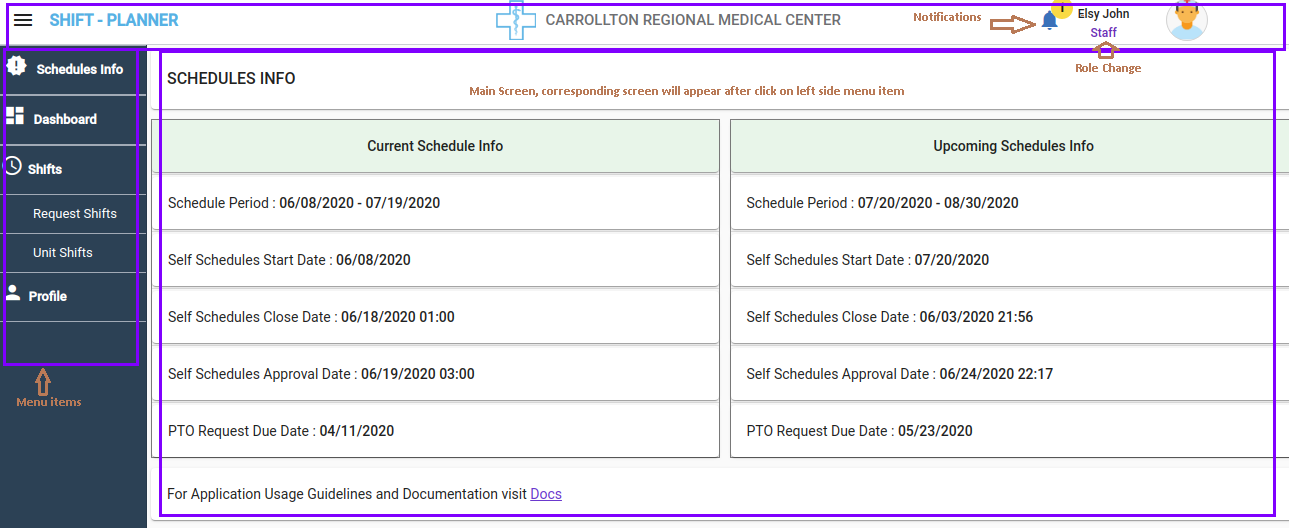
Top Bar
-
The Top Bar contains:
- Hospital Logo
- Notifications Icon
- Logged-in User Role
-
Actions:
- Click the Notifications Icon to view all unread messages.
- Click the Role Name to switch to another role assigned to the user.
Left Side Menu Bar
- The Menu Bar on the left displays all menu items assigned to the current active role.
- Actions:
- Clicking a menu item opens the corresponding screen on the right-hand side.
Main Screen
- This is a Single Page Application (SPA):
- Every screen reflects dynamically in the center screen when a menu item is clicked.
Note:
Ensure your role permissions are correctly set to access the appropriate menu items.
Staff Menu Items
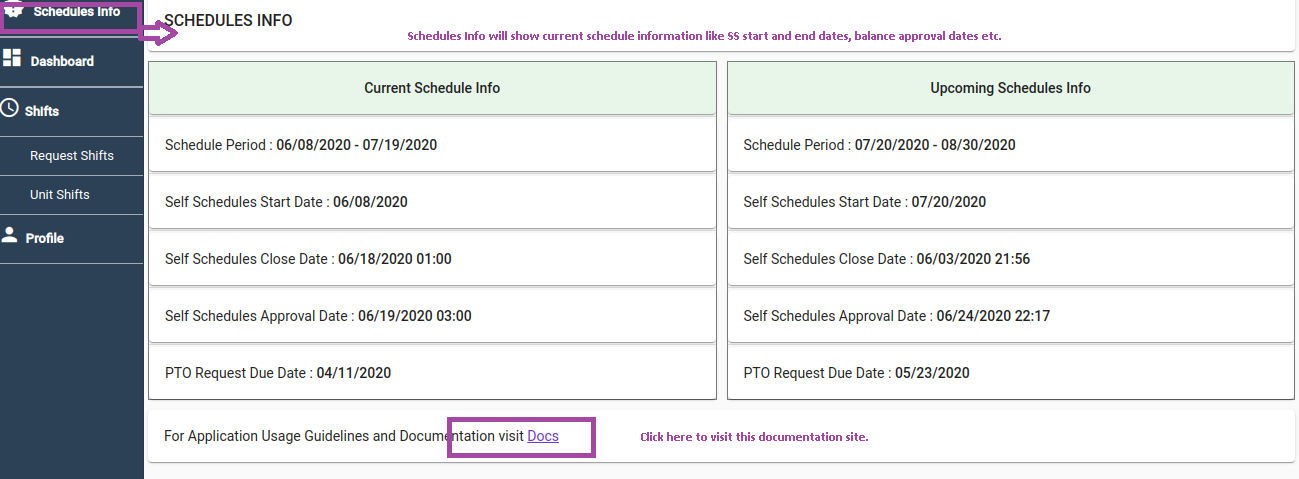
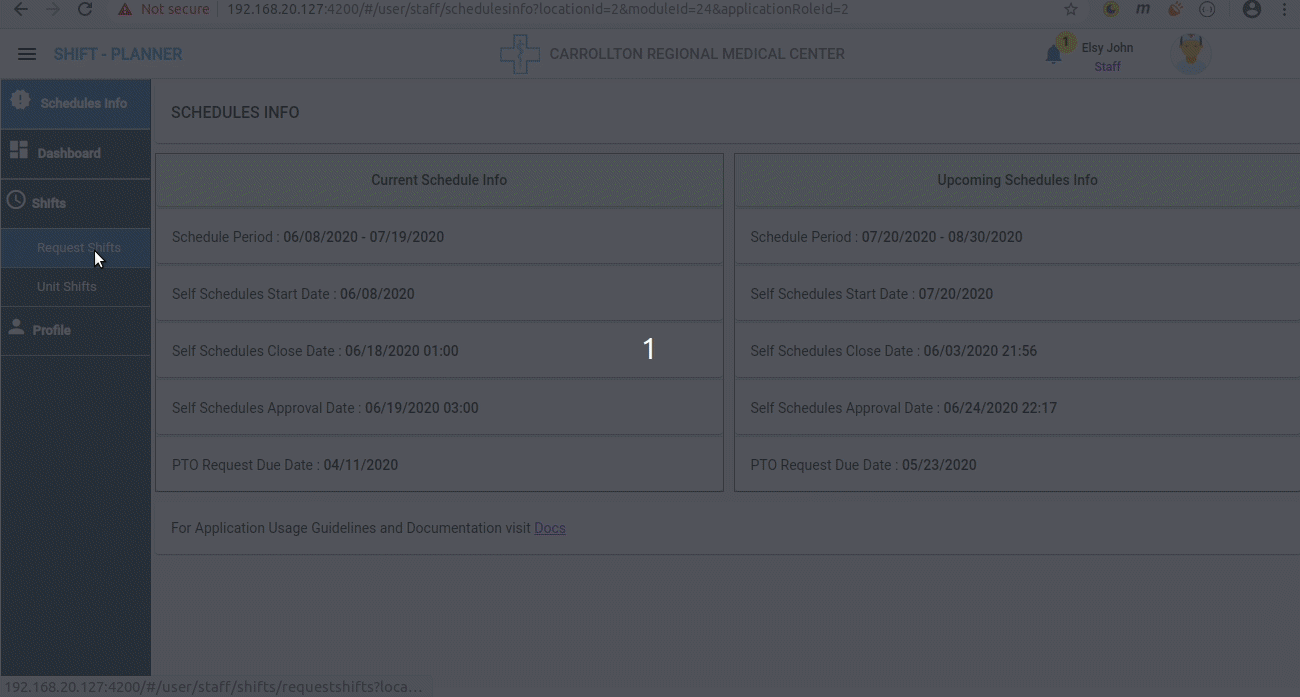
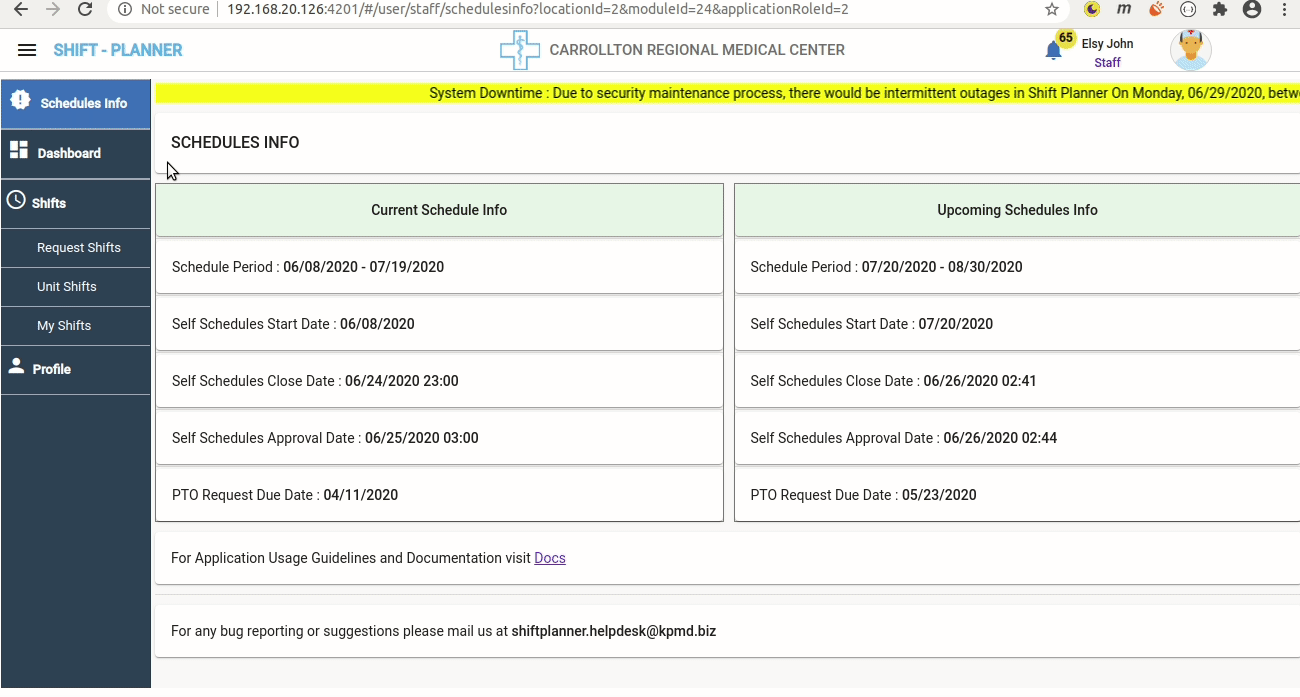
Schedules Info
By default, this page appears to staff after login. It displays information about current and upcoming schedules.
Dashboard
Staff can view the Dashboard screen by clicking the Dashboard menu item on the left-side navigation bar.
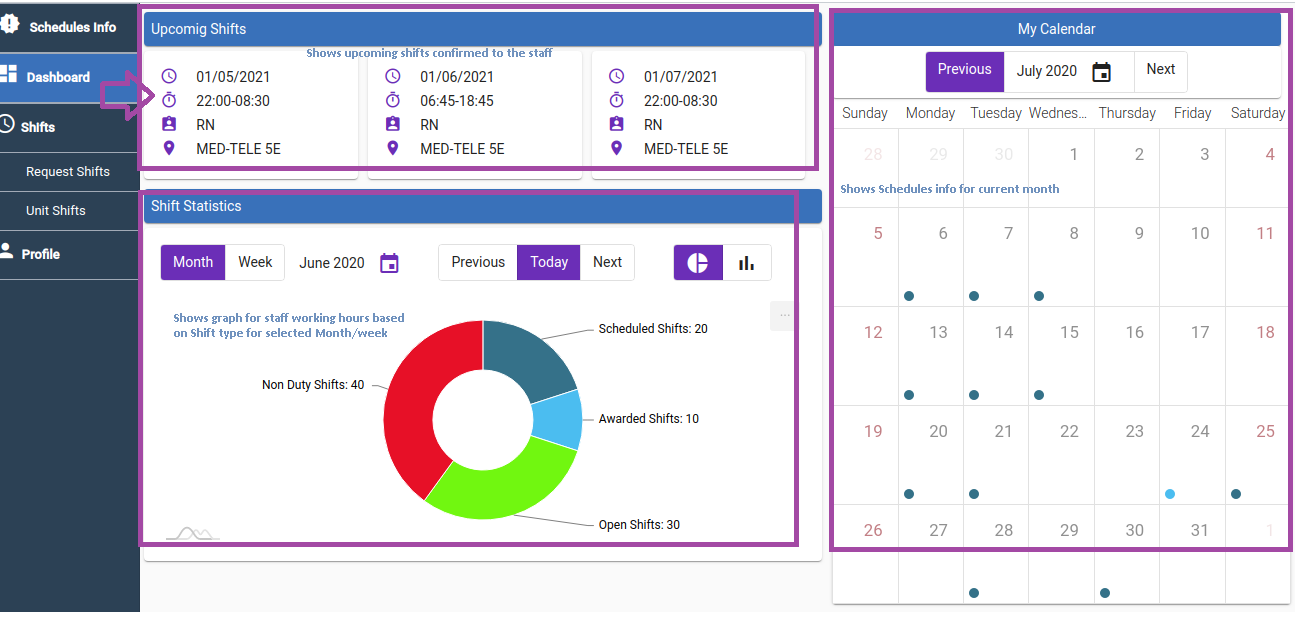
Key Sections on the Dashboard:
-
Upcoming Shifts
- This top section displays upcoming confirmed shifts for the staff, along with related schedule information.
-
Shift Statistics
- This chart shows staff shift hours grouped by shift type, such as:
- Working Shifts
- On-Call Shifts
- Non-Duty Hours
- This chart shows staff shift hours grouped by shift type, such as:
-
My Calendar
- Displays staff-confirmed schedules in a calendar format.
Hiding Calendar Shifts While Balancing
If a date on the calendar falls within the start and end dates of a current balanced schedule, no schedule information will be displayed until the balance period is over.
Request Shifts
Self Schedule Request
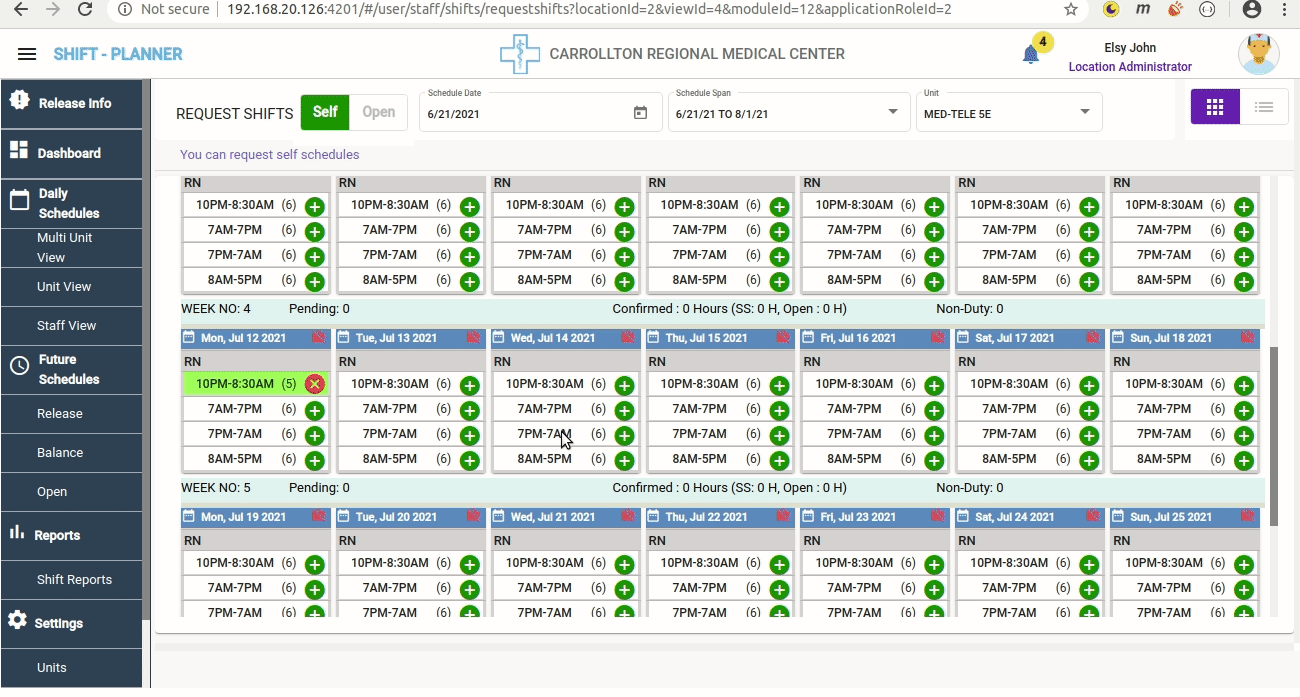
After schedules are released by the Manager for a unit, staff can request a self-schedule by following these steps:
- From the left-side menu panel, click on Request Shifts under the Shifts menu.
- After clicking on Request Shifts, staff will see the schedule screen on the right side.
- At the top of the screen, staff can select the Schedule Date or Schedule Span to view available self-schedule shifts released by the Manager.
- By default, the current date and schedule are selected.
- After selecting the schedule span, the calendar grid will display available shifts based on the staff's unit and skill.
- Available shifts are displayed in six rows, each representing a week.
- Each row contains seven day cards, with available shifts displayed for each day.
- Click the + (green button) to request a self-schedule shift.
- Once a shift is requested, the + button will turn into a – (red button), which can be used to cancel the shift if needed.
- Note: Shift requests or cancellations can only be made before the Manager balances the self-schedules.
Self Schedules Visibility
Staff can see self-schedules only after schedules are released by the Manager.
Additionally, staff must have the corresponding unit and position competence to view schedules.
Video Demonstration
Check the following video for applying a self-schedule and Non-Duty PTO request:
Non Duty Request
- Staff can request a Non Duty for required dates from the schedules calendar by clicking the red icon (Office_Off) on the top-right corner of each day's schedule card.
- After clicking this icon, a pop-up will appear to select the type of Non Duty.
- Click on the Apply button to submit the request.
Max 40 Hours/week rule
Staff can only request a maximum of 40 hours per week in self-schedules, which includes PTO hours.
Self Schedule and Non Duty Approval
- After two weeks of the self-schedule period, Managers can start balancing the self-schedules applied by staff.
- Approved self-schedules and Non Duty days will be updated to the following colors:
- Blue: Approved self-schedules.
- Red: Approved Non Duty days.
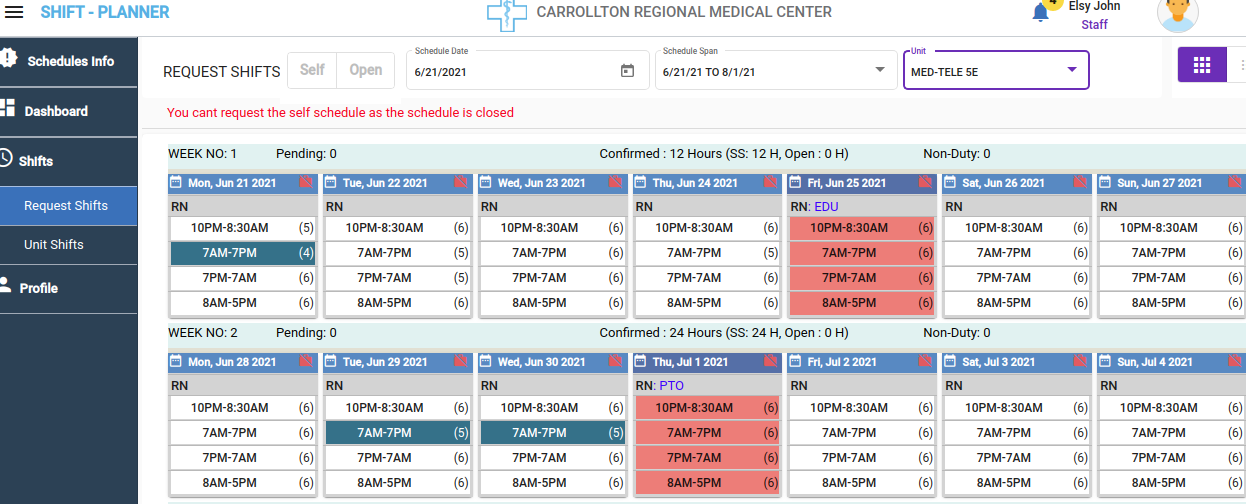
Self Schedules Request Time
Staff can only request schedules for a two-week period after the schedule is released.
However, Administrators can modify these dates if necessary.
Once the time period is over, staff cannot make any changes to their applied requests.
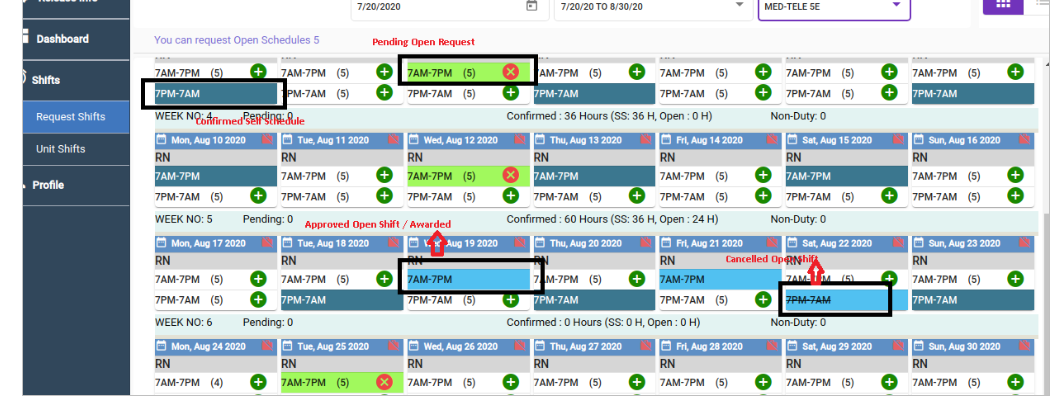
Open Shift Request & Approval
- After Self Schedules Balance, the Manager will release open shifts to staff.
- Staff can see a + button to apply for open available shifts on the same Request Shifts screen.
- Requesting shifts for open shifts follows the same process as self-scheduling:
- Click the + (green button) to send an open shift request to the Manager.
- Open shift requests can be submitted until 2 hours before the shift start time.
- Once awarded by the Manager, open shifts will appear with a blue background.
- If an open shift request is cancelled by the Manager, it will still show with a blue background and a strikethrough.
Please check the following screen to see how Open Shift requests appear when applied by staff and approved by the Manager:
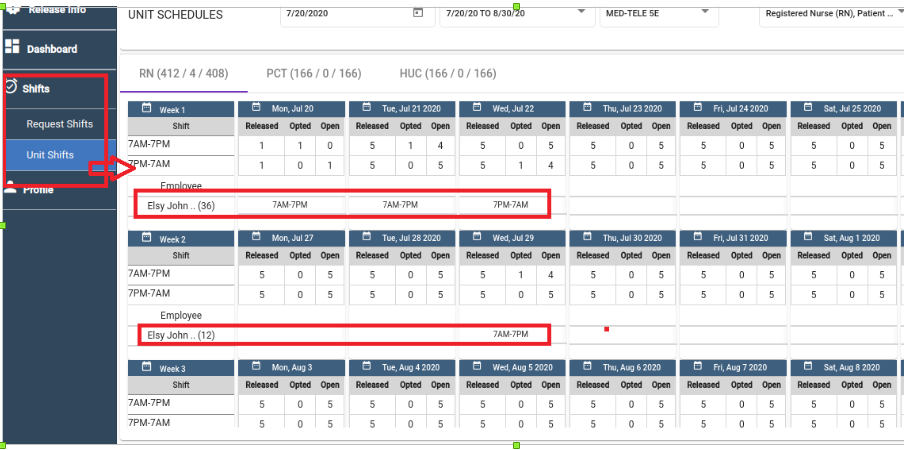
Unit Shifts
Staff can view other staff requests and confirmed shifts within a unit by navigating to:
Shifts → Unit Shifts
Please check the following screenshot for the Unit Shifts screen:
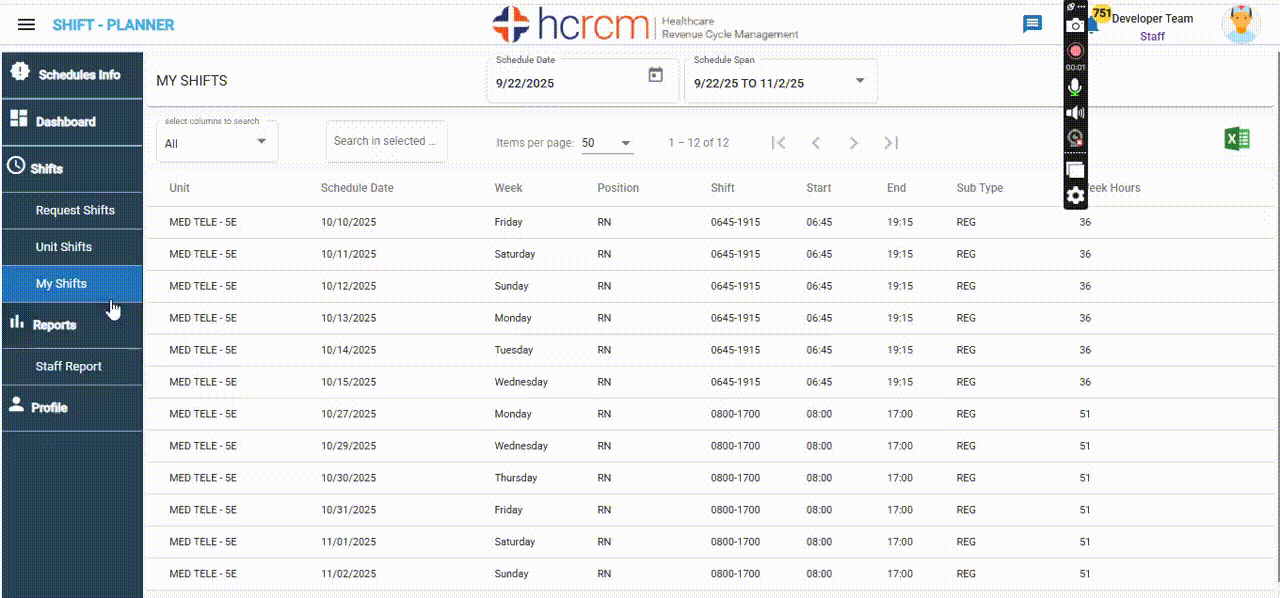
My Shifts
Staff can view their complete schedules for a schedule period on this screen. Additionally, schedules can be downloaded in Excel format.
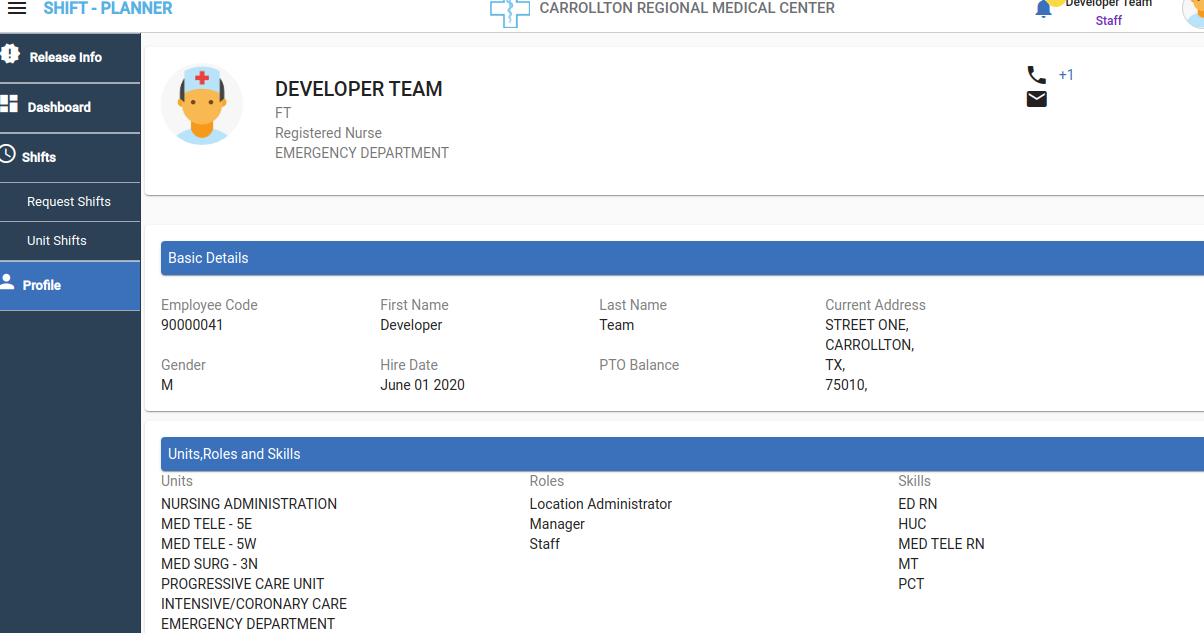
Profile
Staff can view basic profile information, including assigned units, roles, and skills for the Shift Planner application, by clicking on the Profile menu from the left-side navigation bar.
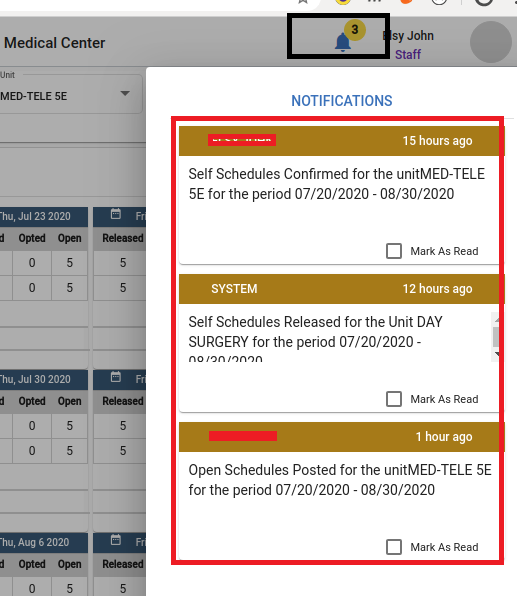
Notifications
- After login, a bell icon is visible on the top-right corner beside the username. This icon displays notifications for the user.
- Currently, the system is configured to send notifications to staff in the following cases:
- When the Manager releases self-schedules.
- When the Manager approves self-schedules.
- When the Manager releases open schedules.
- Future updates will include notifications for other required information based on user suggestions.
Please refer to the following screenshot for checking notifications:
Summary of Rules for Staff
General Scheduling Rules
- Staff can only request self-schedules for a two-week period after the schedule is released by the Manager.
- Staff cannot modify self-schedule requests once the two-week period is over.
Self-Schedule and Non-Duty Requests
- Staff can request a maximum of 40 hours per week in self-schedules, including PTO hours.
- Non-Duty requests can be made by clicking the red icon (Office_Off) on the schedule calendar.
- Staff cannot modify or cancel requests after Manager balancing.
Open Shifts
- Open shifts become available after self-schedule balancing by the Manager.
- Staff can request open shifts until 2 hours before the shift start time.
- Approved open shifts appear with a blue background, and cancelled requests appear with a blue background and a strikethrough.
Notifications
- Notifications are sent to staff when:
- Self-schedules are released by the Manager.
- Self-schedules are approved by the Manager.
- Open shifts are released by the Manager.
- Additional notifications may be added based on user suggestions.
Reports - STAFF REPORT
Staff can pull their all shift information based on schedule span or Date range.
Watch the following video to learn how to filter reports:
Viewing Shifts and Profile
- Staff can view their complete schedules in the My Shifts screen and download them in Excel format.
- Staff can view their assigned units, roles, and skills in the Profile screen.
Important Notes
- Self-Schedule Visibility: Staff can only view self-schedules after they are released by the Manager, and only for assigned units and positions.
- Hiding Calendar Shifts While Balancing: No schedule information is displayed for dates within the balancing period.