Manager Documentation
After logging into the Shift Planner, Managers will see the following Home Screen:
Key Features:
-
Top Bar:
- Displays the Hospital Logo, Notifications Icon, and the logged-in User Role.
- Actions:
- Click the Notifications Icon to view all unread messages.
- Click the Role Name to switch to any other roles assigned to the user.
-
Left-Side Menu Bar:
- Displays all menu items assigned to the current active role.
- Actions:
- Clicking on a menu item displays the corresponding screen on the right-hand side.
-
Single Page Application (SPA):
- Every screen dynamically updates in the center screen after clicking on a menu item from the left-side navigation bar.
Manager Menu Options
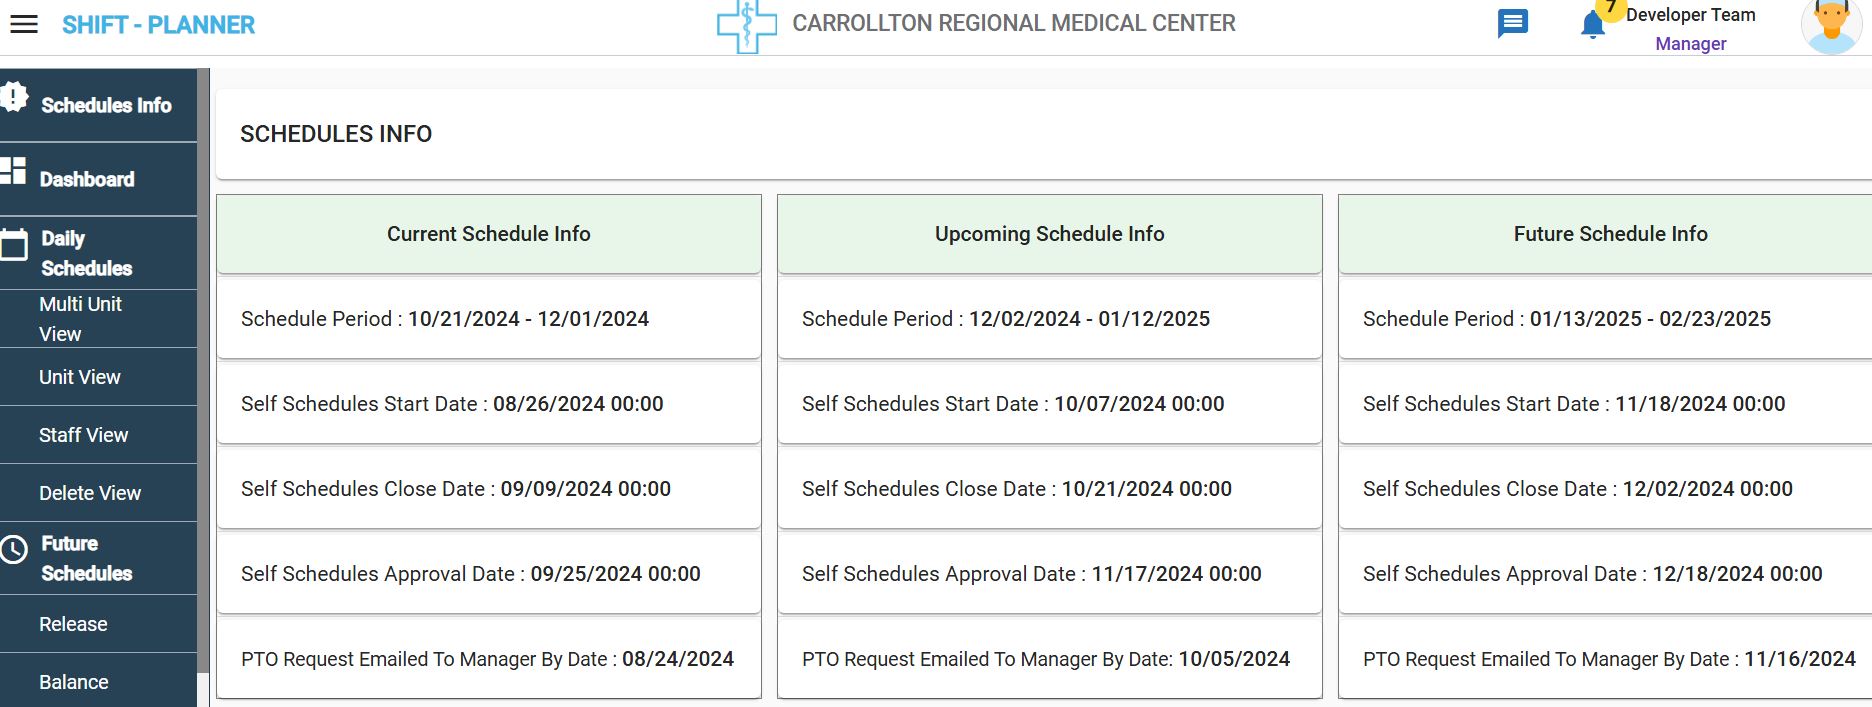
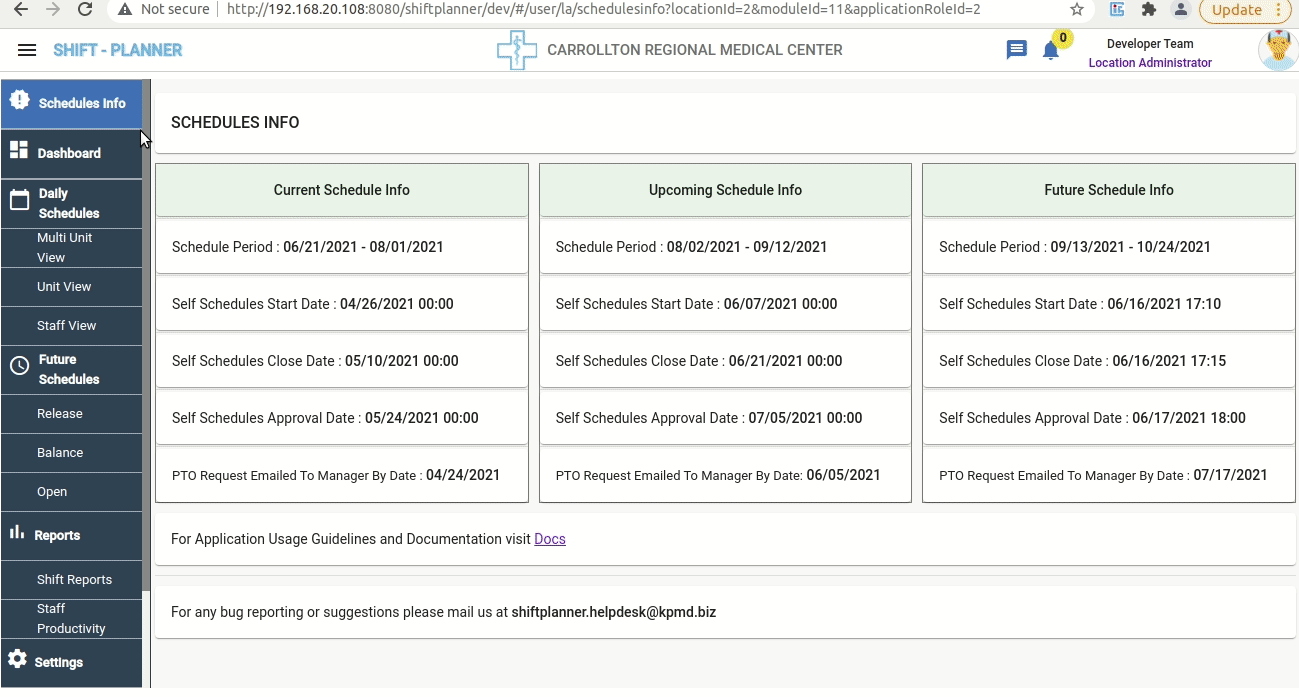
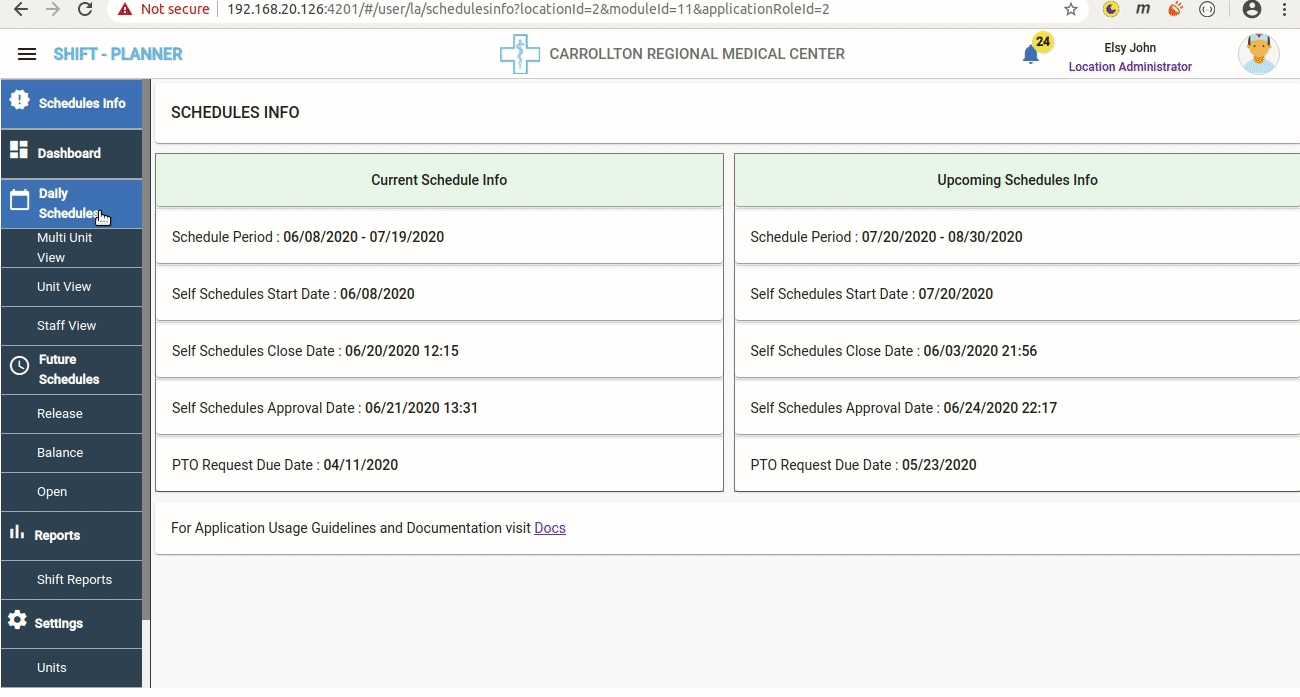
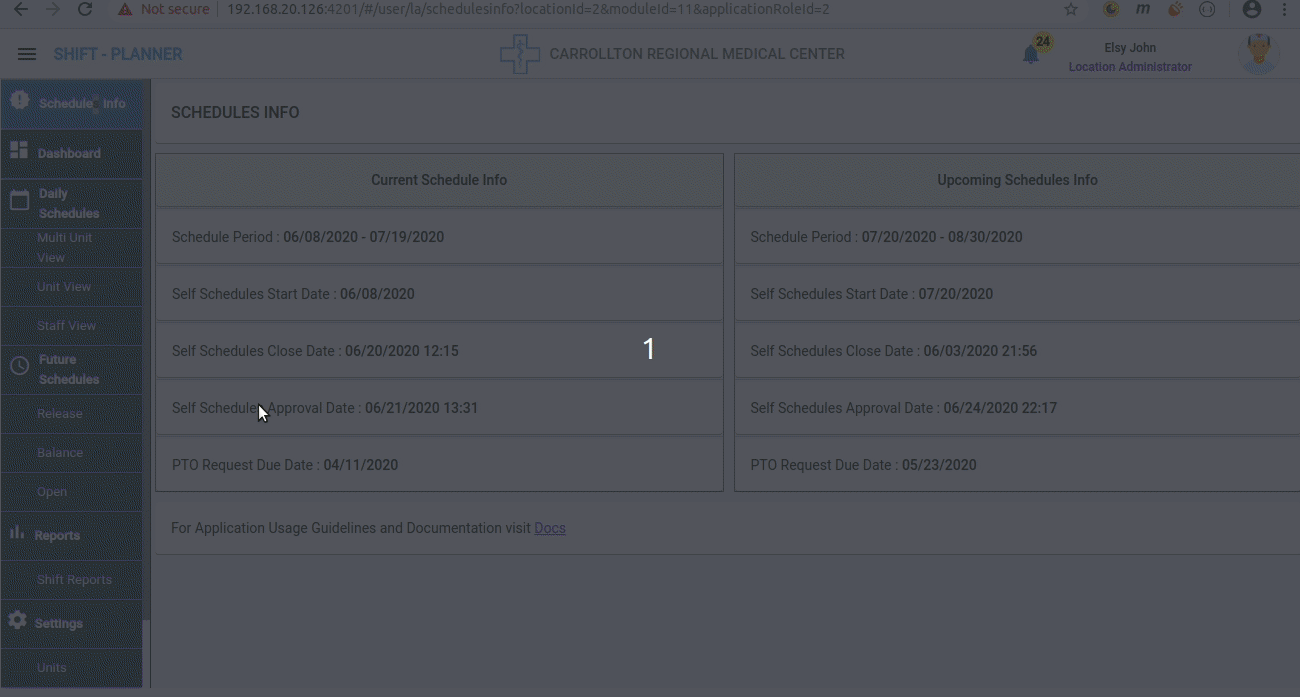
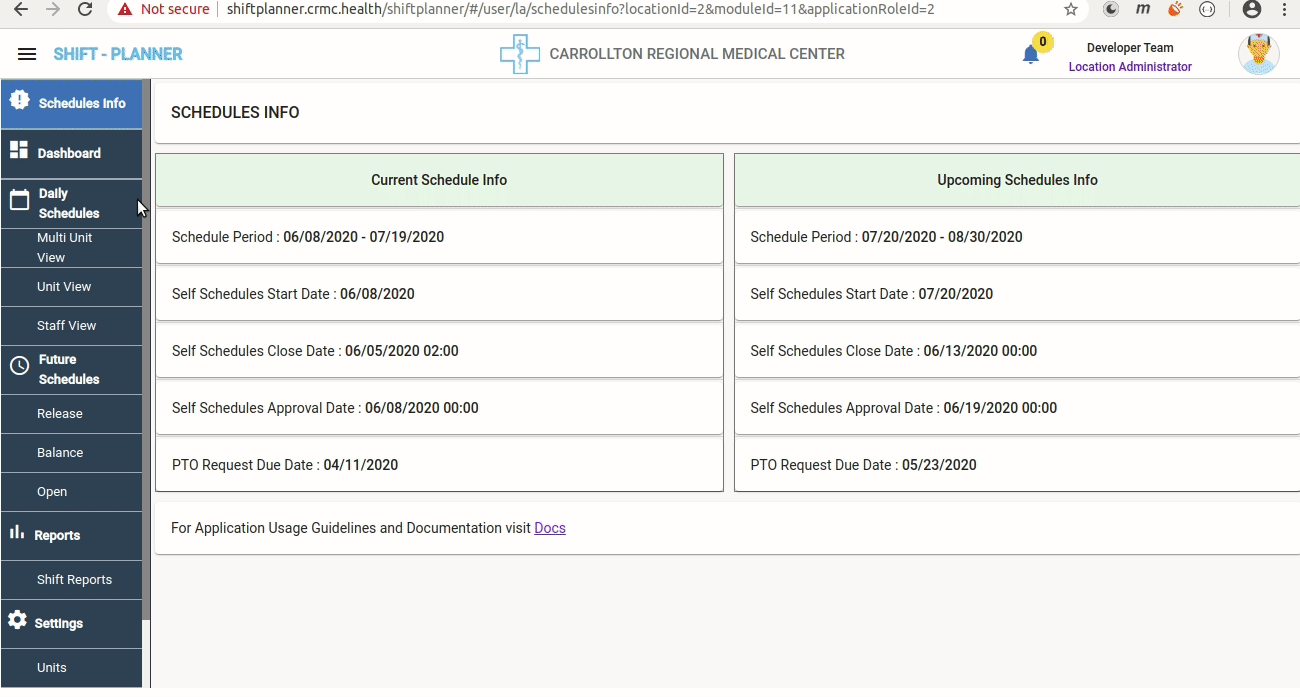
Schedules Info
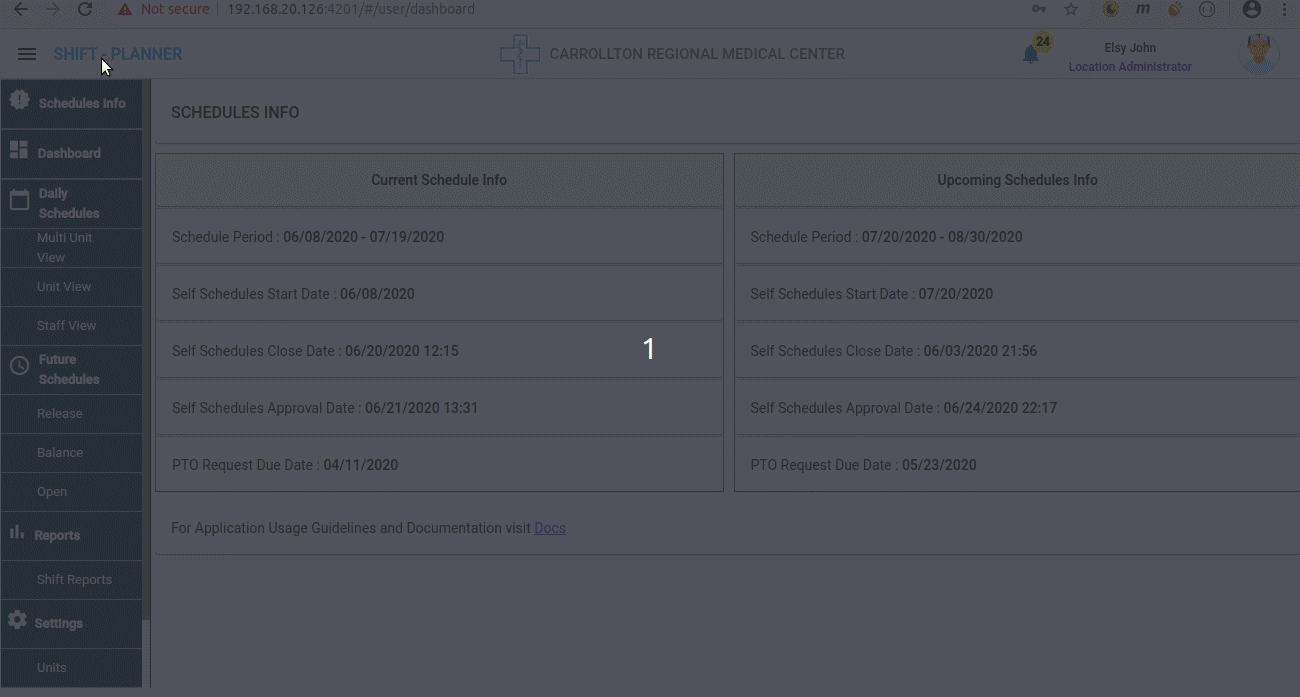
By default, the Schedules Info page is displayed to the Manager after login. This page provides information about current, upcoming and future schedules.
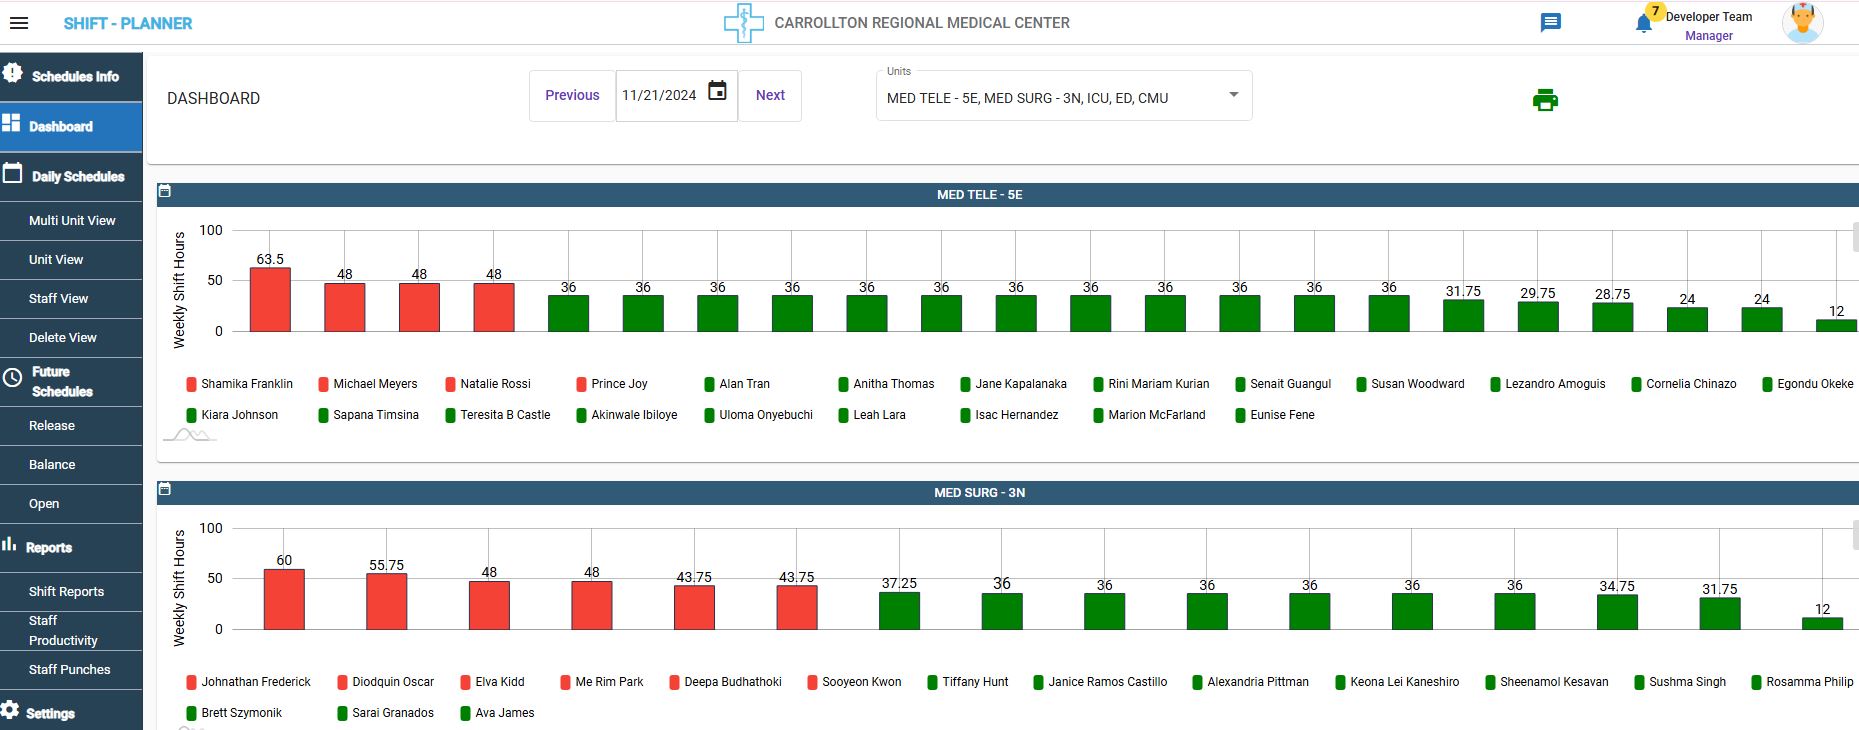
Dashboard
The Manager's Dashboard displays the following information:
- Current Week Staff:
- Shows staff in their allocated units for the current week.
- Total Opted Hours:
- Displays total hours opted by staff for the current week.
- Hours exceeding 40 hours are highlighted with red bars for easy identification.
Future Schedules
The Future Schedules menu provides Managers with options to:
- Release schedules.
- Balance schedules.
- Release open shifts and award them to staff.
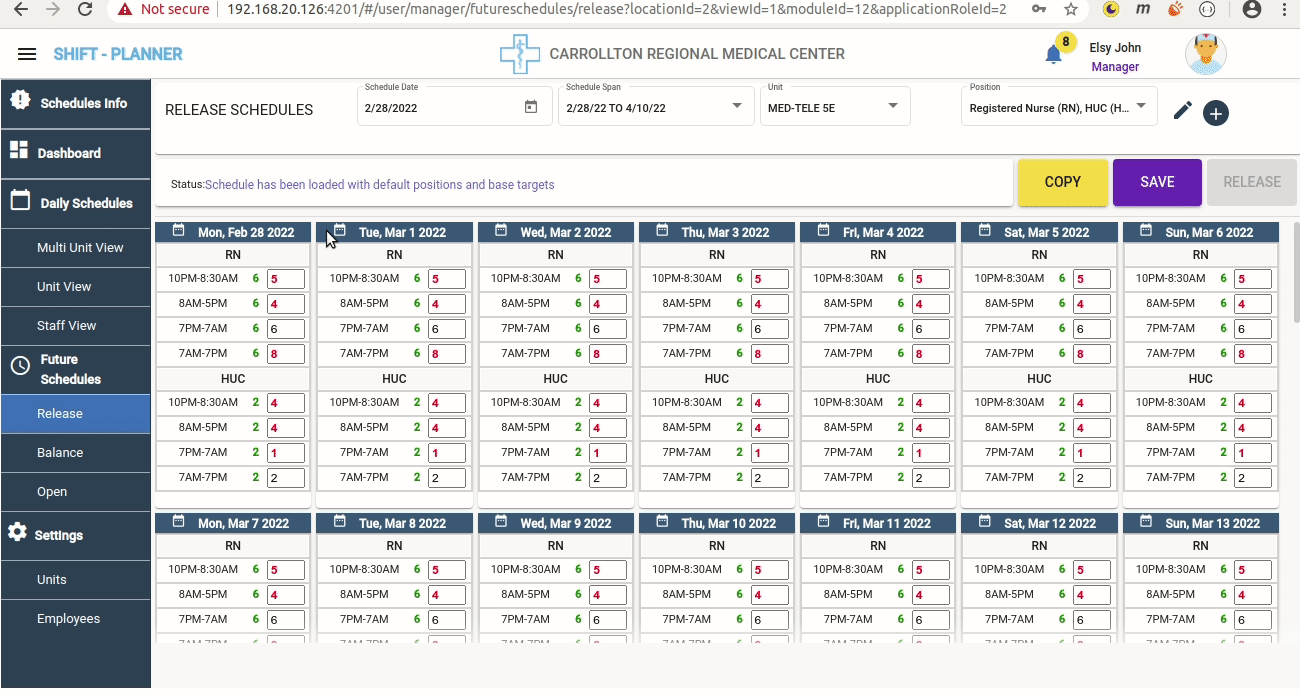
Release Schedules
To see release schedules screen, click on the Release option under Future Schedules. The following screen will appear:
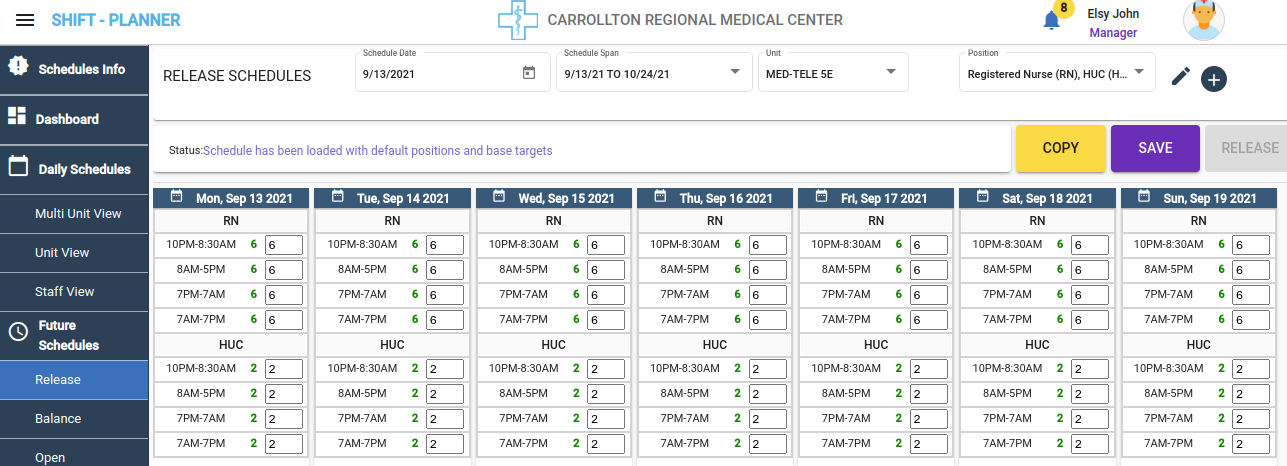
Steps for Releasing Schedules:
- After clicking the Release menu, the above screen appears on the right side.
- The top row of the screen contains:
- Schedule Period: Select the target schedule period.
- Unit Dropdown: Select the unit for which schedules will be released.
- Position Dropdown: Displays available positions configured under unit settings.
- Managers can uncheck any positions not required for the current release.
- Status Message: Displays the release status of the selected schedule (e.g., released, not released, or saved).
-
Action Buttons:
-
Copy Button: Opens a pop-up to copy position targets to other schedules.
- The schedule consists of 6 weeks with 7 days in each week.
- Managers often need to repeat the same number of positions for every day in the schedule.
- Using the Copy Button, Managers can modify the positions for one date.
- The values from the selected date can then be copied to all other dates in the schedule, saving time and effort.
- This is especially helpful for adjusting position counts beyond the default configuration.
- Check the following video:

-
Save Button: Saves the position counts.
- Managers can edit counts multiple times before releasing schedules.
- The latest saved counts are finalized during the release.
- Release Button: Releases the schedules.
- Staff can only request self-schedules after the Manager clicks this button for the target unit.
-
NO MODIFICATIONS AFTER RELEASE
After clicking the Release Button, Managers cannot make any modifications to the released schedule.
Please refer to the following video for the Schedules Save and Release actions:
Post-Release Actions
- Once schedules are released, staff can apply for self-schedules for up to 2 weeks (this duration is configurable).
- After the self-schedule period, the Manager will balance and approve the applied schedules.
- For more details, refer to the Balance Schedules section.
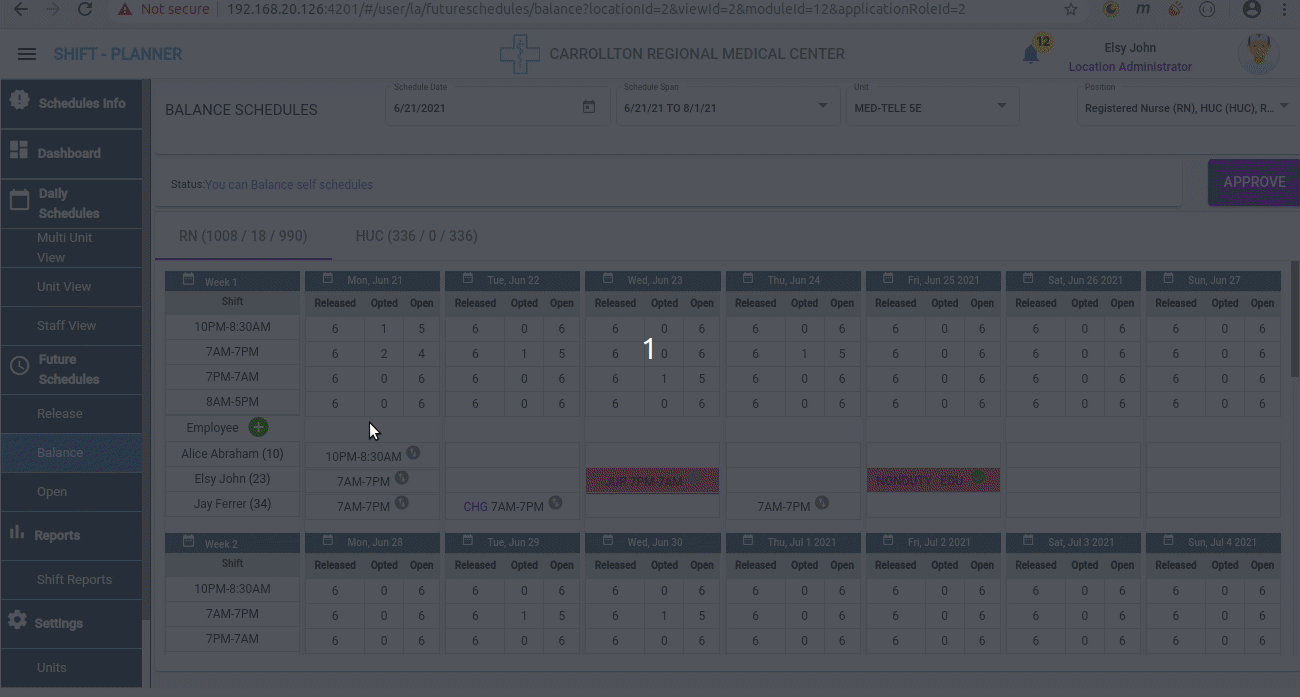
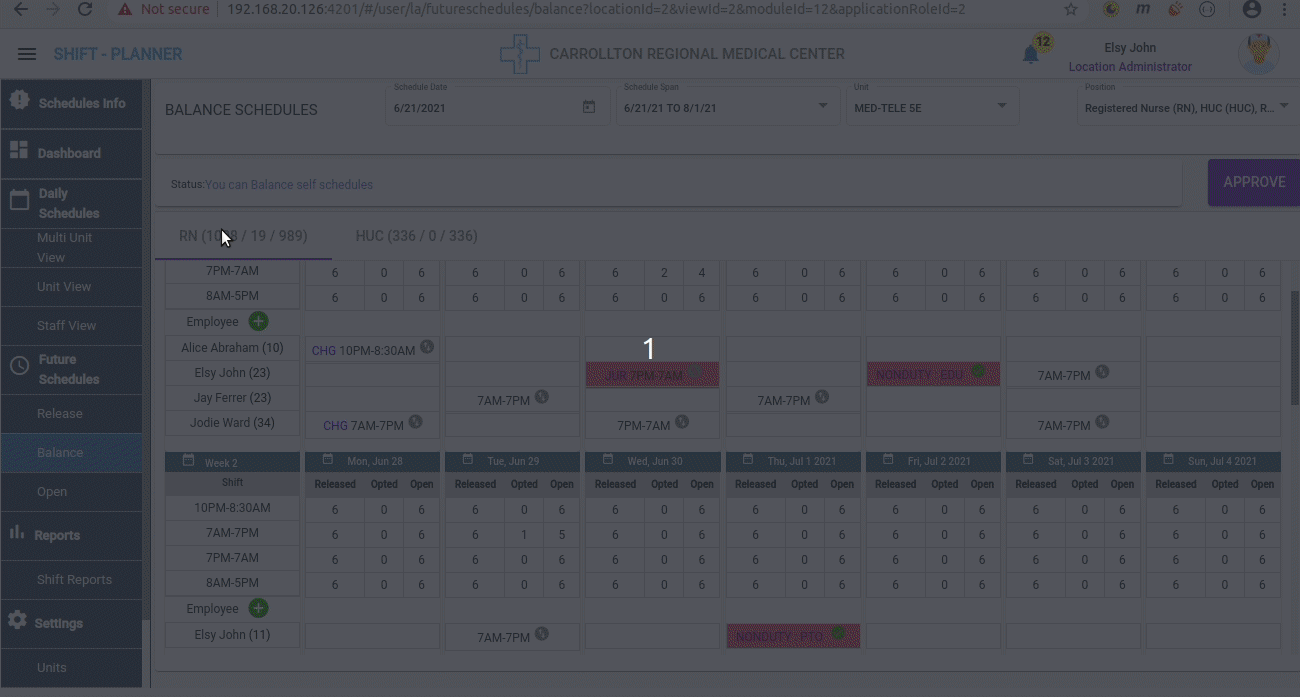
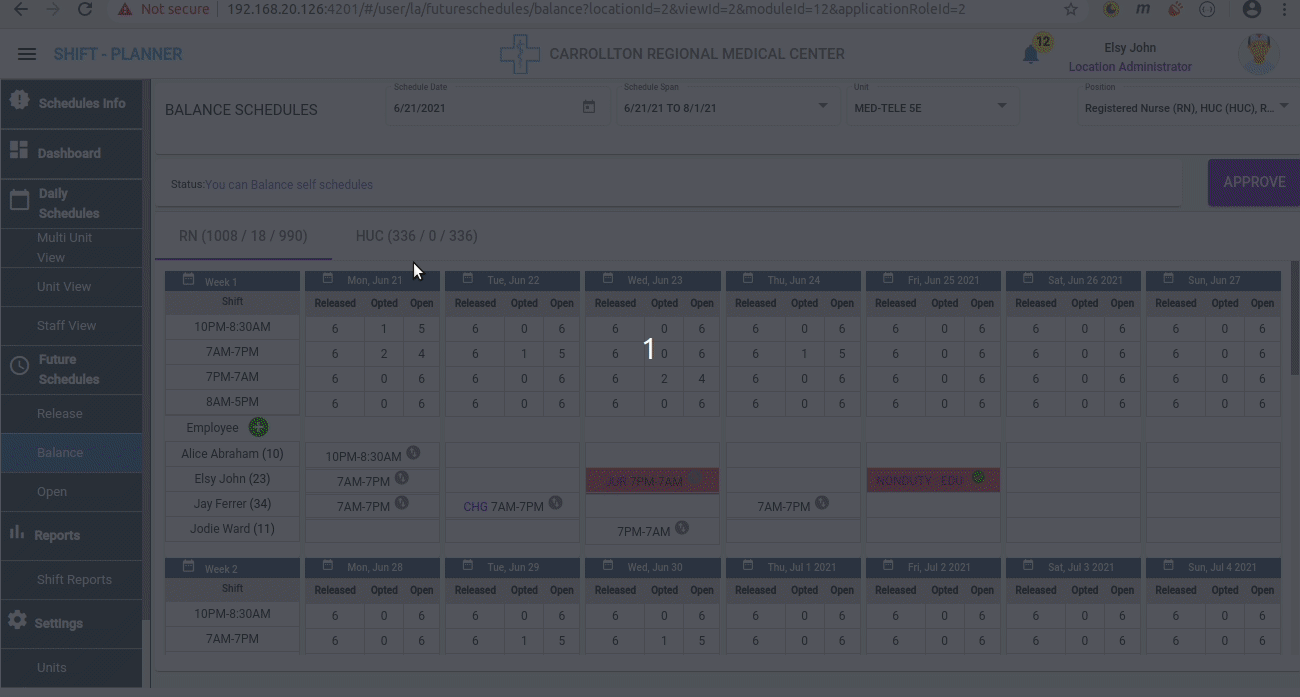
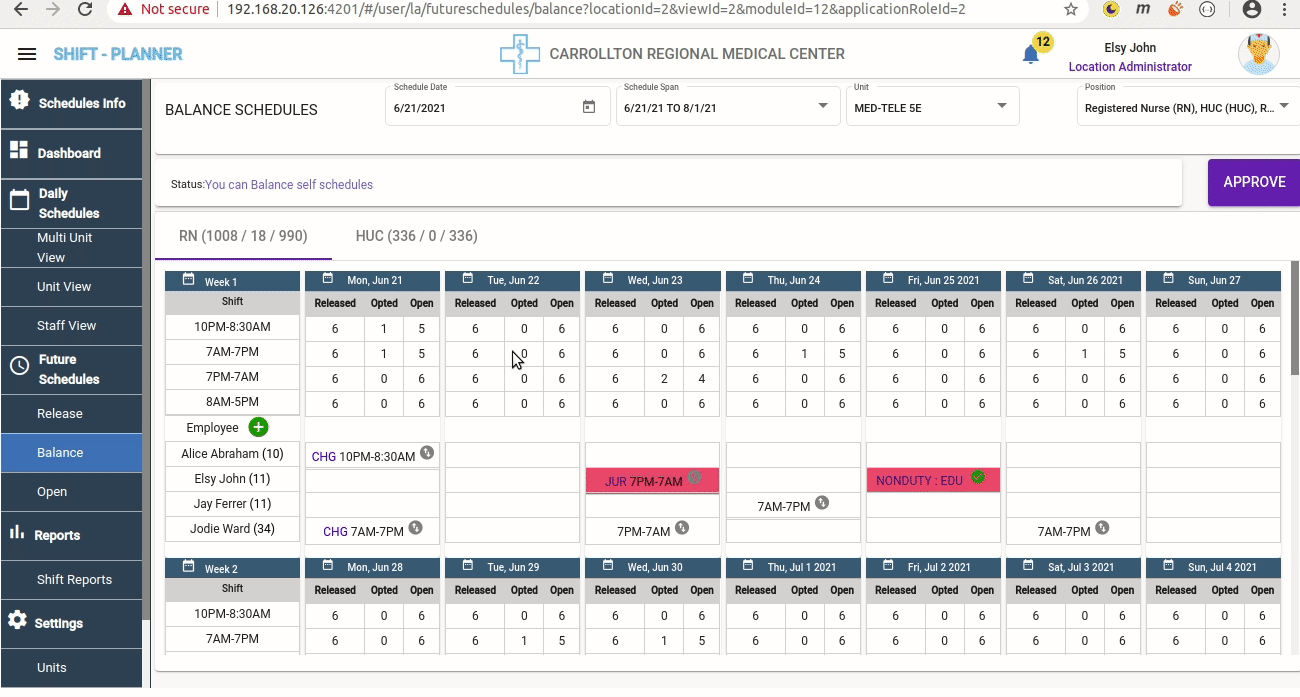
Balance Schedules
To balance and approve self-schedules applied by staff, click on the Balance menu under Future Schedules.
Here is the Balance Schedules screen:
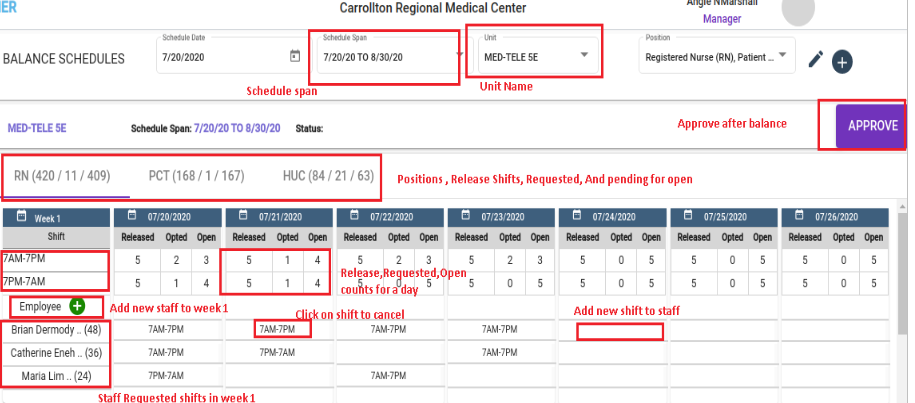
Info:
Balancing can only be performed by the Manager after the self-schedule time period is over. Until then, Managers can view all staff requests on this screen.
Actions in Balance Screen
Add Employee
- On the left, above the employee names for the week, there is a + option.
- Clicking this allows Managers to add a new employee to the schedule.
Add New Shift to Employee
- Managers can add a new shift for an existing employee by clicking on a white cell in the grid.
- Select the employee row and the required date column to choose a cell.
- A pop-up will appear to assign the required shift.
Edit or Cancel Shift for Employee
- To edit or cancel a shift, click on the shift name in the cell.
- A pop-up will appear for editing or canceling the shift.
Float Shift
- To move (float) a shift, click the arrows icon beside the shift name.
- Then, click on the desired white cell in the grid to float the shift to the new position.
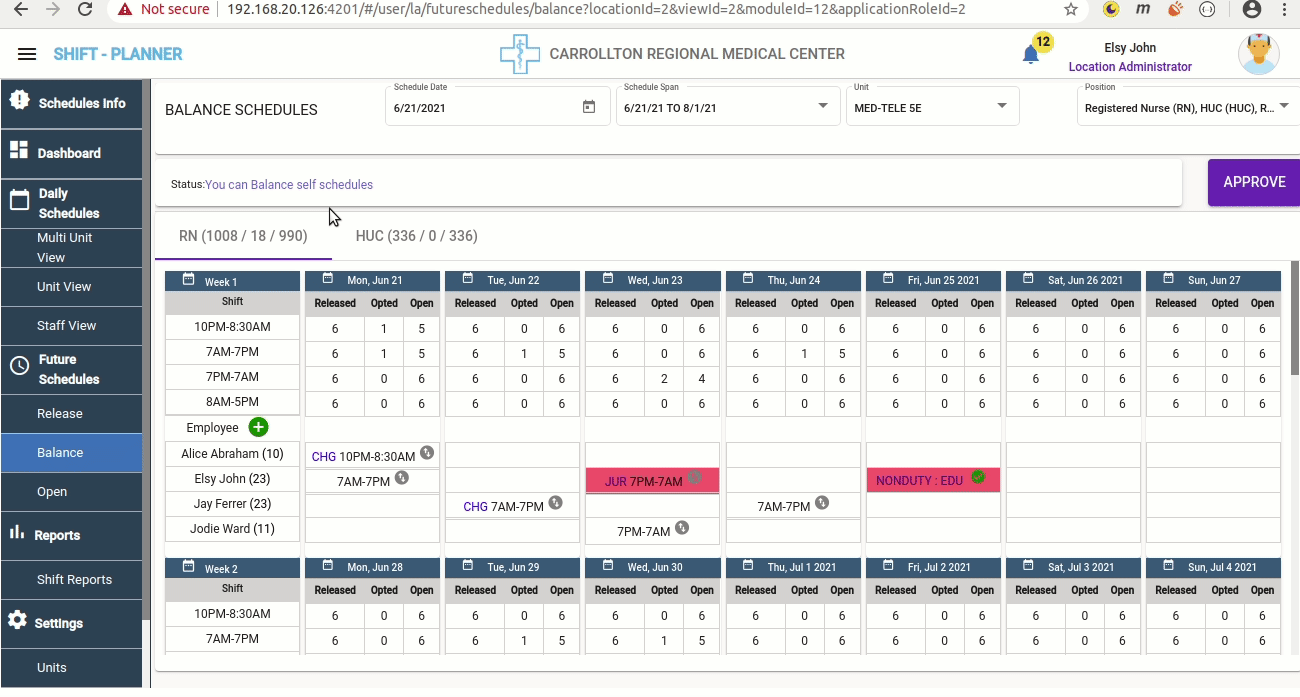
Approve or Reject Non-Duty Requests
- Managers can approve or reject Non-Duty Days by clicking on the Non-Duty cell for the corresponding employee.

Approve All Schedules
- After making the necessary changes to the schedules, Managers can click the Approve button at the top of the screen.
- This action confirms all schedules on the Balance screen.
Warning
Managers can approve schedules multiple times until the Approval Close Date.
Once the close date passes, all schedule editing options will be disabled.
Managers must click the Approve button at least once to confirm self-schedules.
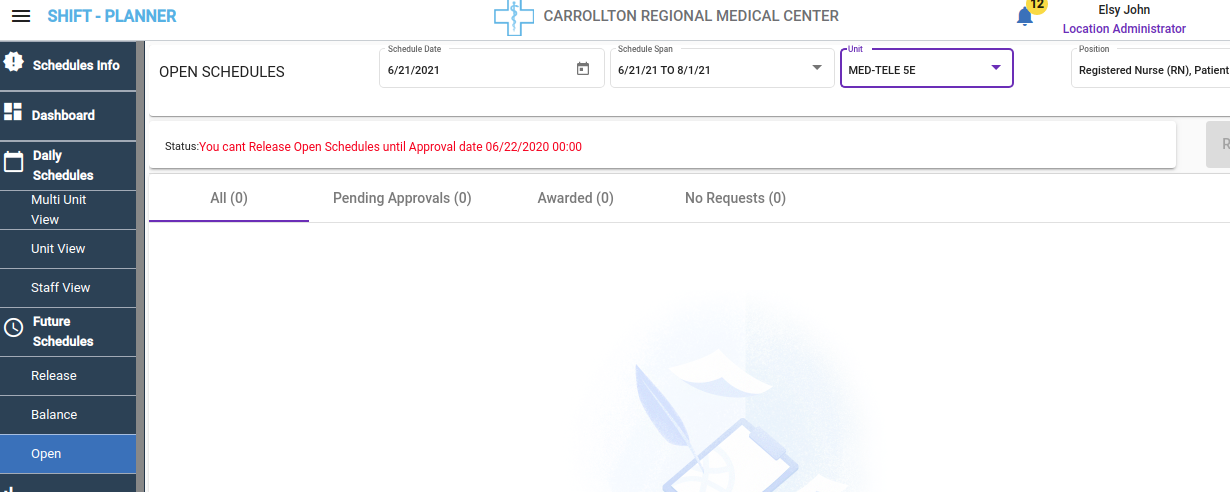
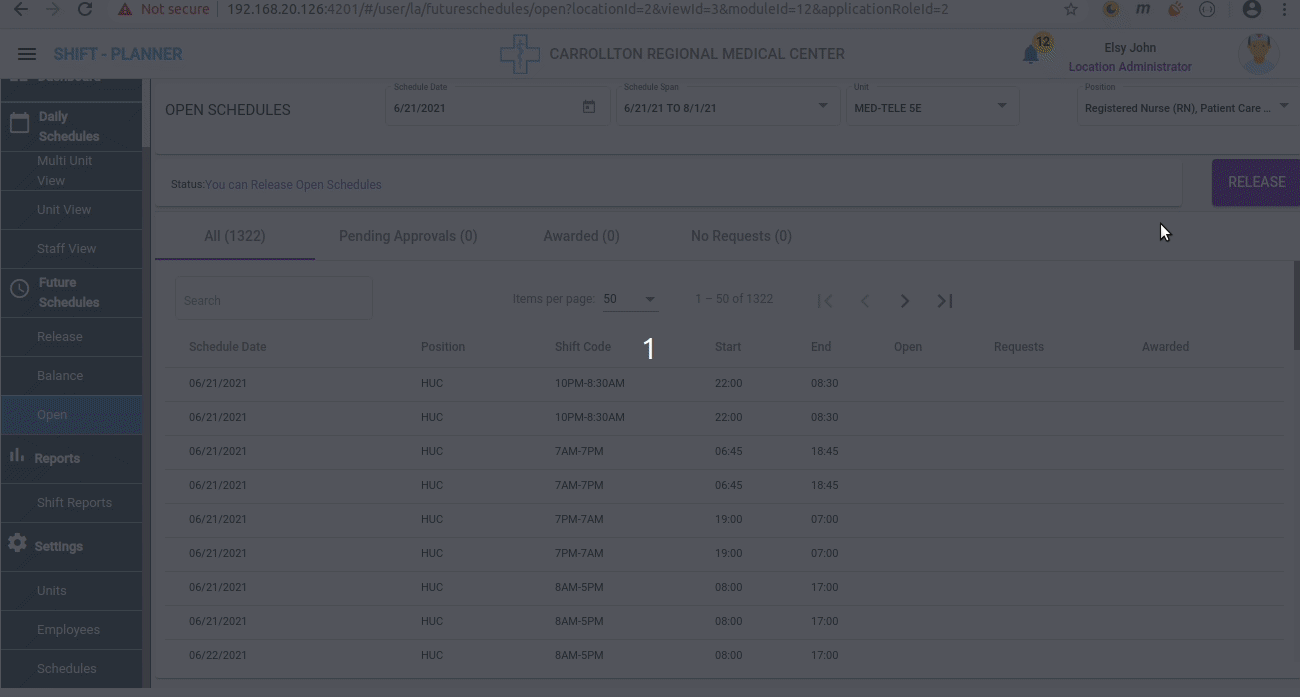
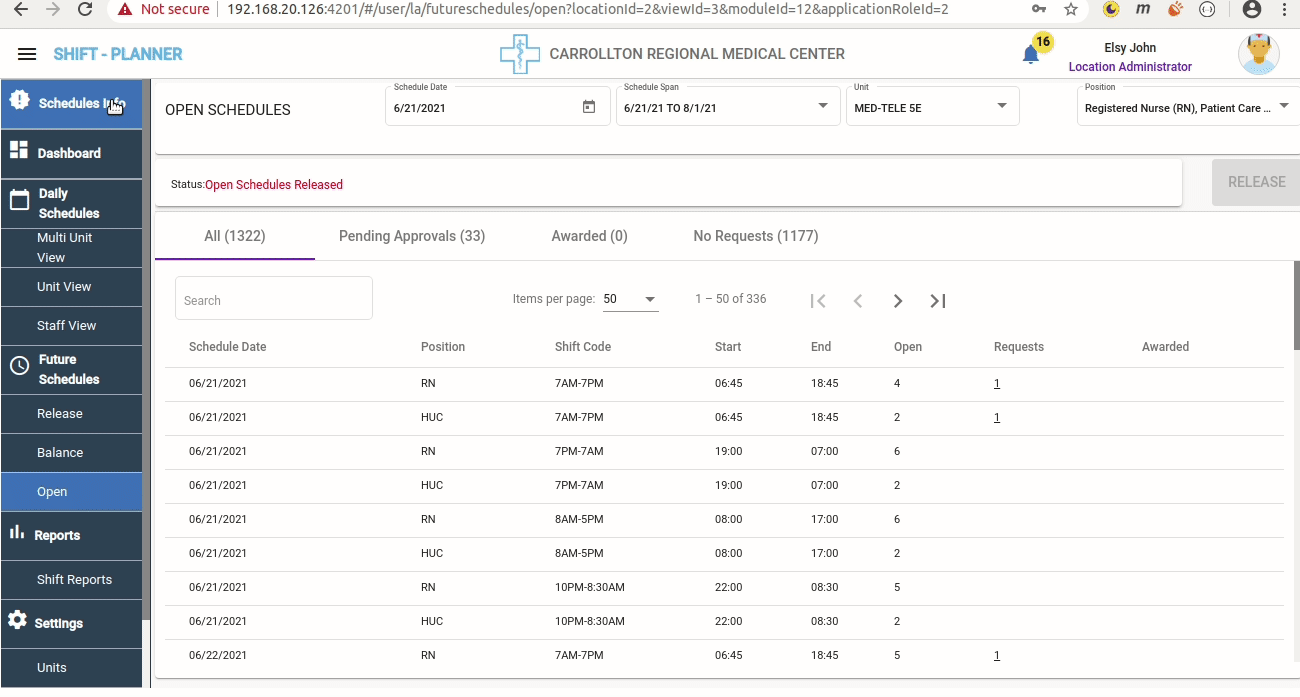
Open Schedules
After the approval of Balance Schedules, Managers can release the remaining open shifts that were not opted for or approved in self-schedules. These open shifts are made available for staff to request.
To access the Open Schedules screen, navigate to:
Future Schedules → Open
Open Schedules Workflow
- Select the schedule range and unit for which open schedules need to be released.
- Check the status message bar:
- Indicates whether the open schedules are released or if balancing is still in progress.
- Once the balance date is over, the Release button will be enabled. Managers can then click on the Release button to release open positions to staff.
Before Balance Date Example
Before the balance date is due, the Open Schedules screen shows the following status message:
Release Open Schedules
After the balance date has passed, Managers can view open shift details, and the Release button will be activated.
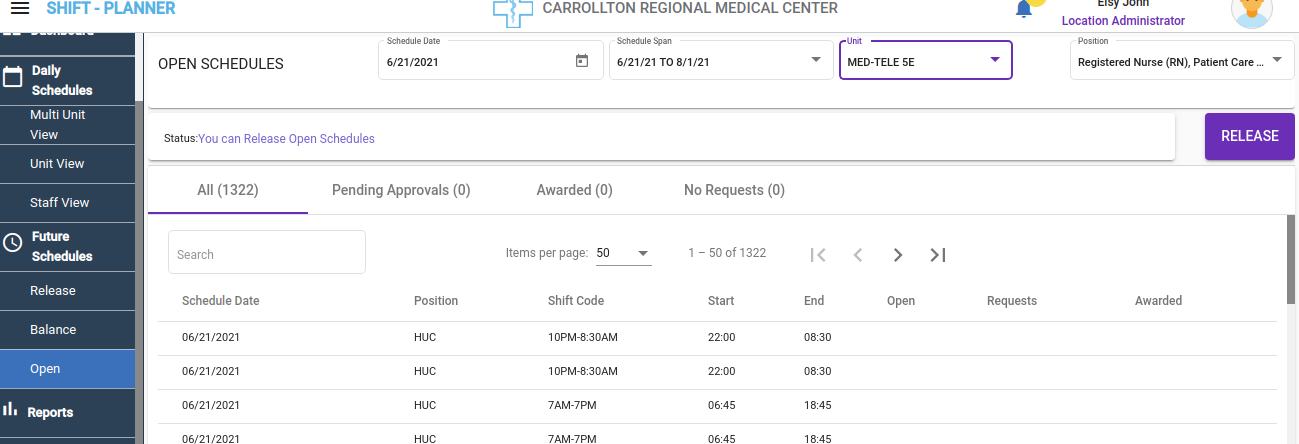
Clicking the Release button will release all open schedules to staff:
Warning
Staff can see open shifts on their screen only after the Manager clicks the RELEASE button, as shown in the video above.
Open Schedules Page Tabs
-
All Tab:
Displays all open positions initially released, even after awarding those shifts. -
Pending Approvals Tab:
Shows open shifts with at least one request from staff, which are not yet approved or canceled by the Manager.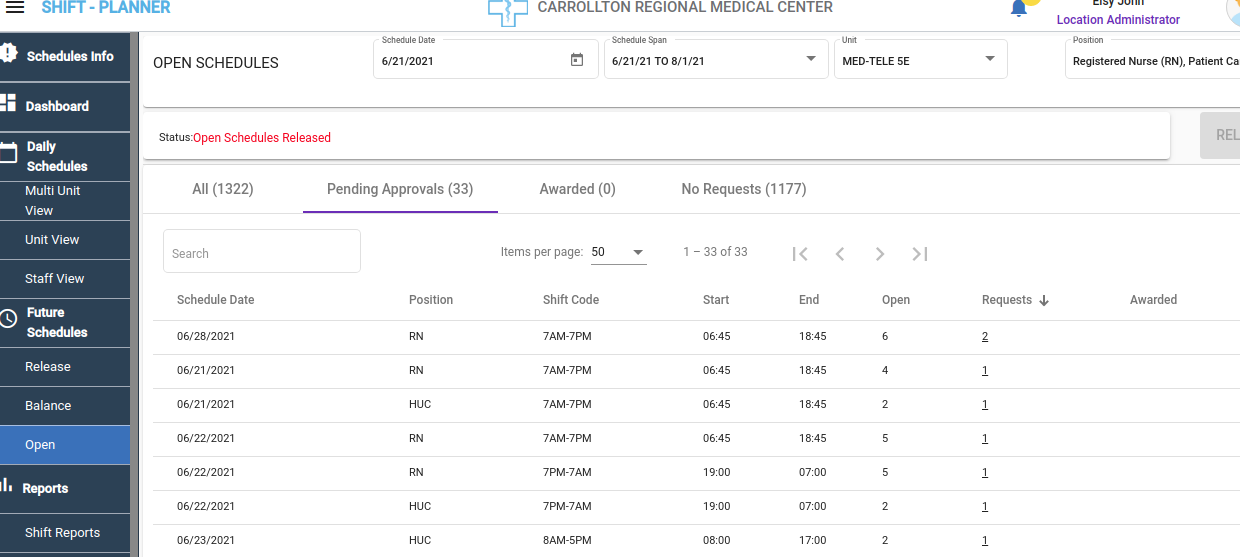
-
Awarded Tab:
Displays all shifts that have been awarded to staff. -
No Requests Tab:
Shows open shifts that have not received any requests from staff.
Awarding Open Schedule Requests
- Navigate to the Pending Approvals Tab.
- Select the shift you wish to approve and click on the Requests column (underlined).
-
A pop-up window appears with the following details:
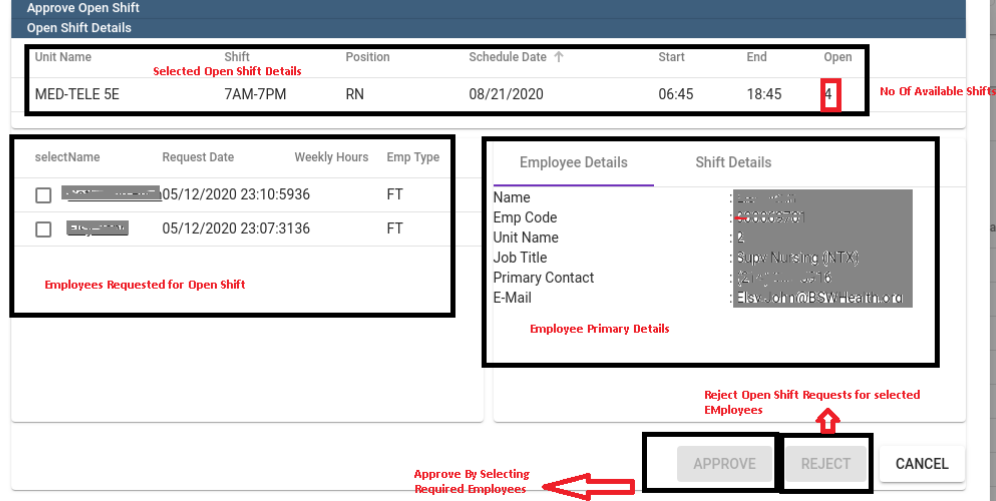
- Shift Details: Displays selected open shift details and the number of available open slots.
- Employee Requests:
- Shows staff who requested the open shift.
- Displays confirmed shift hours for the employee in the same week as the open shift.
- Employee/Shift Details: Displays the employee's confirmed shifts for the same week.
-
Select the employee(s) to approve or reject the open shift request:
- Check the box beside the employee's name.
- Click Approve or Reject at the bottom of the pop-up.
- If the open shift has multiple slots, you can approve or reject requests for multiple employees at once.
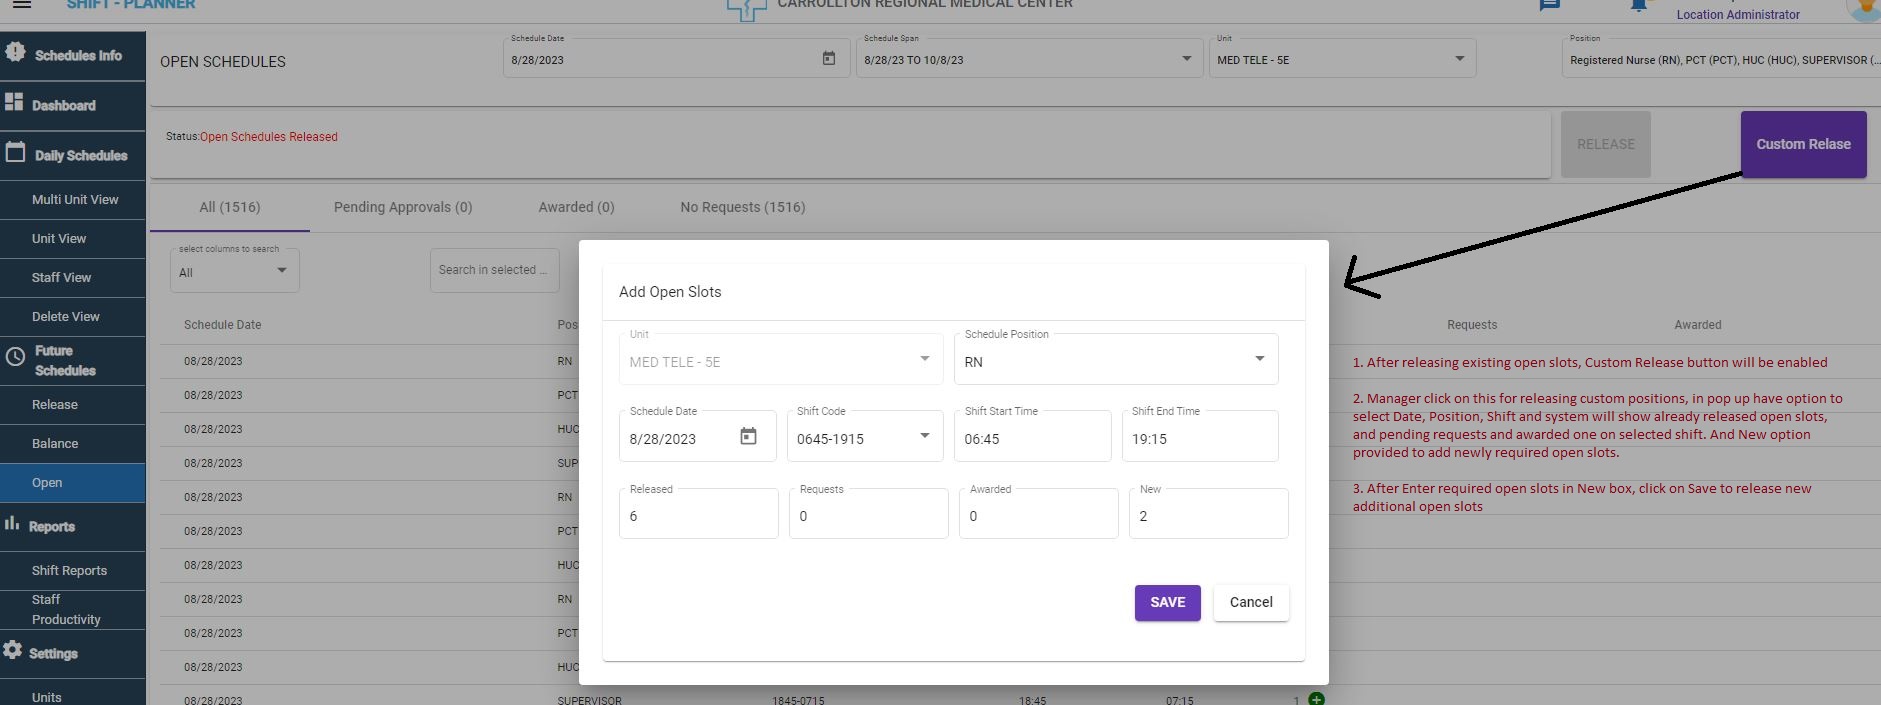
Custom Open Schedules Release
-
Introduction The Custom Release feature allows Managers to add custom open schedule slots after releasing the existing open schedules.
-
Enabling the Custom Release Button
- Located beside the Release button.
- Becomes enabled only after the existing open schedules are released.
-
Using the Custom Release Option When clicked, a pop-up appears where Managers can:
- Select Position, Schedule Date, and Shift.
- View: - Already existing open slots. - Pending requests. - Awarded shifts count.
- Enter the required number of custom slots.
-
Updating Custom Slots
- Click the Save button to add the new slots.
-
Increasing Open Slots
- Click the + button beside the open slot count to increase slots for a specific position, date, or shift.
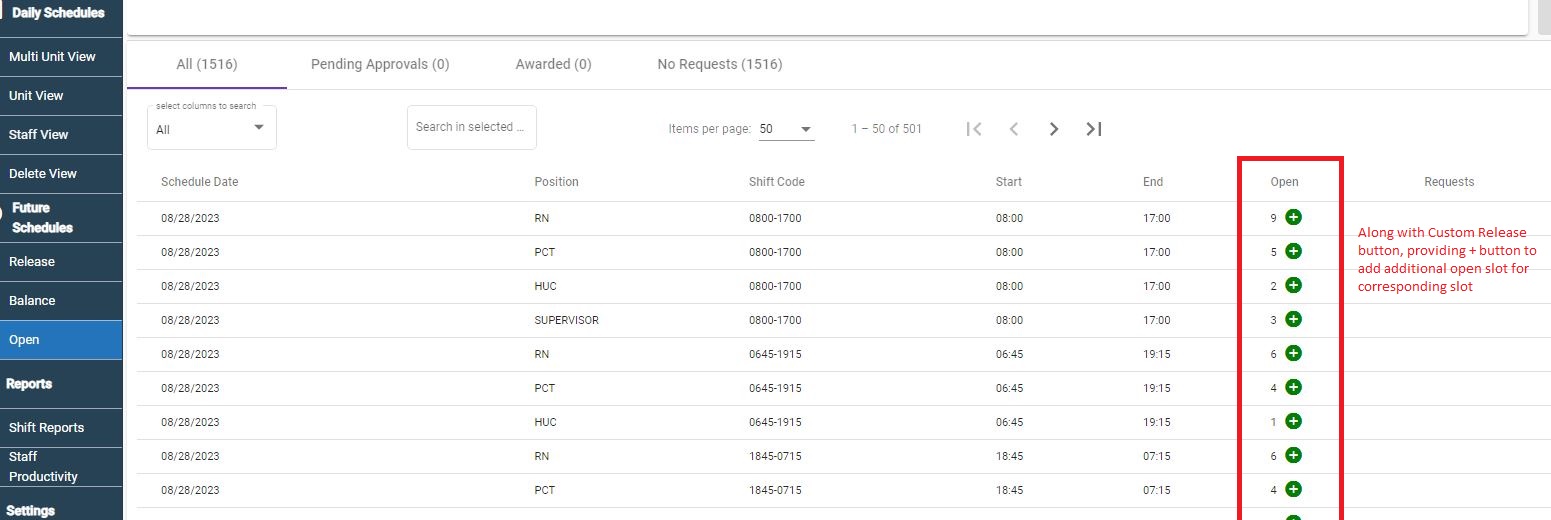
- Click the + button beside the open slot count to increase slots for a specific position, date, or shift.
-
Note: No Deletion of Custom Added Shifts
- Custom shifts cannot be deleted once added.
Open Shift Approval or Rejection Video
Watch the following video for details on approving or rejecting open shift requests:
Daily Schedules
This section displays finalized staff schedules at the day and unit levels.
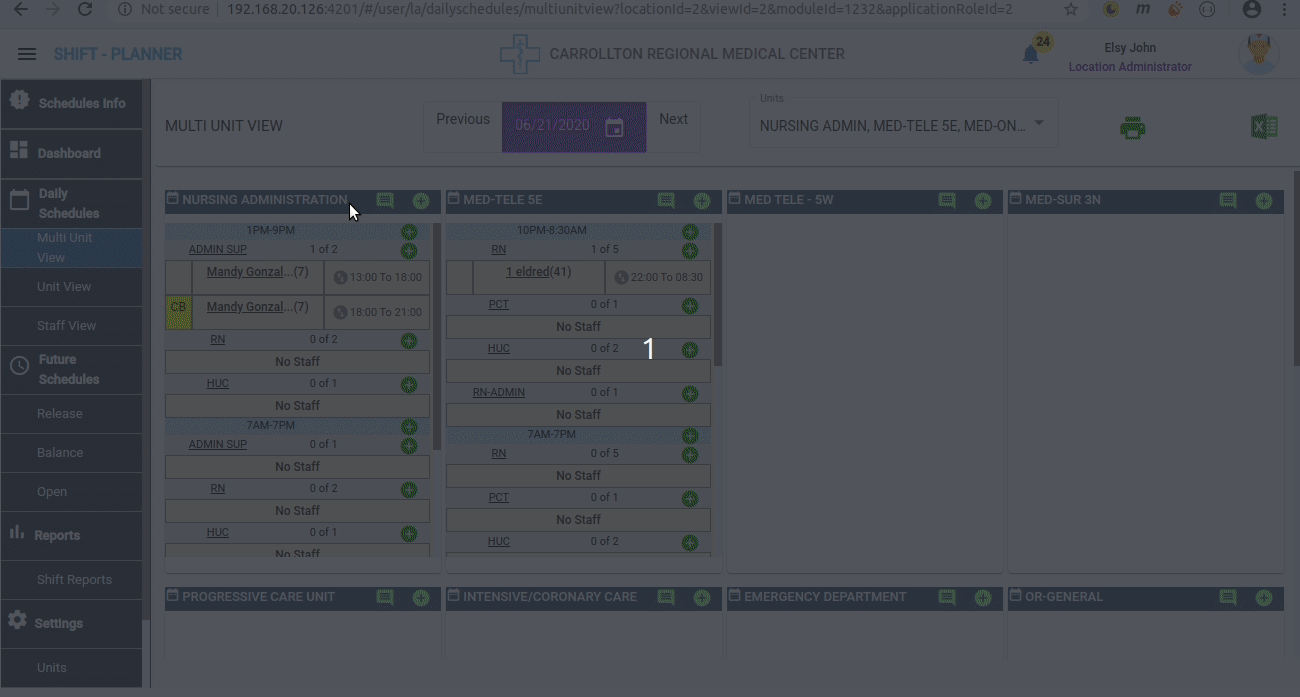
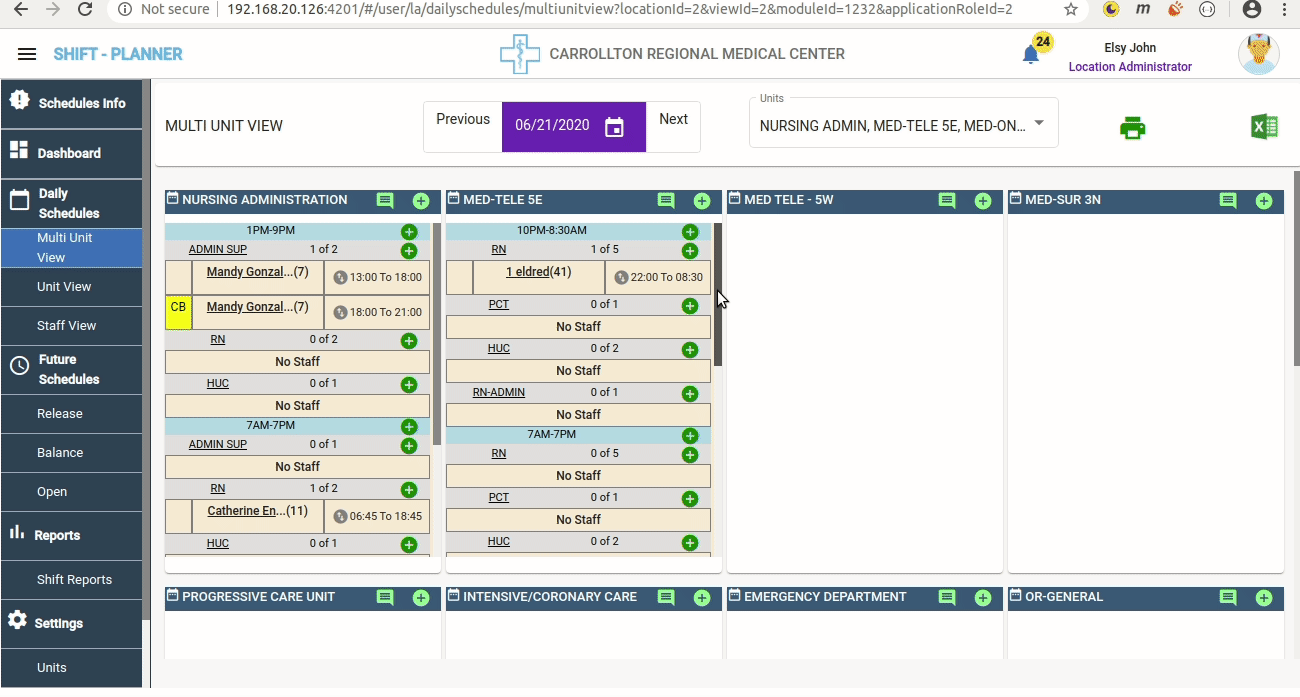
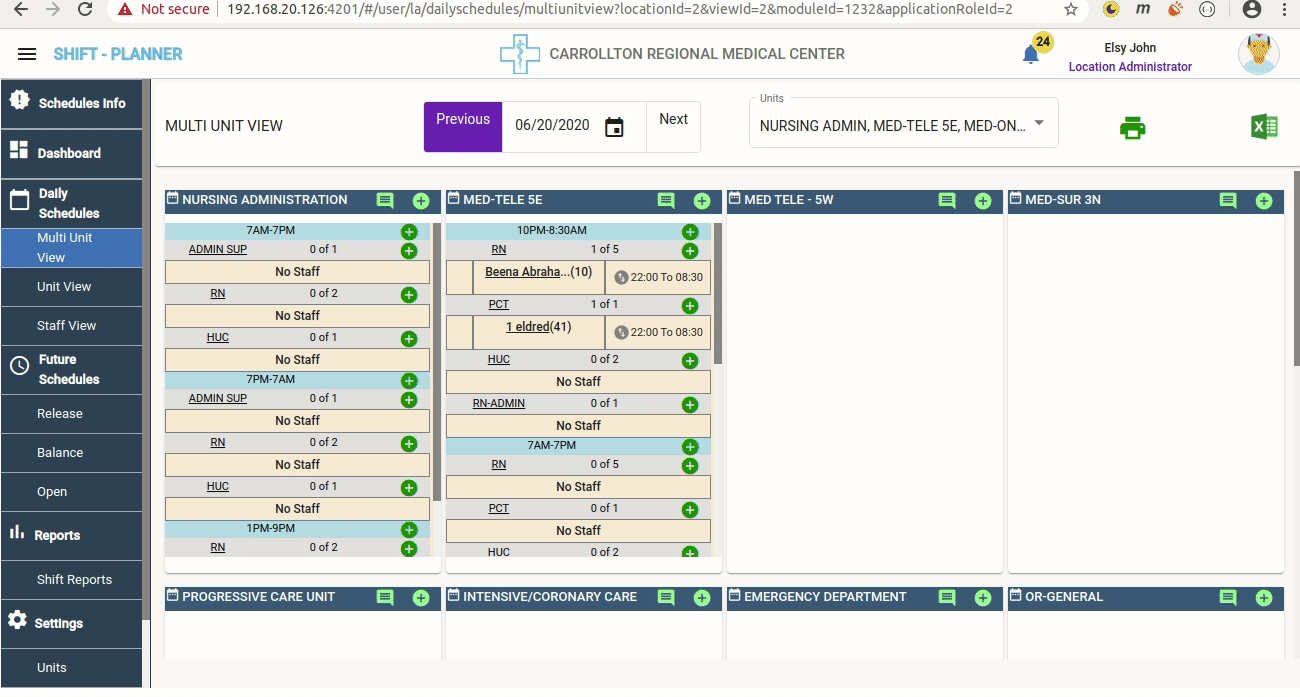
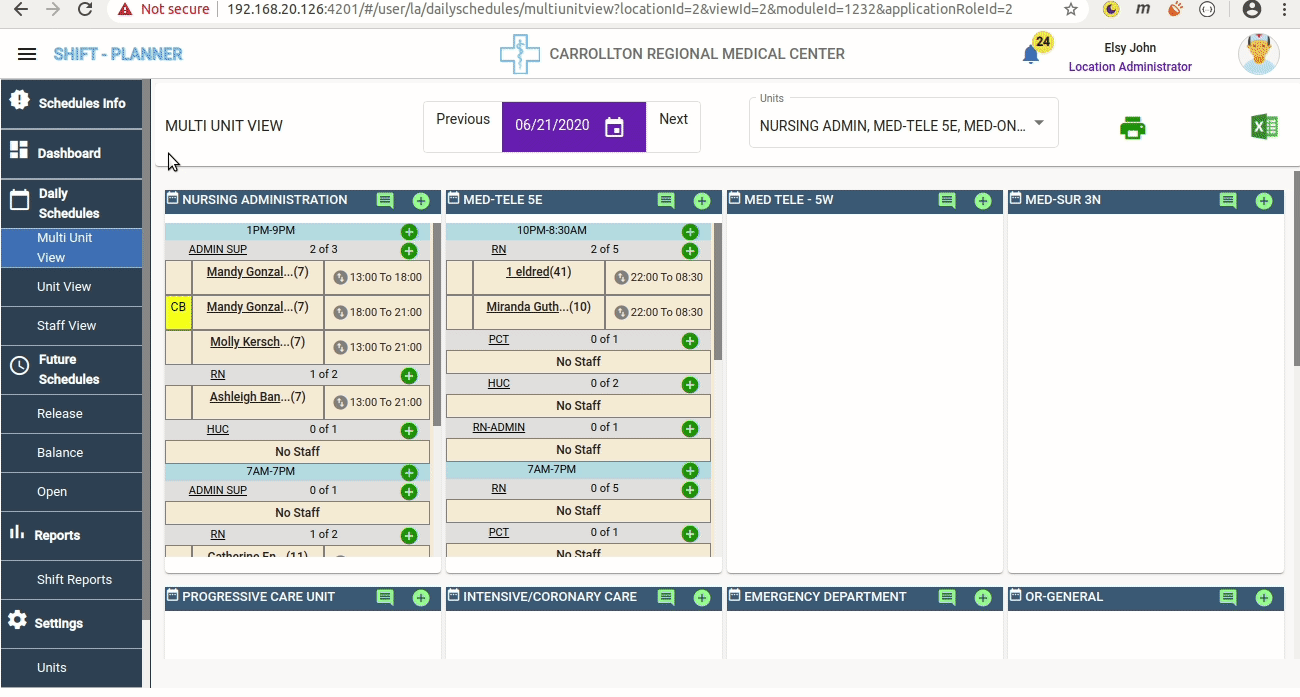
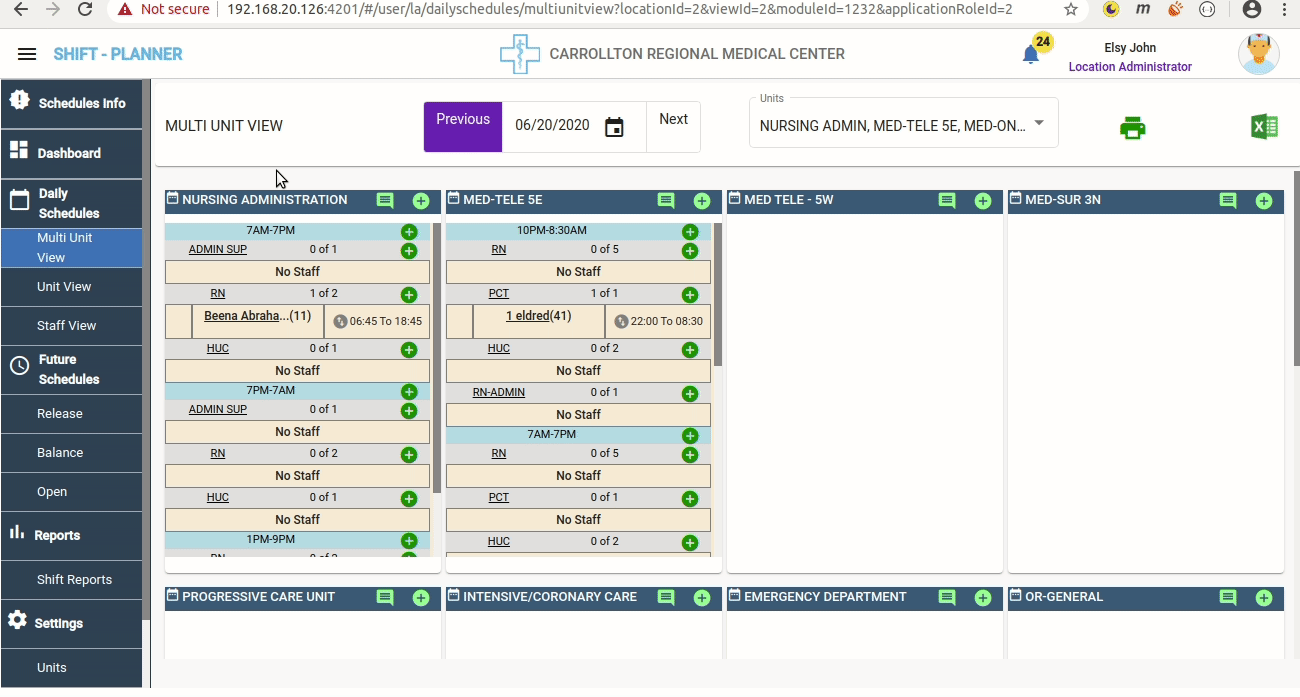
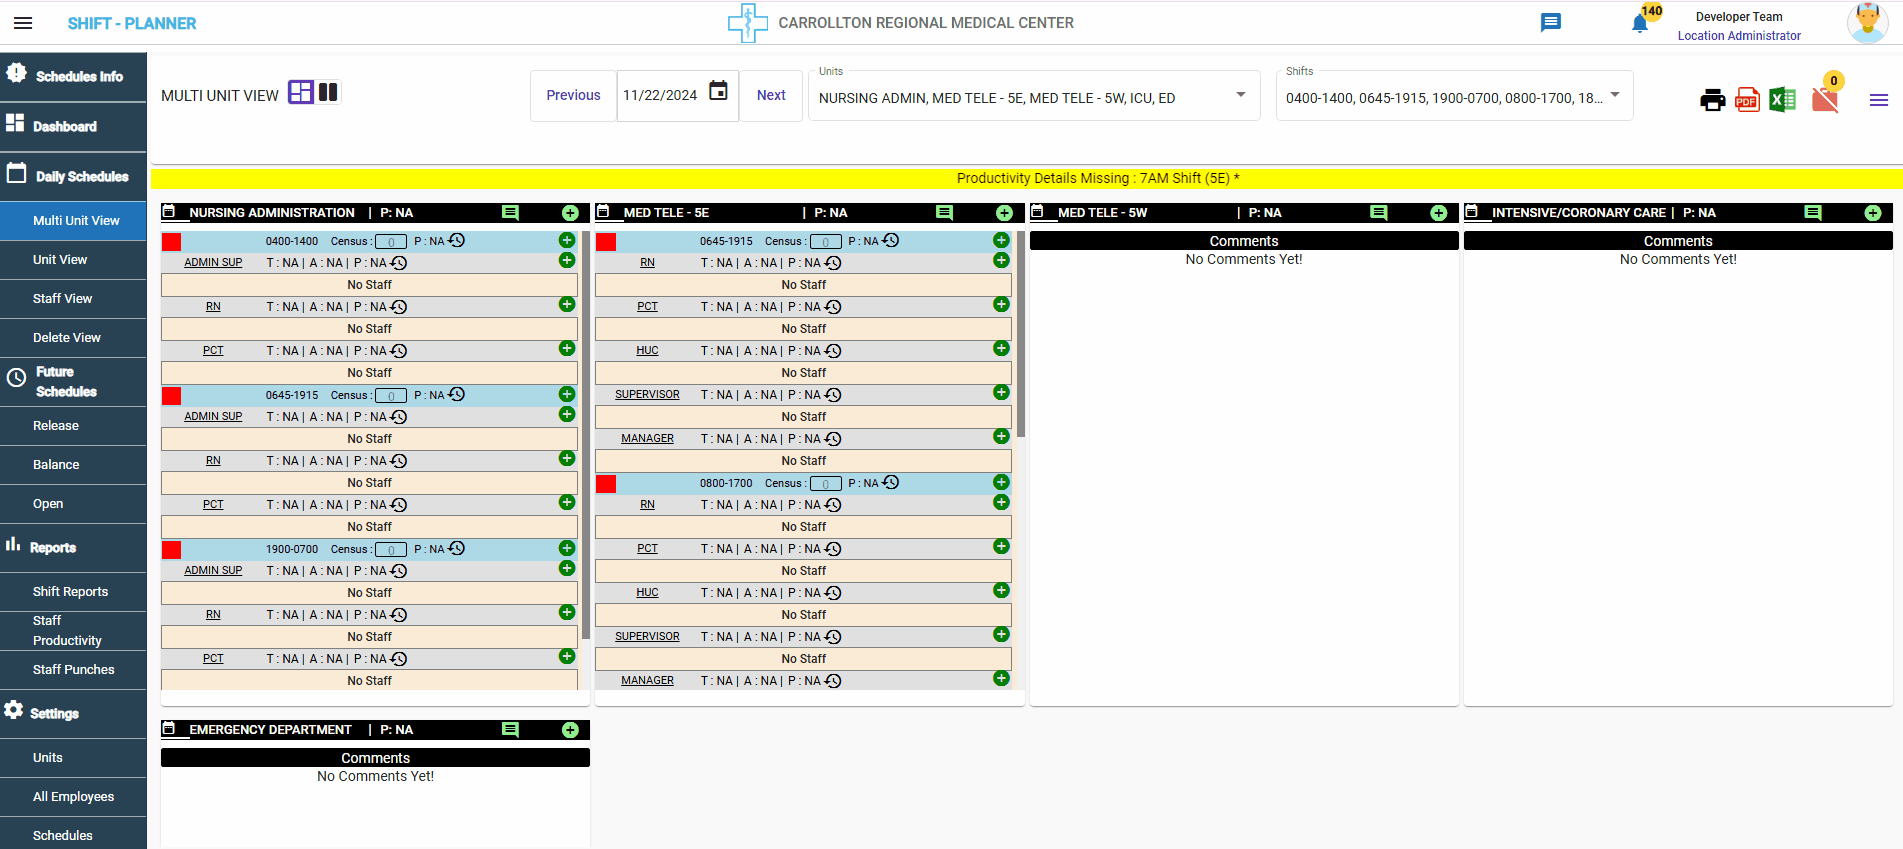
Multi Unit View
Navigate to Daily Schedules → Multi Unit View to see all staff schedules for the selected date and units.
- On the top of the Multi Unit View screen, the following options are available:
- Select Date: Choose the required date (default is the current date).
- Units Dropdown: Displays all accessible units for the Manager. Managers can check or uncheck units to view schedules as needed.
- Print Option: Print selected unit schedules in PDF format.
- Excel Download Option: Download all unit schedules for the selected dates in Excel format.
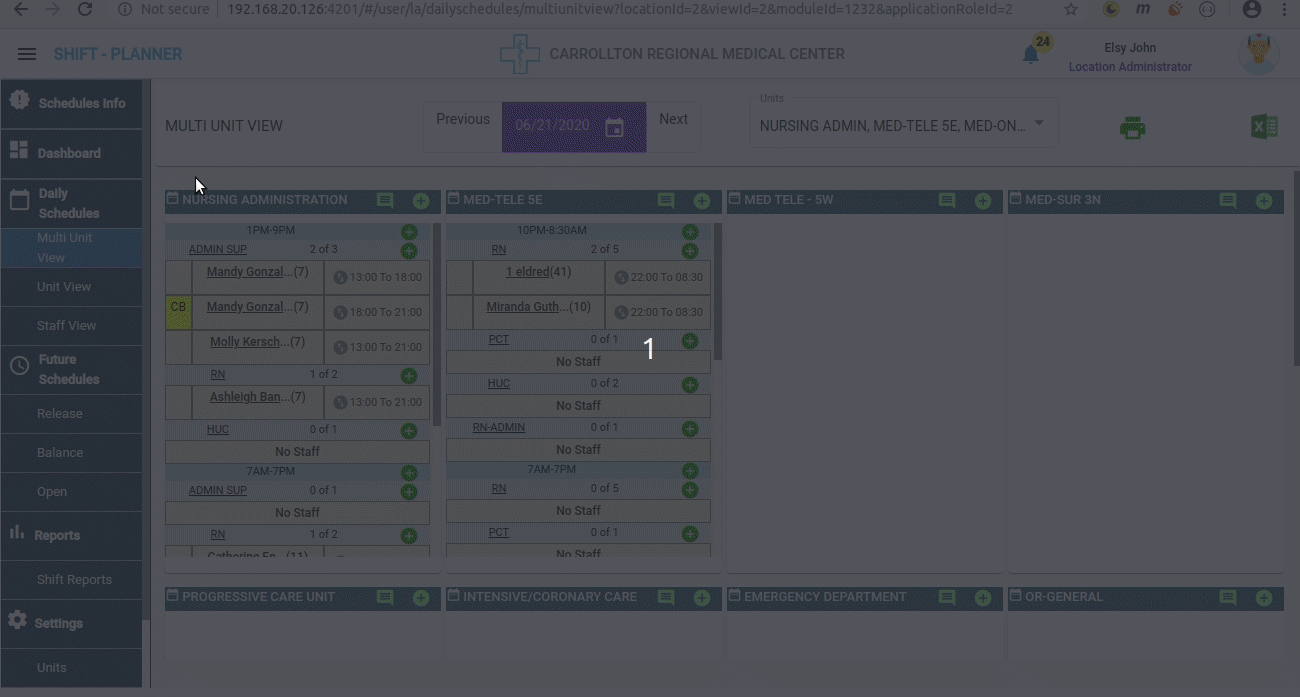
Adding Staff to Shifts
In the Multi Unit View, staff can be added to shifts in the following ways:
-
Add Staff from Unit Level:
- Click the + icon beside the unit name at the top to add a shift for staff.
- Managers can add any position (even unreleased) and any shift to any staff.
-
Add Staff from Shift Level:
- Click the + icon beside the shift name in each card to add staff to that specific shift with one of the released positions.
- Click the + icon beside the shift name in each card to add staff to that specific shift with one of the released positions.
-
Add Staff from Position Level:
- Click the + icon beside the position name to add staff directly to the selected position.

- Click the + icon beside the position name to add staff directly to the selected position.
Editing Staff Shifts
Managers can edit staff shifts by clicking on the staff name. The following actions are available:
- Change shift type and sub-types.
- Split the shift into sub-shifts.
- Cancel the entire shift.
- View the complete Staff Calendar.
Edit/ Extend staff shift :
Managers can Extend staff shift end time.
- If No Sub shifts are present for a shift, Manager can directly edit End Time and save.
- If Sub shifts are present, Delete sub shifts and modify End Time. Now do split shifts again.
Staff Calendar View:
Adding and Printing Comments to Units
Managers can add comments to a unit by clicking the message icon beside the unit name. These comments will also be included in the print view.
Floating Staff Shifts
To move a staff shift from one cell to another, click the arrows icon beside the shift time. Then, select the target cell.
Check Audit Log for the Shift
Administrators/Managers can review the complete audit log for a shift, starting from the initiation of self-scheduling to the day the schedule is closed. The audit log includes details about:
- Changes made, such as splitting shifts, updating shift type or sub-type.
- Cancellations and any other modifications.
For more details, check the following video:
Staff Names Colors Legend
In the Multi Unit View, staff members are displayed in different colors. These colors represent various categories of staff, such as:
- Agency Staff
- PRN (Pro Re Nata) Staff
- Seasonal Staff
- And more.
For a detailed explanation, please check the following video:
Multi Shifts Assignment
Managers can assign multiple ad-hoc shifts to staff directly from the Multi Unit View.
For more details, please check the following video:
Staff Punches Info
Managers can view detailed information about staff punches for the day, including:
- Punch In and Punch Out times.
- Variance and other relevant details.
For more information, please check the following video:
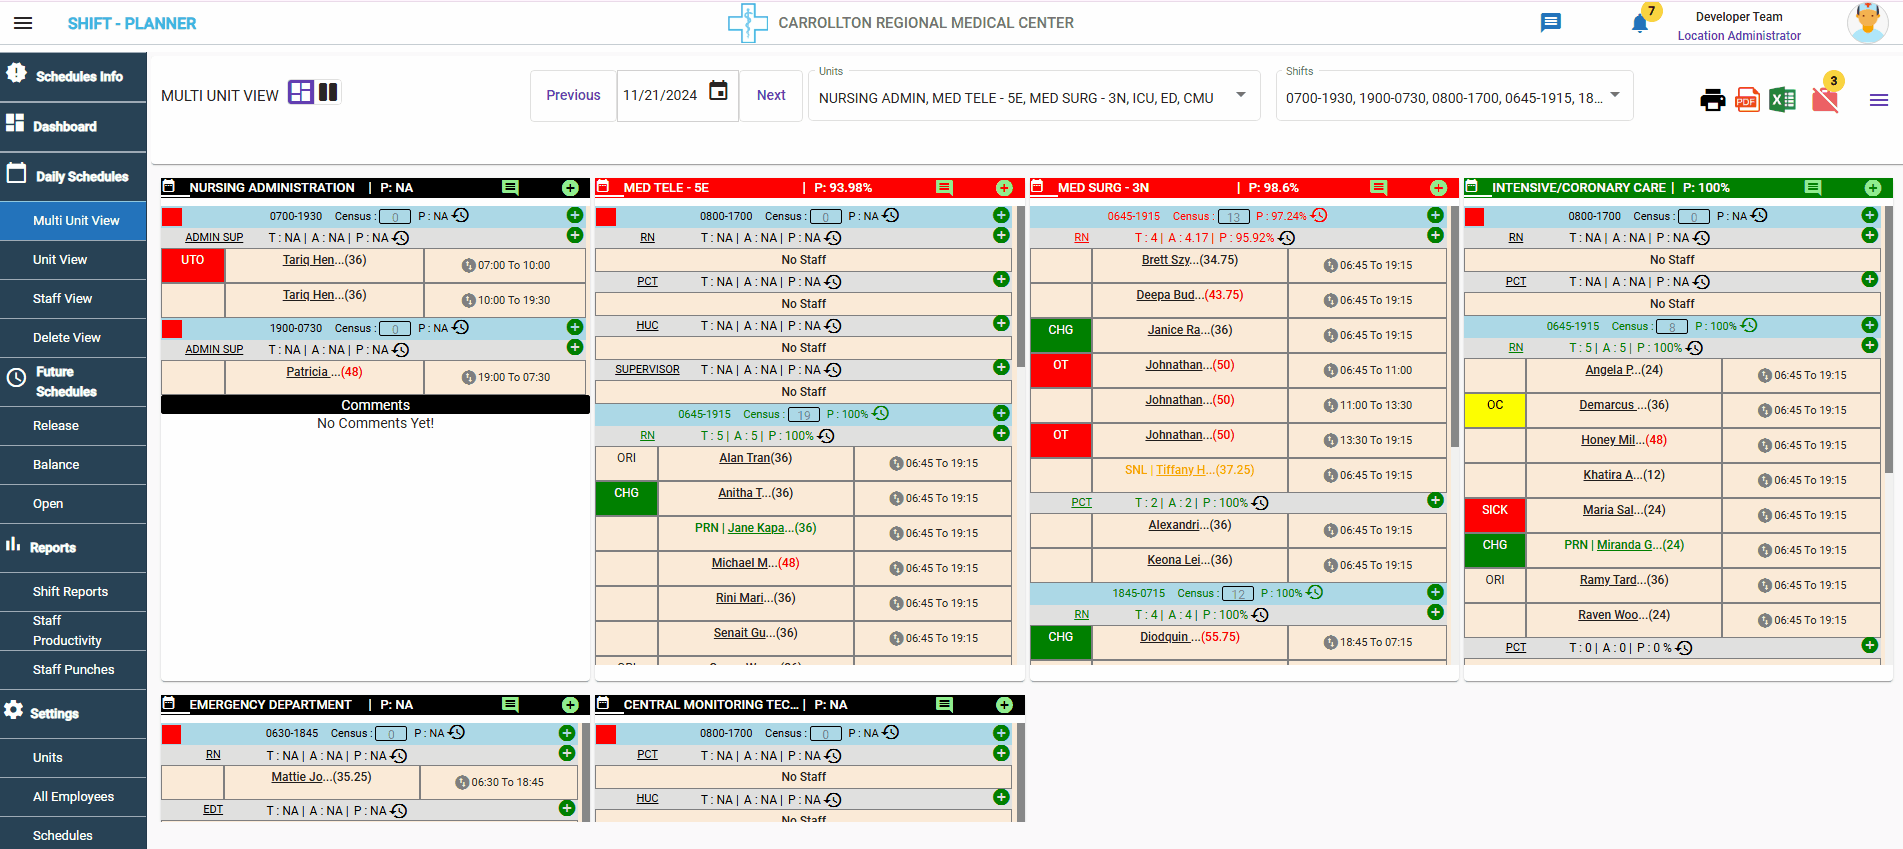
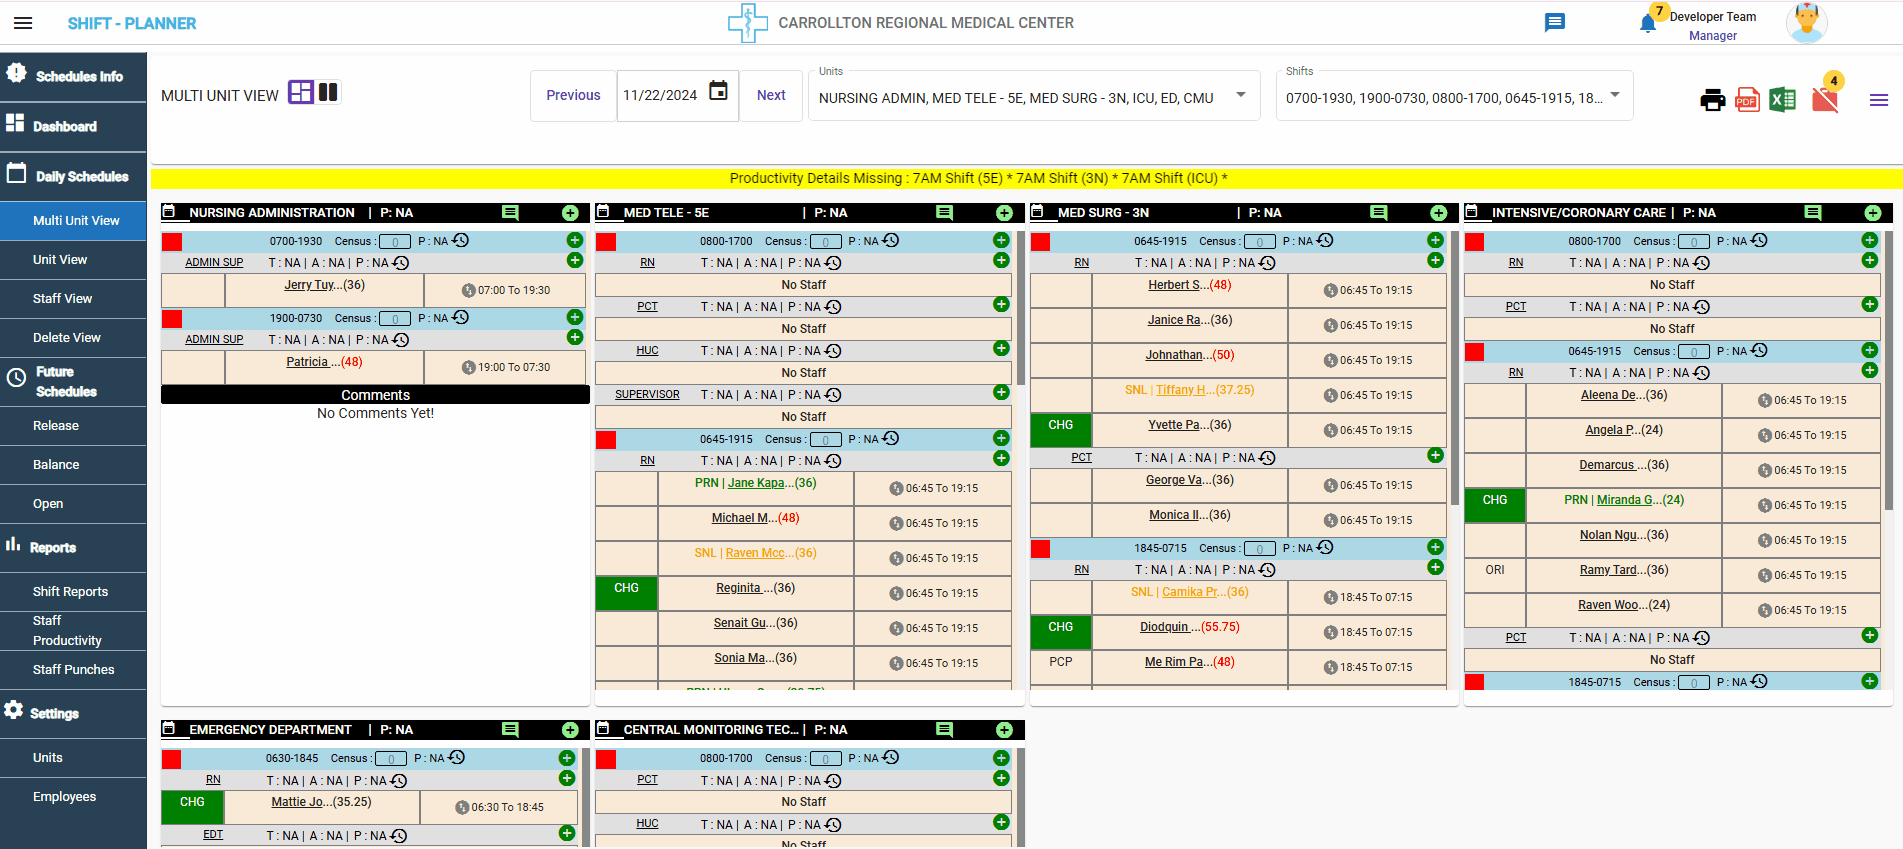
Unit/Shift Productivity Details
The Multi Unit View displays productivity details for units, shifts, and positions based on the master settings configured in the Settings Page.
How Productivity is Calculated
- Managers/Admins configure the required staff count for each Unit/Shift/Position in the Settings Page.
- Managers can enter the census number for each unit and shift.
- Only Managers with Census Edit Access can update census numbers (assigned under Settings → Employees).
-
Productivity is recalculated when:
- Census counts are updated.
- New staff are added to a unit.
- A staff shift is canceled.
- A staff shift is split (only actual shift hours are considered, excluding Non-Duty and On-Call hours).
- A staff shift is floated to another unit.
-
Changes to productivity are logged. Logs can be accessed via the log history icon (round arrow) beside the position or shift code.
-
Productivity parameters:
- T (Target Staff): Staff required as per settings.
- A (Actual Staff): Scheduled staff for the shift/position.
- P (Productivity):
(Target Staff / Actual Staff) * 100.
-
Color Indicators:
- Red: Productivity < 100%.
- Green: Productivity = 100%.
- Blue: Productivity > 100%.
Assigning Census Edit Access:
Unit View
Navigate to Daily Schedules → Unit View to see schedules at the unit level. This view displays the complete 6-week schedule for the selected unit.
All other options remain the same as in the Multi Unit View.
Staff View
The Staff View displays all confirmed staff schedules for the selected schedule period. This report provides comprehensive shift information for each staff member.
Features of Staff View
- Search:
- Managers can search for specific staff or shift details.
- Sort:
- Sort schedules based on staff names, shift types, or other criteria.
- Export to Excel:
- The entire report can be exported to Excel for further analysis or record-keeping.
Reports
The Reports section provides various reports to assist Managers in their workflow. Currently, the Shift Reports and Productivity Reports are available to track and analyze staff schedules and productivity.
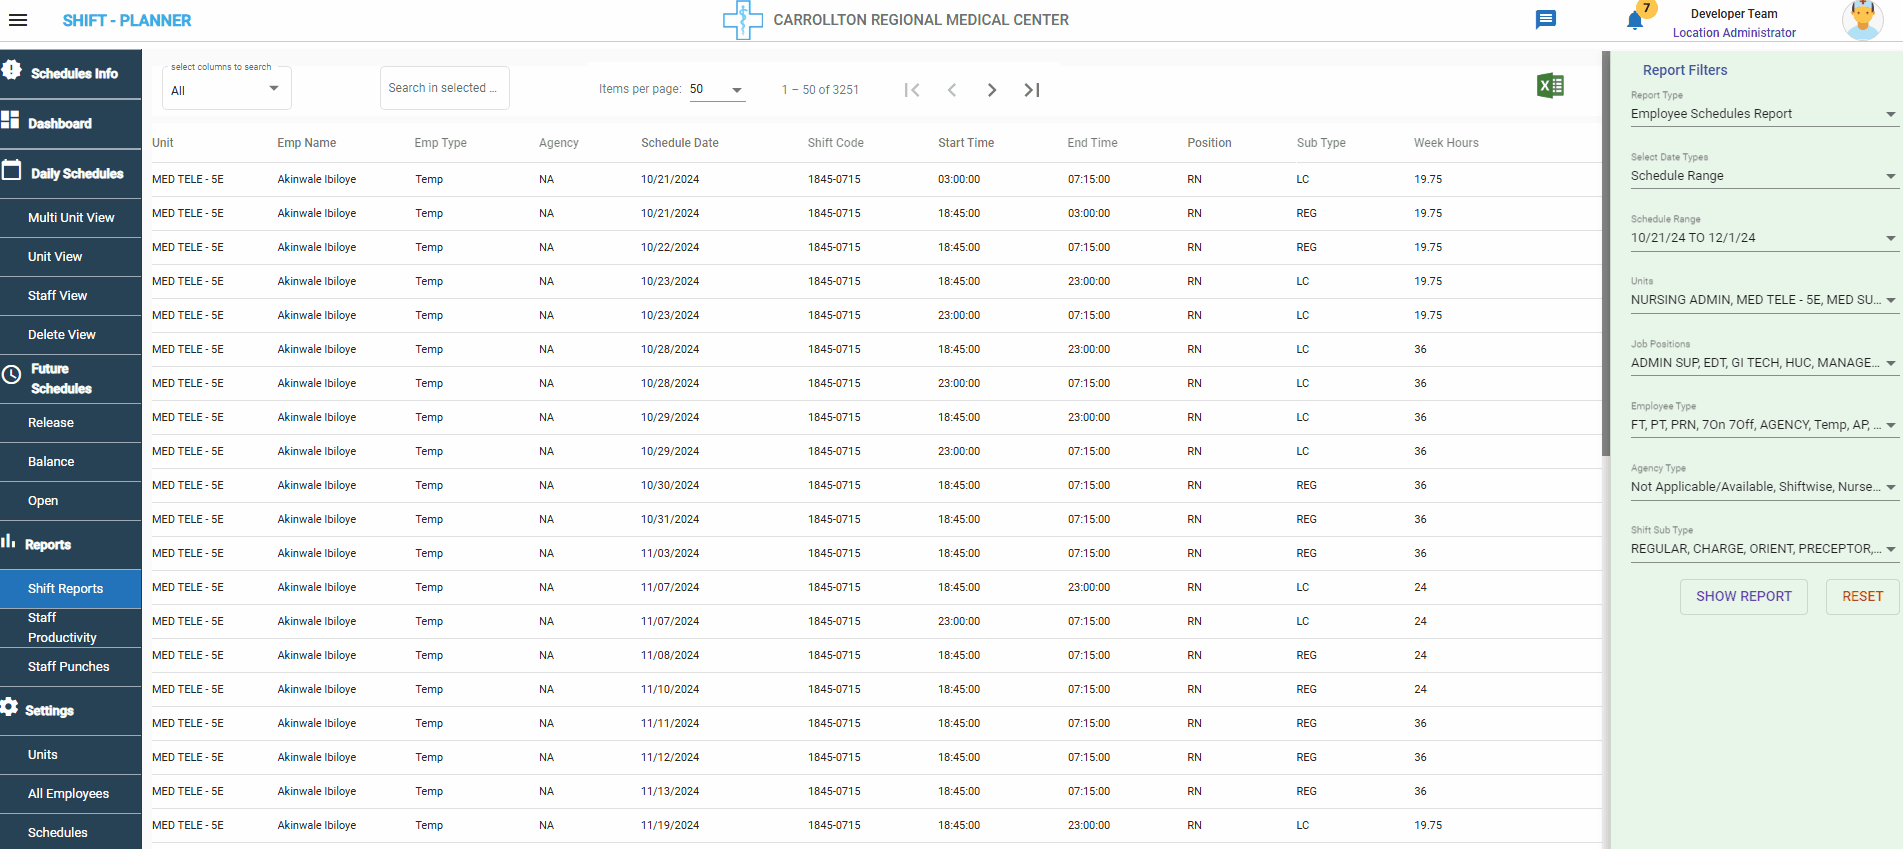
Shift Report
To access the Shift Report, navigate to:
Reports → Shifts Report from the left-side navigation bar.
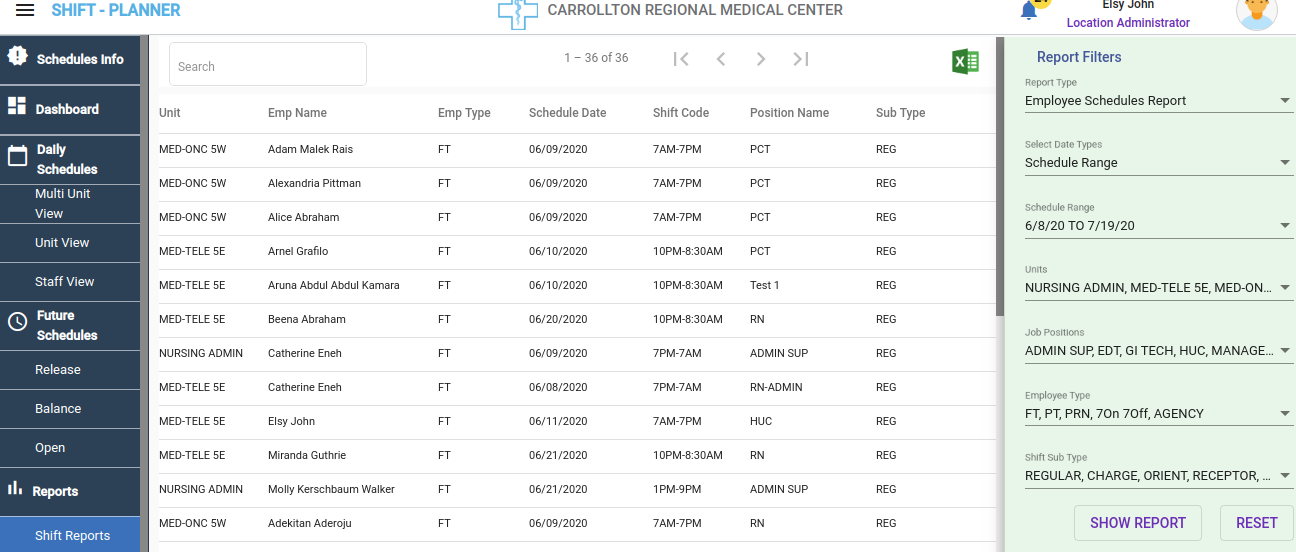
Key Features of Shift Report
- The page is divided into two sections:
- Left Side: Displays the report data.
- Right Side: Provides report filter options.
- Managers can filter the report data using various filter options to customize the view.
Example Reports generation
General report with Filters
Watch the following video to learn how to filter reports:
SICK Report
Watch the following video to learn how to filter SICK reports:
Shift reports can be used to run reports for any subtypes and for any duration of time. For example if you want to run sick call report for your department for the past year you can use the custom dates and the filters as shown in the video.
Floating Shifts Report
Watch the following video to learn how to filter Floated Shifts reports:
Floating shifts refer to those shifts that are adjusted or moved from one unit to another unit.

Productivity Report
The Productivity Report displays productivity details for each unit on the selected date. This report only includes units with productivity settings configured in the Settings page.

Settings
The Settings section allows Managers to configure Units, Positions, Shifts, and Staff Roles.
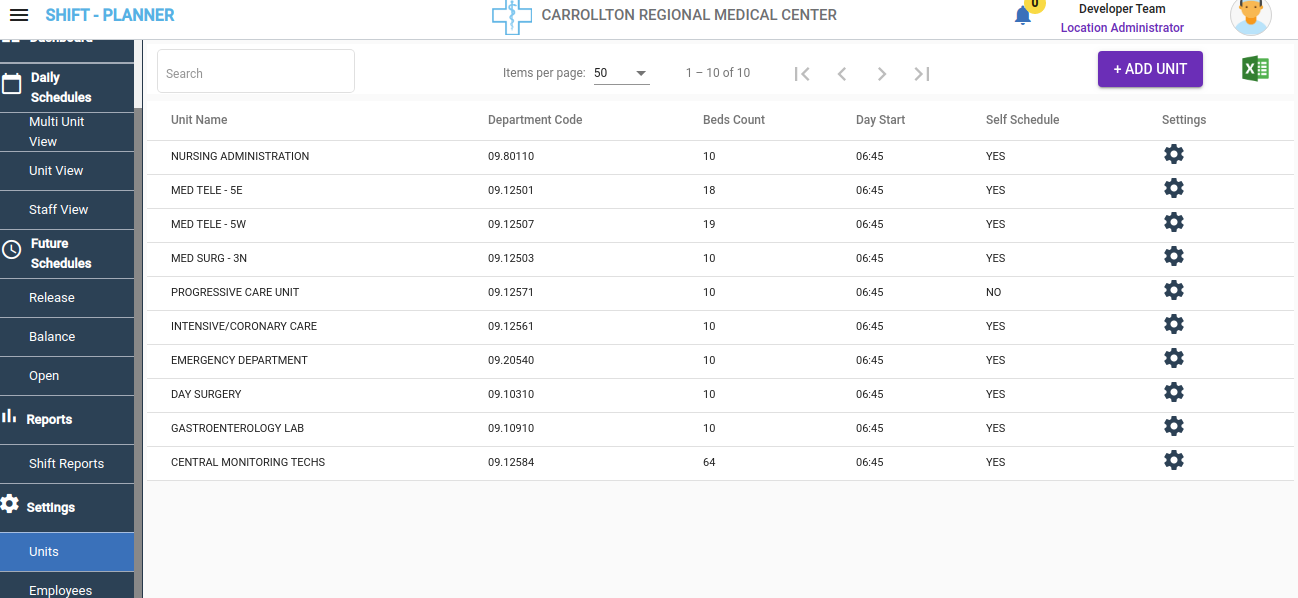
Units Settings
The Unit Settings provide the following configurations:
Basic Unit Details
- Change Unit Name and Short Name.
- Map the unit to an HRMS Department.
- Configure Bed Information for the unit.
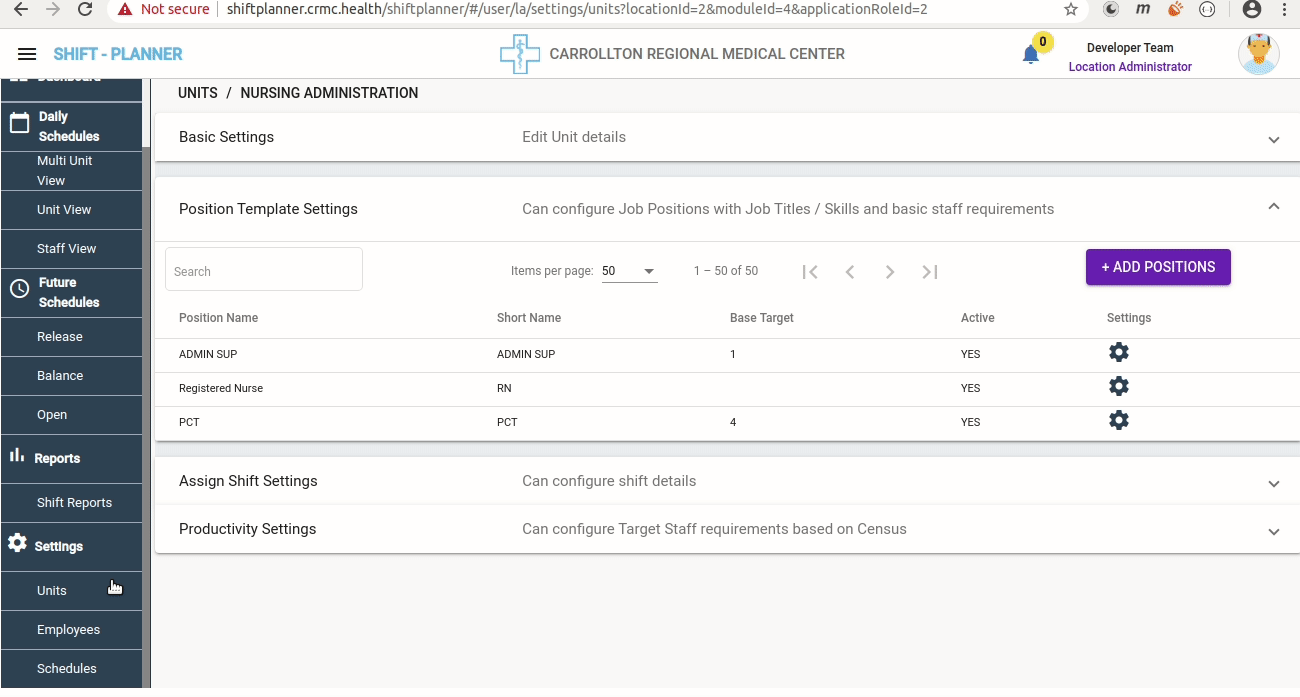
Position Template Settings
This section is the primary configuration for positions within units. Required positions can be added by clicking the Add Position button.
- Enter Position Details:
- Name and Short Name of the position.
- Set Target Requirements:
- Define the base target staff requirement for this position within the unit. These values will appear in release schedules.
- Configure Staff Job Codes:
- Only staff with these HRMS job codes can apply for self-schedules.
- Configure Skill Sets:
- Restrict scheduling to staff with specific skill sets.
Warning
Staff must have one of the configured job codes and skills to view and request shifts for released schedules. Otherwise, they cannot request shifts for this position.
Assign Shift Settings
This setting allows Managers to add required shifts for a unit. All configured shifts for the unit's positions will appear during schedule releases.
- Click the Add Shift button to view all available shifts from HRMS.
- Select the required shifts and click Save.
- Note: Shifts must be configured in HRMS; they cannot be added directly in the Shift Planner.
Productivity Settings
The Productivity Settings allow Managers to set the required number of staff for each position/shift based on census data. This feature was added on June 28th, 2021.
How to Set Staff Requirements Based on Census
- Navigate to Units → Target Unit → Settings → Productivity Settings.
- Select the Target Date to view or modify active settings for a specific day/shift.
- Future dates can be selected to apply changes.
Warning
Any new changes to settings will take effect from the current target date to all subsequent dates, unless changed again.

Employees Settings
Note
- The Shift Planner imports all Nursing Department staff details from the HRMS Application.
- New users must first be registered in HRMS (under Nursing Departments) to access the Shift Planner.
- Agency staff must also be created in HRMS before accessing their profile in the Shift Planner.
The Employees Settings allow Managers to view employee profiles and modify unit, role, and skill access settings.
- Navigate to Settings → Employees to view staff details for all nursing units.
- Use the Search Box to find an employee by name.
- Click the Settings Icon to view and edit employee-specific settings.
- Scroll to the bottom of the page to see assigned Units, Roles, and Skills.
- Click the + Icon in each section to modify details.
